
“I wasn’t planning on making dessert that day,” I admit, “but then I found myself staring at a jar of cream cheese in the fridge and a handful of strawberries that were about to go bad.” It was a hot Saturday afternoon, and honestly, the last thing I wanted was to turn on the oven. So, I grabbed some Mason jars, threw together what I had on hand, and the result? These easy no-bake strawberry cheesecake cups became an unexpected favorite in my summer recipe rotation.
Maybe you’ve been there too—craving something sweet but not wanting the mess or the heat of baking. This recipe started as a bit of a happy accident, with a cracked bowl and a toddler demanding attention halfway through the process. Yet, the creamy, slightly tangy cheesecake filling layered with fresh strawberries and a crunchy graham cracker base was just the kind of treat that felt like a mini celebration. It’s simple, pretty, and honestly, the perfect way to cool off when the sun is blazing outside.
What I love most is how these little jars make dessert feel special without fuss. Whether you’re hosting a backyard BBQ or just want a quick after-dinner treat, these strawberry cheesecake cups bring a bit of homemade charm without the stress. Plus, they’re portable, so you can grab one on the go or pack them for picnics. Let me tell you, once you try these, you might find yourself making them more often than you expected.
Why You’ll Love This Recipe
After testing countless no-bake desserts, this easy no-bake strawberry cheesecake cups recipe stands out for a few reasons. First, it’s almost foolproof—no baking means no oven worries, and the layered presentation in Mason jars is just plain charming. Here’s why you might want to have this recipe on speed dial:
- Quick & Easy: Ready in under 20 minutes, perfect for busy weeknights or last-minute cravings.
- Simple Ingredients: Uses pantry staples and fresh strawberries—nothing complicated or hard to find.
- Perfect for Summer: Refreshing and light, these cups cool you down without weighing you down.
- Crowd-Pleaser: Kids and adults alike always ask for seconds, and they’re great for potlucks or picnics.
- Unbelievably Delicious: The creamy texture of the cheesecake filling paired with juicy strawberries and crumbly graham cracker crust is just next-level comfort food.
This isn’t just another no-bake cheesecake. The cheesecake filling is whipped to a silky smoothness by folding in whipped cream, giving it that dreamy texture you usually get from a baked version. Plus, the jars make portion control a breeze—and honestly, they look so cute that guests always comment on them. This recipe has become my go-to for casual gatherings and those evenings when you want something sweet but not too heavy.
What Ingredients You Will Need
This recipe uses simple, wholesome ingredients to deliver bold flavor and satisfying texture without the fuss. Most of these are pantry staples or easily found fresh produce. Feel free to swap or adjust based on what you have!
- For the Crust:
- 1 ½ cups (150g) graham cracker crumbs (I prefer Honey Maid for best texture)
- 5 tablespoons (70g) unsalted butter, melted (adds richness and helps bind the crumbs)
- 2 tablespoons (25g) granulated sugar (balances the buttery crumbs)
- For the Cheesecake Filling:
- 8 oz (225g) cream cheese, softened (room temperature is key for smoothness)
- ½ cup (100g) granulated sugar
- 1 teaspoon pure vanilla extract (adds depth to the flavor)
- 1 tablespoon lemon juice (brightens the filling)
- 1 cup (240ml) heavy whipping cream, chilled (helps create that airy, fluffy texture)
- For the Topping:
- 1 ½ cups (225g) fresh strawberries, hulled and sliced (fresh is best, but frozen works in a pinch)
- Optional: 1 tablespoon strawberry jam or preserves (for a glossy finish)
- Optional: fresh mint leaves for garnish
Ingredient Notes: If you want a dairy-free option, try swapping cream cheese with a plant-based version and use coconut cream instead of heavy cream. For gluten-free, use gluten-free graham cracker crumbs or finely crushed gluten-free cookies. I usually pick smaller strawberries because they’re sweeter and easier to slice into these cups.
Equipment Needed
- Mason jars or small glass cups (8 oz/240ml size is perfect for individual servings)
- Mixing bowls (one large for the cheesecake filling, one small for the crust)
- Electric hand mixer or stand mixer (to whip the cream and cream cheese smooth)
- Spoon or spatula (for folding and layering)
- Measuring cups and spoons (for accuracy)
- Food processor or rolling pin (to crush graham crackers if you’re not buying pre-crumbled)
If you don’t have a mixer, you can whisk the cream cheese and sugar by hand, but it’ll take a bit longer and more elbow grease. I once tried using a fork and, honestly, it was a workout! Mason jars make the dessert portable and mess-free, but if you don’t have them, small dessert bowls or even pretty glasses work just fine. When it comes to cleaning, I recommend soaking the mixer attachments immediately after use to avoid stubborn cream cheese residue.
Preparation Method
- Prepare the Crust: In a medium bowl, combine 1 ½ cups graham cracker crumbs, 5 tablespoons melted butter, and 2 tablespoons sugar. Stir until the mixture resembles wet sand with no dry spots. (About 3 minutes)
- Assemble the Base Layer: Spoon about 2 tablespoons of the crust mixture into each Mason jar. Press down firmly with the back of a spoon or your fingers to create a compact base. Set aside. This helps form a sturdy foundation that won’t crumble when you eat. (5 minutes)
- Make the Cheesecake Filling: In a large bowl, beat the softened cream cheese with ½ cup sugar and 1 teaspoon vanilla extract until smooth and creamy. (Use an electric mixer on medium speed for about 2-3 minutes)
- Add Lemon Juice: Mix in 1 tablespoon lemon juice to brighten the flavor. It helps cut the richness and adds that cheesecake tang.
- Whip the Cream: In a separate chilled bowl, whip 1 cup heavy cream until stiff peaks form. This usually takes 3-4 minutes with a mixer. (Look for peaks that hold shape but aren’t grainy)
- Fold the Whipped Cream: Gently fold the whipped cream into the cream cheese mixture using a spatula. Take your time here—folding keeps the filling light and fluffy. Avoid overmixing or you’ll lose that airy texture. (Approx. 2 minutes)
- Layer the Filling: Spoon or pipe the cheesecake mixture over the graham cracker crust in each jar, filling about two-thirds full. Smooth the top with the back of a spoon.
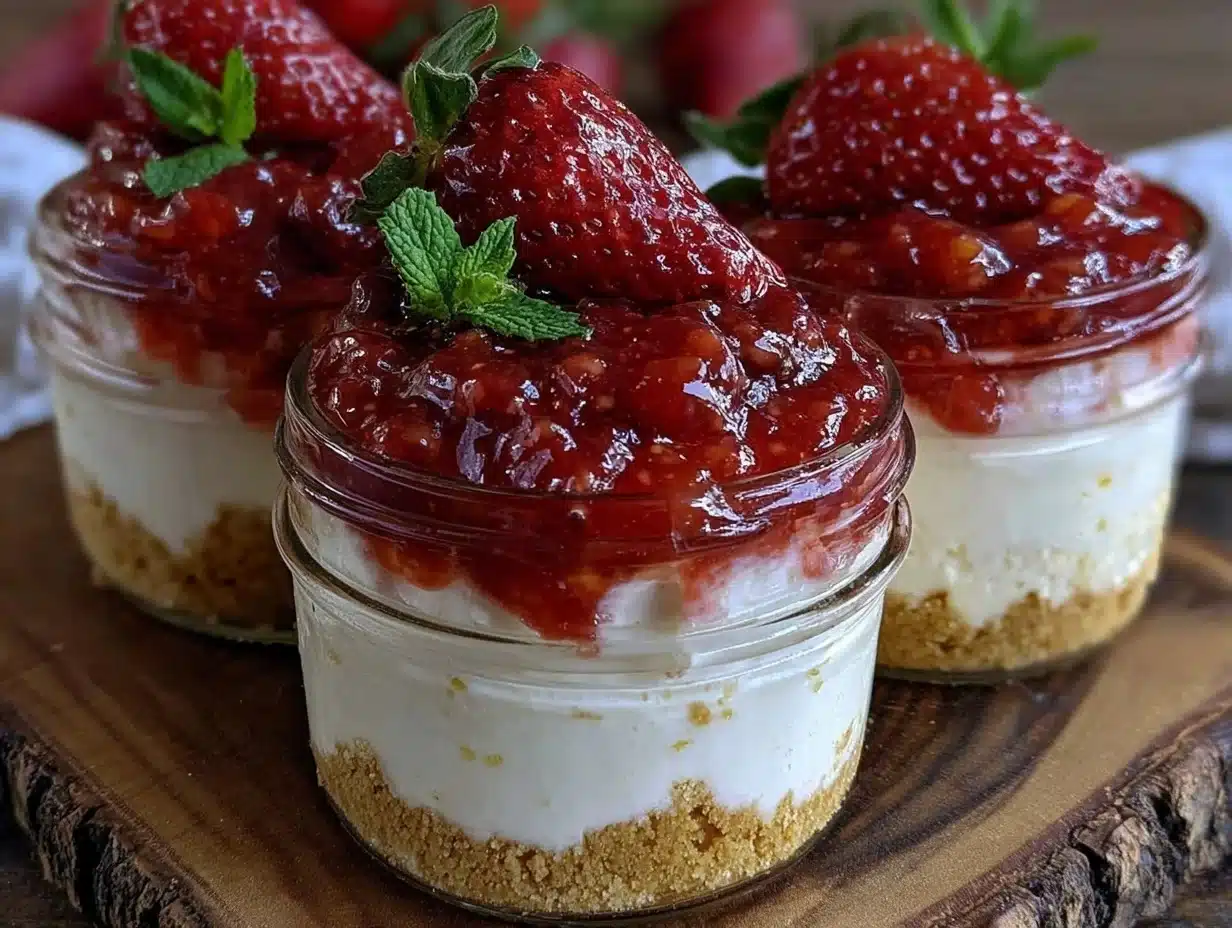
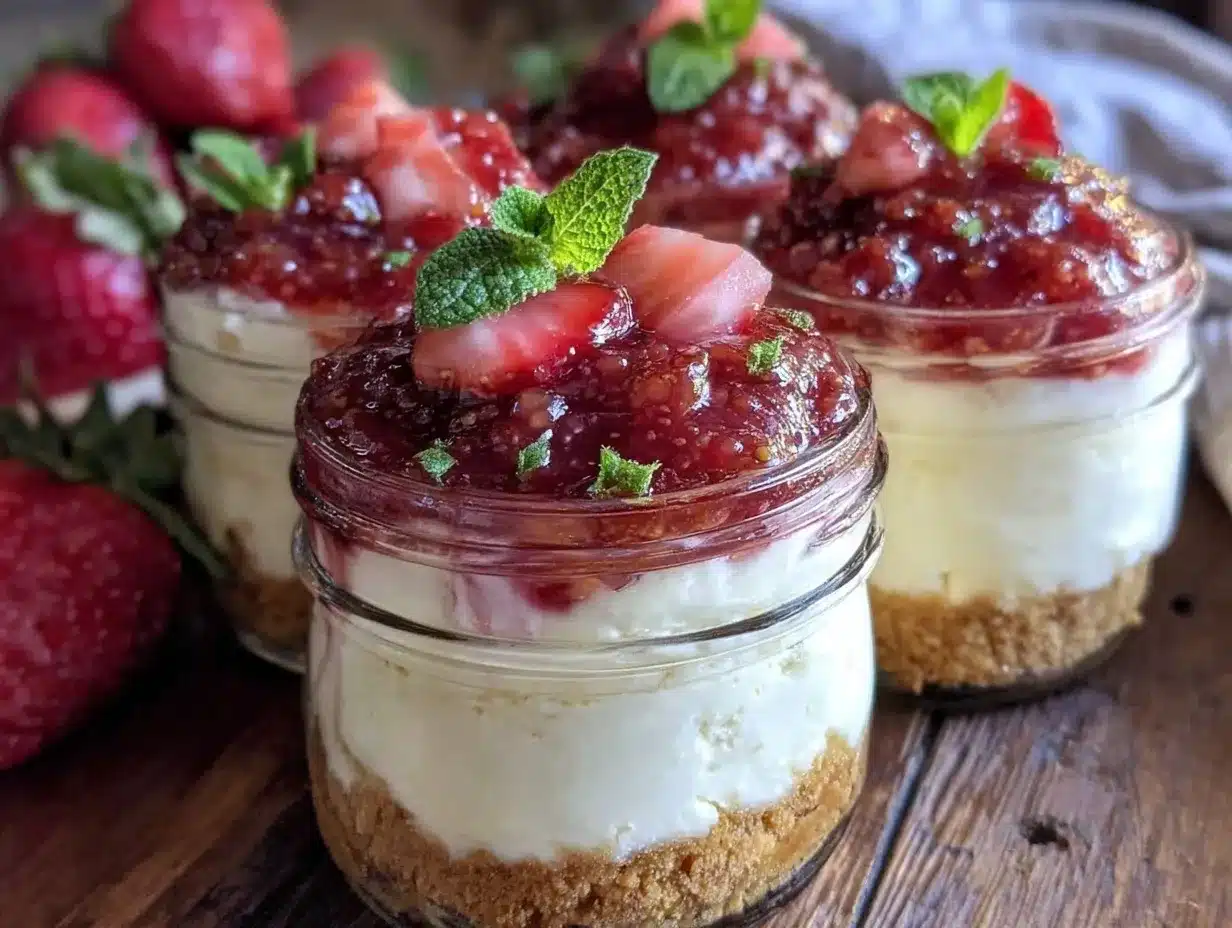
- Add Strawberry Topping: Layer the sliced fresh strawberries on top of the cheesecake filling. If using, spoon a small dollop of strawberry jam over the berries for a glossy finish. (3 minutes)
- Chill: Cover the jars with lids or plastic wrap and refrigerate for at least 2 hours, ideally 4, to let the flavors meld and the filling set properly. (Patience is key here!)
- Serve: Before serving, garnish with fresh mint leaves if you like. Grab a spoon, and enjoy the creamy, fruity goodness straight from the jar.
Quick tip: If you’re short on time, 1 hour in the fridge will still yield a tasty treat but the texture won’t be quite as firm. Also, don’t skip pressing the crust firmly; otherwise, it falls apart when you dig in.
Cooking Tips & Techniques
Whipping up these no-bake strawberry cheesecake cups is pretty straightforward, but a few tricks can make your dessert even better. Here’s what I’ve learned through practice:
- Softening Cream Cheese: This is crucial. If your cream cheese isn’t soft enough, lumps will form, and the filling won’t be smooth. I usually leave mine out for about 30 minutes before mixing.
- Whipping Cream to Stiff Peaks: Watch closely; if you overwhip, it turns grainy or buttery. Stop when peaks hold shape but still look shiny.
- Folding Technique: Don’t rush folding whipped cream into the cream cheese mix. Use a gentle hand with a spatula, cutting through the center and scooping around the edges. This keeps the filling airy.
- Crust Texture: For crunchier crust, toast the graham crumbs lightly in a dry pan for a few minutes before mixing with butter.
- Strawberry Prep: Use ripe but firm strawberries so they hold their shape on top. If berries are too soft, they can make the topping watery.
- Multitasking: While the cheesecake fills chill, wash your prep tools and get ready to pack or serve. It saves time and keeps your kitchen tidy.
One time, I forgot to chill the mixing bowl for whipping cream, and it took forever to get good peaks. Lesson learned: chill everything you can! Also, if you want to sweeten the strawberries a bit more, toss them with a teaspoon of sugar and let them sit for 10 minutes before topping.
Variations & Adaptations
These strawberry cheesecake cups are super versatile. Here are some ways I’ve tweaked the recipe to keep it fresh or suit different diets:
- Berry Medley: Swap strawberries for a mix of blueberries, raspberries, and blackberries for a colorful twist.
- Chocolate Crust: Use crushed chocolate cookies or Oreo crumbs instead of graham crackers for a richer base.
- Vegan Version: Use dairy-free cream cheese and coconut whipped cream. For the crust, check for vegan-friendly cookies or make a nut-based crumb.
- Mini Cheesecake Bites: Use smaller jars or shot glasses for bite-sized portions, perfect for parties.
- Flavor Boost: Add a tablespoon of strawberry puree or a splash of almond extract into the cheesecake filling for extra flavor layers.
Personally, I once added a layer of crushed pistachios between the crust and filling for a lovely nutty crunch. It wasn’t in the original plan, but surprisingly delightful! Feel free to get creative—this recipe is forgiving and open to your imagination.
Serving & Storage Suggestions
Serve these strawberry cheesecake cups chilled for the best texture and flavor. They’re ideal straight from the fridge but if you prefer a slightly softer bite, let them sit at room temperature for 10 minutes before digging in. Presentation-wise, the Mason jars speak for themselves, but a sprig of fresh mint or a dusting of powdered sugar adds a nice touch.
As for pairing, these cups go wonderfully with iced tea, sparkling lemonade, or even a light rosé if you’re feeling fancy. For a fuller dessert spread, add some toasted nuts or a small fruit salad on the side.
Store leftovers in the fridge with lids on the jars—these will keep well for up to 3 days. They don’t freeze very well because the texture changes once thawed, so I recommend making only what you plan to eat within a few days. When reheating, it’s best to enjoy cold or at room temp; microwaving tends to ruin the creamy texture.
Interestingly, I’ve noticed the flavors mellow and meld a bit more if you let the cups rest overnight, so sometimes I make them a day ahead for an even tastier treat.
Nutritional Information & Benefits
Each serving (one 8 oz jar) of these strawberry cheesecake cups contains approximately:
| Calories | 320 kcal |
|---|---|
| Fat | 22g (mostly from cream cheese and butter) |
| Carbohydrates | 28g (includes natural sugars from strawberries and added sugar) |
| Protein | 5g |
| Fiber | 2g (mainly from graham cracker crumbs and strawberries) |
Strawberries bring antioxidants, vitamin C, and fiber, which are great for immune support and digestion. The cream cheese adds calcium and protein but also saturated fat, so it’s a treat best enjoyed in moderation. For those watching carbs, reducing sugar or swapping the crust for almond flour crumbs can help lower carb content. This recipe is naturally gluten-containing unless you use gluten-free crumbs, so keep that in mind for allergy concerns.
From a wellness angle, I appreciate how these cheesecake cups satisfy sweet cravings without the heaviness of traditional baked cheesecakes. The fresh fruit topping adds vitamins and freshness, making it feel like a little indulgence with a touch of nutrition.
Conclusion
Honestly, these easy no-bake strawberry cheesecake cups have become a staple in my summer dessert lineup. They’re quick to put together, require no oven time (which is a blessing when it’s hot out), and look adorable served in Mason jars. Whether you’re feeding a crowd or just treating yourself, this recipe strikes the perfect balance between creamy, crunchy, and fruity.
Feel free to tweak the toppings and crust to fit your taste or dietary needs—this recipe is flexible enough to handle it. I love how it feels like a small celebration in a jar, and I’m betting you’ll love that too. So, why not give these cheesecake cups a try? I’d love to hear how you make them your own, so don’t be shy—drop a comment below or share your variations. Happy no-baking!
FAQs
Can I make these strawberry cheesecake cups ahead of time?
Yes! They actually taste better after chilling for a few hours or overnight. Just keep them covered in the fridge until ready to serve.
What if I don’t have Mason jars?
No worries. Small dessert bowls, glasses, or even reusable plastic cups work perfectly. Just adjust portion sizes as needed.
Can I use frozen strawberries?
Absolutely. Just thaw and drain any excess juice before layering to avoid soggy topping.
Is there a substitute for heavy cream?
You can try whipping coconut cream for a dairy-free alternative, but the texture will be slightly different. Regular heavy cream gives the best fluffiness.
How do I prevent the crust from getting soggy?
Press the crust firmly into the jars and chill it before adding the filling. You can also toast the crumbs lightly to add crunch and reduce moisture absorption.
Pin This Recipe!
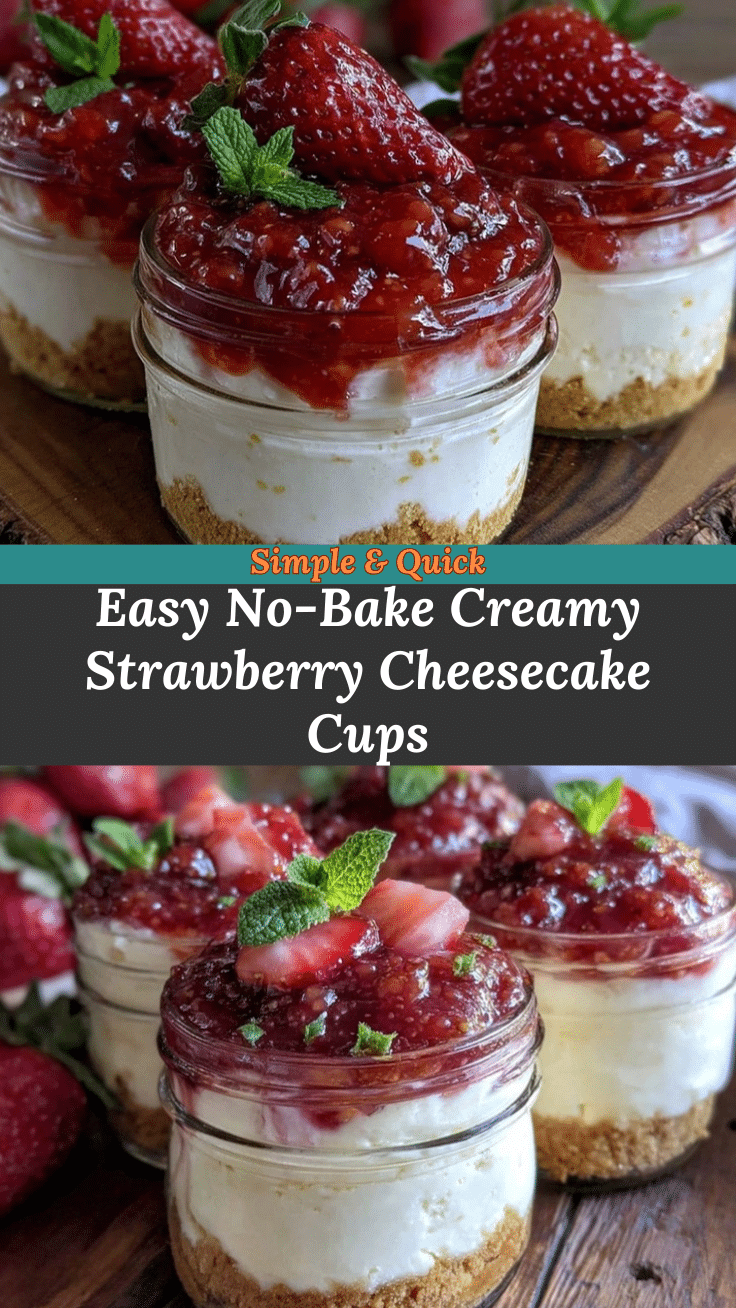

Easy No-Bake Strawberry Cheesecake Cups
- Total Time: 2 hours 15 minutes
- Yield: 6 servings 1x
Description
These no-bake strawberry cheesecake cups are a quick, easy, and refreshing summer dessert featuring a crunchy graham cracker crust, creamy cheesecake filling, and fresh strawberries layered in individual jars.
Ingredients
- 1 ½ cups (150g) graham cracker crumbs
- 5 tablespoons (70g) unsalted butter, melted
- 2 tablespoons (25g) granulated sugar
- 8 oz (225g) cream cheese, softened
- ½ cup (100g) granulated sugar
- 1 teaspoon pure vanilla extract
- 1 tablespoon lemon juice
- 1 cup (240ml) heavy whipping cream, chilled
- 1 ½ cups (225g) fresh strawberries, hulled and sliced
- Optional: 1 tablespoon strawberry jam or preserves
- Optional: fresh mint leaves for garnish
Instructions
- Prepare the Crust: In a medium bowl, combine 1 ½ cups graham cracker crumbs, 5 tablespoons melted butter, and 2 tablespoons sugar. Stir until the mixture resembles wet sand with no dry spots (about 3 minutes).
- Assemble the Base Layer: Spoon about 2 tablespoons of the crust mixture into each Mason jar. Press down firmly with the back of a spoon or your fingers to create a compact base. Set aside (5 minutes).
- Make the Cheesecake Filling: In a large bowl, beat the softened cream cheese with ½ cup sugar and 1 teaspoon vanilla extract until smooth and creamy (use an electric mixer on medium speed for about 2-3 minutes).
- Add Lemon Juice: Mix in 1 tablespoon lemon juice to brighten the flavor.
- Whip the Cream: In a separate chilled bowl, whip 1 cup heavy cream until stiff peaks form (3-4 minutes).
- Fold the Whipped Cream: Gently fold the whipped cream into the cream cheese mixture using a spatula, taking care not to overmix (approx. 2 minutes).
- Layer the Filling: Spoon or pipe the cheesecake mixture over the graham cracker crust in each jar, filling about two-thirds full. Smooth the top with the back of a spoon.
- Add Strawberry Topping: Layer the sliced fresh strawberries on top of the cheesecake filling. If using, spoon a small dollop of strawberry jam over the berries for a glossy finish (3 minutes).
- Chill: Cover the jars with lids or plastic wrap and refrigerate for at least 2 hours, ideally 4, to let the flavors meld and the filling set properly.
- Serve: Before serving, garnish with fresh mint leaves if desired. Enjoy chilled.
Notes
Softening cream cheese before mixing is crucial for smooth filling. Whip cream to stiff peaks but avoid overwhipping. Press crust firmly to prevent crumbling. Chill jars for at least 2 hours for best texture; 1 hour is acceptable but less firm. Toast graham cracker crumbs for crunchier crust. Use ripe but firm strawberries to avoid watery topping. For dairy-free, substitute cream cheese and heavy cream with plant-based alternatives. For gluten-free, use gluten-free crumbs.
- Prep Time: 15 minutes
- Cook Time: 0 minutes
- Category: Dessert
- Cuisine: American
Nutrition
- Serving Size: One 8 oz jar
- Calories: 320
- Fat: 22
- Carbohydrates: 28
- Fiber: 2
- Protein: 5
Keywords: no-bake cheesecake, strawberry dessert, summer dessert, easy cheesecake cups, no oven dessert, quick dessert, Mason jar dessert
