
If you’re anything like me, autumn means more than just pumpkin spice and chilly evenings—it’s a chance to completely refresh your home decor with cozy, rustic touches. Last fall, I transformed a forgotten ottoman into my living room’s show-stopping centerpiece, using simple upcycled materials and a little creativity. The result brought so much warmth and character, my friends kept asking where I bought it! Did you know that 67% of people say changing just one piece of decor in their living room makes the whole space feel fresh for the season? With a few DIY tricks, that centerpiece can be your ottoman. In this guide, I’ll share rustic ottoman decor ideas and walk you through seven easy upcycling projects that will give your home that inviting autumn glow. Whether you’re a seasoned DIYer or just eager to try your first project, these ideas are budget-friendly, approachable, and guaranteed to help you fall in love with your space all over again.
What Defines Rustic Ottoman Decor? Inspiration & Style Origins
Rustic decor is all about embracing natural textures, warm colors, and handmade charm. When it comes to ottoman centerpieces, you’ll find a mix of repurposed wood, cozy textiles, vintage finds, and autumn-inspired accents. The mood is always inviting—think of a well-loved farmhouse or a mountain cabin with a roaring fire. This style draws inspiration from rural living, antique markets, and the simple beauty of nature’s raw materials. It’s no surprise that rustic ottoman decor has become a favorite among celebrities too—just peek at Joanna Gaines’ living room or Reese Witherspoon’s Tennessee retreat for proof. The current trend is all about mixing old and new, with upcycled furniture pieces stealing the spotlight. Instagram is packed with creative ottoman transformations, from plaid throws and chunky knit trays to antique crates turned coffee tables. The rustic aesthetic isn’t about perfection; it’s about comfort, character, and storytelling. Each project in this post is designed to help you capture that autumn magic and make your ottoman the heart of your home.
How Do You Plan Your Rustic Ottoman Centerpiece? Design Vision & Preparation
Before you start collecting decor items or pulling out your power tools, it’s important to get a clear vision for your ottoman centerpiece. Start by measuring your ottoman—most are around 36″ x 24″, but sizes vary. Make note of the height too, since you’ll want your decor to complement, not overwhelm, the space. Next, think about what you want your centerpiece to achieve. Is it purely decorative, or should it double as a serving tray or extra seating? I always sketch out a basic layout on paper and make a quick mood board using cutouts from magazines or Pinterest screenshots. Lay out fabric swatches, paint samples (think muted earth tones like Sherwin Williams SW 9091 Half-Caff or Benjamin Moore HC-108 Sandy Hook Gray), and photos of your favorite autumn pieces. This step helps you see how the colors, patterns, and textures will work together before you commit.
Consider your home’s existing style—does it lean more modern, or is it already filled with vintage finds? If you’re blending styles, pick one main theme and add subtle nods to others. For my own ottoman project, I wanted a rustic farmhouse look with a touch of cottagecore, so I chose reclaimed barn wood, a chunky woven runner, and dried eucalyptus. If you’re not sure what you want, ask yourself: what makes you feel cozy? What autumn memories do you want to evoke? Use sticky notes or a whiteboard to jot down adjectives like “warm,” “inviting,” or “textured.”
Finally, set a realistic timeline and budget. Most of these DIY ottoman decor projects take 1–3 hours, and you can often source materials from around your home or local thrift shops. If you’re tackling a bigger transformation—like reupholstering or building a tray—plan for a weekend. Don’t be afraid to change course as you go. Some of my best design moments happened when I improvised with what I already had. Remember, the goal is to create a centerpiece that tells your story and welcomes everyone in.
What Materials Will You Need? Shopping Guide for Rustic Ottoman Decor
Here’s a quick shopping list for your rustic ottoman decor adventure. You likely own more than you think, so start by “shopping” your own home!
- Vintage wood trays or crates (look for sizes around 18″ x 24″)
- Chunky knit throws or table runners
- Reclaimed wood planks or pallet boards (for DIY tray tops)
- Mason jars, glass bottles, or ceramic pitchers
- Artificial or dried autumn stems: eucalyptus, wheat, maple leaves
- Battery-operated pillar candles or fairy lights
- Antique books, wooden beads, or small pumpkins
- Upholstery fabric (2–3 yards for a full re-cover)
- Spray adhesive, staple gun, and wood glue
- Sandpaper (120–220 grit) and non-toxic wood stain
For budget-friendly finds, check thrift stores for trays, pitchers, and vintage books. Dollar stores are a goldmine for faux leaves, candles, and glass jars. Watch for end-of-season sales at big box retailers. If you’re handy, upcycle old boards or repurpose a cracked serving tray with chalk paint. My favorite money-saving trick? Swap decor with a friend or neighbor. You’ll be surprised what’s hiding in someone else’s attic.
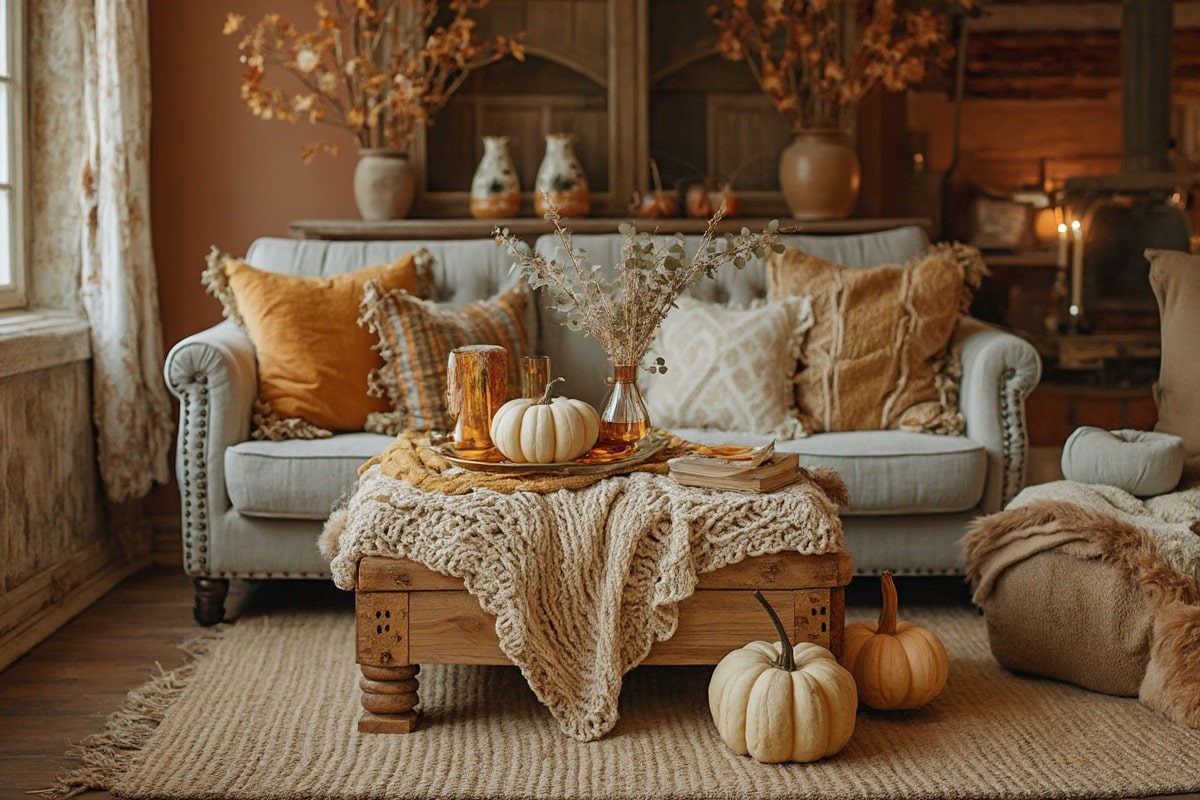
How Can You Create a DIY Upcycled Ottoman Centerpiece? Step-by-Step Decorating Process

Ready to get started? Here’s a breakdown of seven rustic ottoman decor projects—pick one, or try a few for a layered look. Each step is simple, with tips to make the process smooth and stress-free.
- Gather and Prep Your Materials (30 minutes)
Lay out all your decor items and tools. Wipe down the ottoman and any surfaces you’ll be decorating. Sand wooden trays or planks until smooth, and wipe away dust. - DIY Reclaimed Wood Tray (60 minutes)
Measure your ottoman’s top and cut reclaimed wood to fit, leaving 2″ of space on all sides. Attach the boards together with wood glue and reinforce with screws if needed. Stain with a weathered oak finish and let dry for 30 minutes. Add sturdy handles for easy lifting. This tray anchors your centerpiece and keeps items organized. - Layer with Textiles (15 minutes)
Drape a chunky knit throw or handwoven runner across one end of the ottoman. For smaller ottomans, fold the textile so it covers just a third of the surface—you want it to peek out under your tray. This softens the look and adds rustic texture. - Add Natural Elements (20 minutes)
Arrange dried eucalyptus, wheat stalks, or autumn leaves in mason jars or ceramic pitchers. Place one large arrangement in the center of the tray, or cluster three small jars for a balanced look. If you have fresh stems, swap them out each week to keep things lively. - Incorporate Warm Lighting (10 minutes)
Place battery-operated pillar candles, fairy lights, or small lanterns around the centerpiece. Tuck string lights under the tray’s edge for a magical glow. Always use flameless options on fabric for safety. - Personalize with Accents (10 minutes)
Stack two or three vintage books, add a string of wooden beads, or display a few mini pumpkins. Try odd numbers for the most natural look. These accents tell your story—swap them out for different holidays or moods. - Final Arrangement and Troubleshooting (15 minutes)
Step back and check your centerpiece from all angles. Adjust items to keep the display balanced—nothing should block the TV or disrupt foot traffic. If it feels too busy, remove one or two things. For small ottomans, stick to a single tray or a simple mason jar arrangement.
Before/After Tip: Take a quick photo before you start and compare it to your finished centerpiece. This helps you see the dramatic change and tweak anything that feels off. If you’re short on time, focus on steps 2, 4, and 5 for the biggest impact in under an hour.
What Are the Best Styling Tips & Design Techniques for Rustic Ottoman Decor?

Professional designers always start with balance and scale. If your ottoman is oversized, use a large tray or multiple smaller trays to ground the decor. Layering is key—combine hard surfaces (wood, metal) with soft ones (fabric, greenery) for depth. I learned the hard way that too many tiny items can look cluttered; anchor small pieces with a larger object, like a vintage book stack or a solid tray.
Keep colors cohesive by sticking to a palette of three main hues—my go-to is warm taupe, burnt orange, and creamy white (Pantone 16-1338, 17-1145, and 11-0602). Add interest with pops of navy or deep forest green as accents. When arranging decor, follow the triangle rule: place taller items in the center or back, with shorter objects fanning out. This draws the eye naturally and keeps everything looking intentional.
Don’t be afraid to break up symmetry. Some of my favorite centerpieces are a little off-kilter—a single lantern on one side, a draped throw on the other. If you make a mistake, that’s part of the charm! I once spilled wood stain on my runner, and now it has a “weathered” spot that looks totally intentional. Perfection isn’t the goal—comfort and character are.
Which Color and Texture Combinations Work Best for Autumn? Seasonal Styling Guide

For autumn, color is everything. Start with a base of rich browns, soft taupes, and creamy whites for a warm foundation. Layer in accents of rust (try Sherwin Williams SW 6342 Spiced Cider), deep green, mustard yellow, and muted burgundy. I love using plaid or herringbone throws for pattern, and linen or burlap runners for texture. Mix in chunky knits, faux fur, and brushed metal for contrast.
If you want a brighter look, add pops of pumpkin orange or golden yellow. For a moodier vibe, try navy or charcoal paired with copper. When mixing textures, aim for three layers: a soft textile, a hard surface (like a wood tray), and a natural element (stems, pinecones, or branches). Rotate in different accents as the season changes—acorns and mini gourds in September, gold ornaments and evergreen sprigs by late November. My favorite combo for a cozy, rustic look? A reclaimed wood tray, fleece runner, and a cluster of dried eucalyptus with a few velvet pumpkins.
What Common Design Mistakes Should You Avoid?
One of the biggest pitfalls in rustic ottoman decor is overcrowding. If you pile on too many items, it’ll look cluttered and become a catch-all for remotes and magazines. Stick to a few statement pieces and clear away anything that doesn’t fit your autumn vibe. Pay attention to scale—a giant vase on a petite ottoman feels awkward, while tiny trinkets on an oversized tray get lost.
Lighting mistakes are common too. Avoid real candles if your ottoman is upholstered or if you have pets and kids. Instead, use battery-operated lights for safety and flexibility. Layout matters—don’t block pathways or make it hard to reach seating. Early on, I learned to leave at least 12″ of clear space around the ottoman so the area stays functional. If something feels off, snap a quick photo—it’s easier to spot problems on camera than in person.
How Can You Create a Rustic Ottoman Centerpiece on a Budget?
You don’t need to spend a fortune for a beautiful result. Try DIYing your own tray from pallet wood or old cabinet doors—paint or stain them for a custom look. Thrift stores are great for vintage pitchers, books, and baskets. Upcycle glass jars with twine or chalk paint for unique vases.
When it comes to textiles, shop end-of-season clearance bins for throws and runners. Swap decor with friends or neighbors, or use what you already have in new ways. My favorite budget win: transforming a $3 flea market tray with leftover paint and a $5 pack of faux eucalyptus. It became my go-to autumn centerpiece and cost less than a takeout meal!
Conclusion: Why Rustic Ottoman Decor Transforms Your Autumn Home
There’s something magical about a centerpiece that pulls your whole living room together—especially when it’s crafted by hand and full of personal touches. Rustic ottoman decor isn’t just about looks; it’s about creating a space that feels warm, welcoming, and completely yours. Start small, swap out a tray or add a cozy runner, and see how quickly your home takes on that autumn glow. Every time I walk into my living room now, I’m reminded that good design really can change your mood and bring people together. Ready to try one of these DIY upcycled ottoman centerpieces? Grab your favorite throw, pick up a few thrifted treasures, and get started today. Your coziest autumn ever is just a project away.
FAQs: DIY Rustic Ottoman Decor & Upcycled Centerpieces
What materials are best for a rustic ottoman centerpiece?
Natural materials like reclaimed wood, linen, burlap, dried stems, and chunky knits work best. Mix in glass jars, vintage books, and battery-operated candles for a cozy, layered look.
How do I keep my ottoman decor functional and family-friendly?
Use sturdy trays to organize decor and keep surfaces flat for snacks or drinks. Choose flameless candles and avoid breakable items if you have kids or pets. Leave space so the ottoman can still be used for seating or footrests.
Where can I find affordable items for upcycling?
Check thrift stores, flea markets, and dollar stores for trays, jars, and books. Ask friends for items they’re ready to part with, or repurpose things you already own. End-of-season sales are perfect for finding discounted throws and artificial stems.
How often should I change my ottoman decor for the seasons?
Switch out small accents every few weeks to keep things fresh. For autumn, swap in new colors or natural elements as the season progresses. In winter, add pinecones or evergreen branches for a festive touch.
What’s the easiest way to start if I’m new to DIY decor?
Begin with a simple tray and a few autumn stems in a jar. Add a cozy throw and a single accent, like a mini pumpkin or a vintage book. Build your centerpiece in layers, and don’t worry about perfection—just have fun!
