
Transforming Your Table: A Whimsical Halloween Tale
When Halloween rolls around, our homes often burst to life with spooky yet delightful decor. Last year, I decided to surprise my Halloween dinner guests with a centerpiece that was truly unforgettable—a whimsical DIY ghost chair centerpiece. It was inspired by the mystical charm of vintage ghost stories and the modern elegance of transparent furniture trends. Believe me, the reaction was worth every bit of effort. If you’re craving an enchanting way to infuse your table with Halloween magic, this decor project is your answer.
Did you know that Halloween decor trends have shifted toward blending spooky themes with whimsical elegance? This ghost chair centerpiece is a perfect example of how you can mix eerie vibes with creative beauty. Plus, it’s a fun and budget-friendly way to bring seasonal decor to life. Let me walk you through how to recreate this charming centerpiece for your own Halloween table.
Whimsical Halloween Decor: Style Overview & Inspiration
The whimsical Halloween decor style is all about combining enchanting elements with playful, spooky charm. Think of it as merging the mysterious with the magical. This approach creates a festive atmosphere that feels sophisticated yet fun—a perfect choice for adults and kids alike.
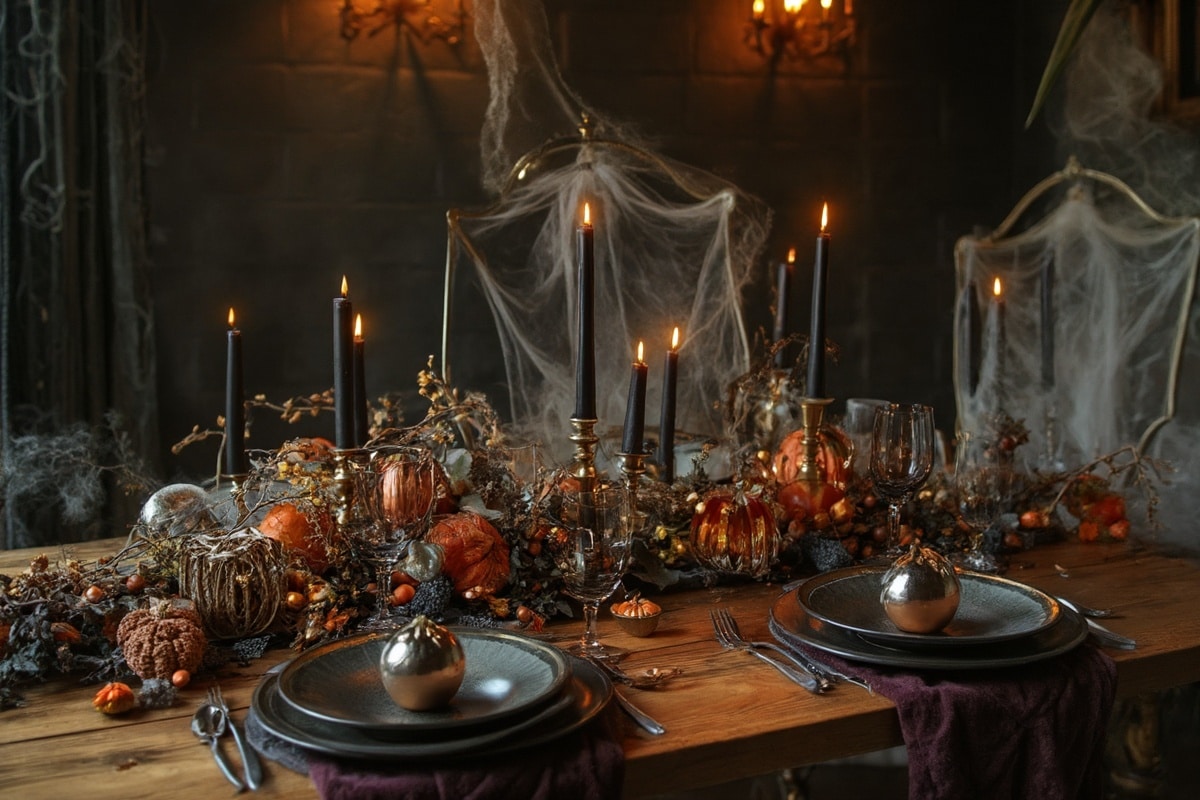
Inspired by vintage Halloween illustrations and modern trends, the ghost chair centerpiece channels the ethereal essence of Halloween. Transparent ghost chairs have been a staple in contemporary design, and this DIY project cleverly incorporates their sleek aesthetic into seasonal decor. Imagine a floating chair adorned with cobwebs, candlelight, and eerie yet elegant accents. It’s a visual treat!
Celebrity homes have embraced whimsical Halloween decor too, with stars like Heidi Klum blending spooky themes with refined design elements. This style is gaining traction, particularly with those who prefer subtle and artistic seasonal touches over traditional scare tactics. With this centerpiece, your Halloween table will capture the same enchanting spirit.
Planning Your Stunning Ghost Chair Centerpiece
Before diving into the DIY process, it’s essential to plan your design. Start by assessing the space on your dining table. Will the centerpiece be the focal point, or will it complement other decor elements? Knowing this helps you decide the size and scale of your ghost chair.
Define your vision by asking yourself: Do you want a hauntingly dark look, or something lighter and whimsical? For my centerpiece, I aimed for an ethereal vibe with white accents, subtle lighting, and a hint of mystery. To refine your idea, create a mood board with photos of ghost chairs, Halloween decor, and color palettes. Pinterest is a great tool for this.
Once your vision is clear, decide on materials and textures. Transparent acrylic or plastic works well for the chair frame, while gauzy fabrics like cheesecloth are ideal for ghostly drapes. Add candles, faux cobwebs, and miniature pumpkins for extra charm. Remember to balance whimsy with practicality; the centerpiece should be visually stunning without overwhelming the table’s functionality. A tip from my experience: keep the height of the chair proportional to the table size so it doesn’t block the view across the table.
Materials & Shopping Guide
Here’s what you’ll need to craft your DIY ghost chair centerpiece:
- A transparent acrylic or plastic chair (child-sized works best)
- Cheesecloth or gauzy fabric
- Battery-operated LED candles
- Faux cobwebs
- Miniature pumpkins and gourds
- Hot glue gun and glue sticks
- Optional: glitter, faux flowers, or spooky figurines
If you’re on a budget, check thrift stores or online marketplaces for second-hand chairs. Craft stores often have seasonal sales on Halloween items, so keep an eye out for discounts. For DIY enthusiasts, consider repurposing old fabrics or creating your own faux cobwebs using cotton batting.
Step-by-Step Decorating Process
Here’s how to create your ghost chair centerpiece in just a few steps:
- Prepare the Chair: Start by thoroughly cleaning your acrylic or plastic chair to ensure a clear, polished look. If the chair isn’t transparent, spray paint it with a frosted glass effect for a ghostly appearance.
- Add Gauzy Drapes: Drape cheesecloth or gauzy fabric over the chair, letting it hang loosely to mimic the look of a ghost. Use scissors to create jagged edges for added effect.
- Attach Cobwebs: Stretch faux cobwebs over the chair and the draped fabric. Secure them with a hot glue gun if necessary.
- Incorporate Lighting: Place LED candles strategically within the centerpiece. You can set them on the chair seat or around its base. Avoid open flames to keep things safe.
- Add Seasonal Accents: Arrange miniature pumpkins, gourds, or spooky figurines around the chair and on the table. For extra sparkle, sprinkle glitter or faux flower petals.
- Position the Chair: Place your ghost chair in the center of the table, ensuring it’s stable and visible from all angles. Adjust the drapes and cobwebs as needed.
- Final Touches: Dim the lights and test the LED candles to create a magical ambiance. Take a step back and admire your creation!
This process takes roughly 2-3 hours, depending on your level of detail. My advice? Play spooky music while you work to get into the Halloween spirit!
Styling Tips & Design Techniques
To make your ghost chair centerpiece truly stand out, here are some styling tips:
Balance is key—ensure the chair doesn’t overshadow the table’s other elements. If you’re adding place settings, stick to simple designs that complement the centerpiece without competing for attention.
Layer textures to create depth. Combine the smooth surface of the chair with the soft cheesecloth and the rough texture of faux cobwebs. Add metallic accents like gold-painted pumpkins for a luxe touch.
Use scale effectively. A child-sized chair works well for most dining tables, but if your table is larger, a slightly bigger chair might be necessary. Always check proportions to avoid a cluttered look.
Finally, don’t forget to photograph your masterpiece! Use natural or candlelight for a magical glow. Share your photos with friends—who knows, you might inspire their Halloween decor!
Color & Texture Combinations
The ghost chair centerpiece thrives on a mix of subtle and bold elements. For a whimsical Halloween vibe, here are some ideas:
Color Palette: Stick to neutral tones like white, gray, and silver for an ethereal look. Add pops of orange or gold for warmth. If you prefer a darker theme, incorporate black accents with deep purple or green highlights.
Texture Suggestions: Combine smooth acrylic with soft cheesecloth and rough cobwebs. Metallic pumpkins or glittered accents add a touch of glam, while matte finishes keep things grounded.
Seasonal variations can include using bright orange pumpkins for a traditional fall look or icy blue tones for a chilling winter Halloween aesthetic.
Common Design Mistakes to Avoid
It’s easy to get carried away with Halloween decor, so watch for these pitfalls:
Overcrowding the table with decor can make it difficult for guests to enjoy their meal. Keep the centerpiece proportional to the table size.
Avoid using real candles—they can be a fire hazard, especially with fabric elements. Opt for LED versions instead.
Don’t skip the planning phase. Without a clear vision, your centerpiece might lack cohesion. Take time to create a mood board and sketch your idea.
Lastly, avoid clashing colors. Stick to a harmonious palette to maintain the whimsical Halloween vibe.
Budget-Friendly Alternatives
You don’t need to splurge to achieve a stunning ghost chair centerpiece. Here are some cost-saving ideas:
- Use a second-hand chair from a thrift store or online marketplace.
- DIY your cobwebs with cotton batting or stretched-out gauze.
- Paint dollar-store pumpkins and gourds for a high-end look.
- Repurpose old fabrics for the drapes instead of buying new cheesecloth.
One year, I created a similar centerpiece using items entirely from my local dollar store. It looked fabulous and cost under $20!
Conclusion
The DIY ghost chair Halloween centerpiece is a whimsical way to bring your seasonal decor dreams to life. With its enchanting combination of mystery and elegance, it’s sure to be the highlight of your Halloween table.
Start small if you’re new to DIY projects—perhaps with just the draped fabric and cobwebs. Once you see how magical it looks, you’ll be inspired to add more elements. Remember, the joy of decorating lies in the creativity and transformation it brings to your space.
So, gather your supplies, play some spooky tunes, and dive into this fun project. Your guests will be amazed, and you’ll have created a Halloween decor masterpiece to remember!
FAQs
Q: Can I use a regular chair instead of an acrylic one?
A: Yes, you can! Spray paint it with a frosted finish to mimic the transparent look.
Q: How do I keep the centerpiece safe with kids around?
A: Use LED candles instead of real ones, and ensure the chair is stable and secure.
Q: What if my table is small?
A: Opt for a miniature chair or scale down the design elements to fit your space.
Q: Can this centerpiece work for other holidays?
A: Absolutely! Swap out the pumpkins for ornaments or flowers, and it can be adapted for Christmas or spring decor.
Q: Where can I find cheap LED candles?
A: Dollar stores, online marketplaces, and seasonal sales at craft stores are great places to look.
