

There’s just something about the sweet, chocolatey smell of crushed Oreos that instantly brings a smile to my face. You know, the kind of scent that drifts through the kitchen and makes everyone poke their head in, wondering what’s going on. The first time I made these Easy Oreo Sushi Rolls Dessert, I was simply trying to keep my kids entertained on a rainy afternoon (don’t we all scramble for kitchen projects when the weather turns sour?). And, honestly, I was surprised by just how much joy these playful, no-bake treats brought to the table.
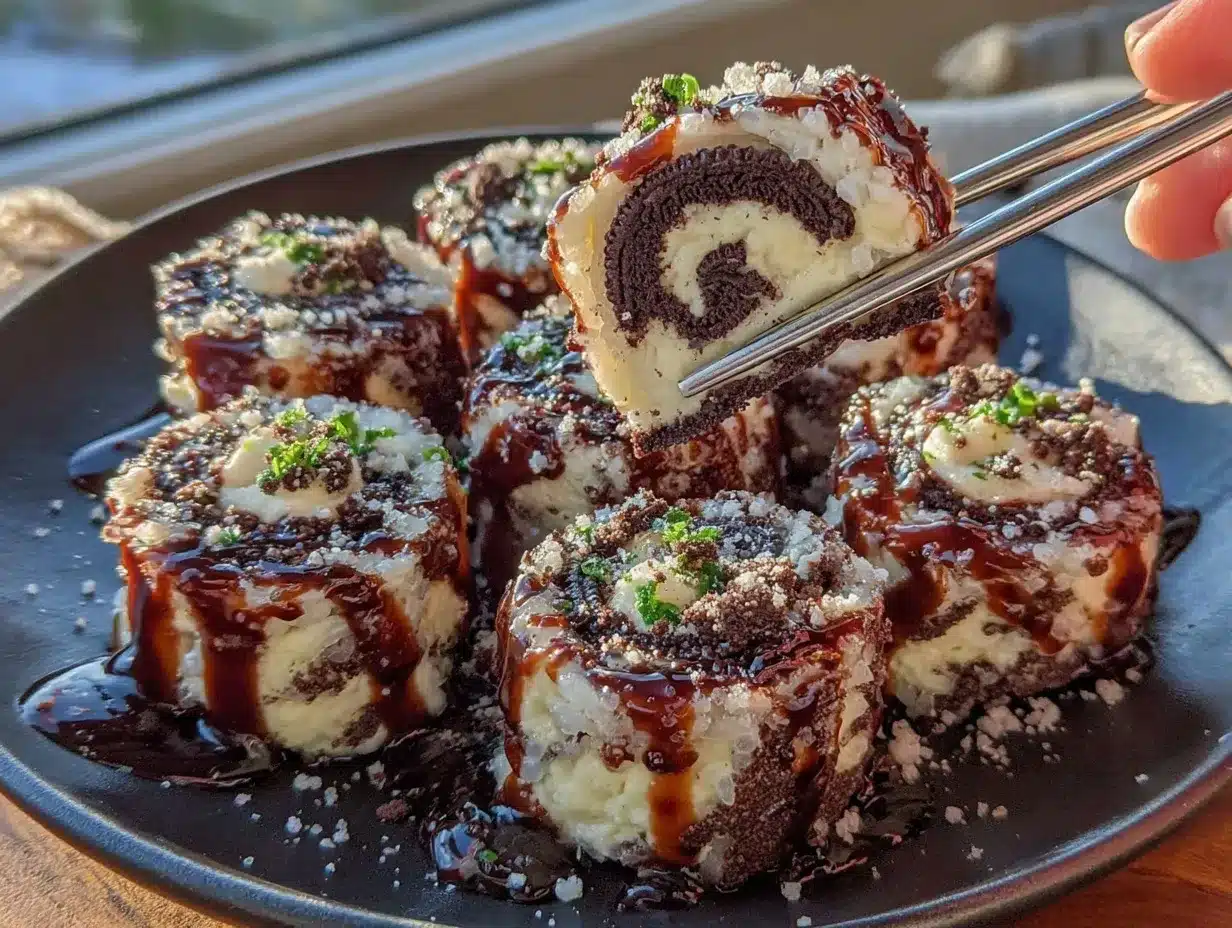
I still remember my daughter’s wide-eyed “Whoa, that’s sushi?!” reaction as I rolled out the first batch. She was expecting something savory, but was greeted instead by a whimsical, chocolatey treat, filled with a creamy center and rolled up just like her favorite bite-sized sushi. It was the kind of moment where you pause, take a deep breath, and just smile because you know you’re onto something truly special. These Oreo sushi rolls quickly became a staple for family movie nights, birthday parties, and (I’ll admit it) late-night cravings when I want something fun but not too fussy.
Growing up, I spent countless afternoons with my grandma, making cookies and candies from scratch. But if I’d known about this Oreo sushi rolls dessert back then, I think we would have added it to our recipe box in a heartbeat. It’s a little bit nostalgic, a little bit quirky, and ridiculously easy—dangerously easy, to be honest. My family can’t resist sneaking pieces off the plate before they’ve even been sliced (and who can blame them?).
Whether you’re looking for a fun project to do with your kids, a unique treat to brighten up your Pinterest dessert board, or just a sweet snack for yourself, these Oreo sushi rolls are pure, whimsical comfort. I’ve tested and tweaked the recipe more times than I can count—in the name of research, of course—and I can confidently say this is a dessert you’ll want to bookmark, share, and make again and again.
Why You’ll Love This Easy Oreo Sushi Rolls Dessert
Let’s face it: sometimes you need a treat that’s as fun to make as it is to eat. Over the years, I’ve made countless desserts, but this Easy Oreo Sushi Rolls Dessert always manages to delight kids and adults alike. Whether you’re a baking pro or a kitchen newbie, this recipe is a sure-fire winner, and here’s why:
- Quick & Easy: You don’t need to preheat an oven or dirty a pile of bowls. These Oreo sushi rolls come together in just 20 minutes—perfect for spontaneous cravings or last-minute playdates.
- Simple Ingredients: No grocery store scavenger hunts required. You probably have everything you need right in your pantry (Oreos, cream cheese, and a few extras, that’s it!).
- Perfect for Parties: These sushi rolls are a showstopper at birthday parties, sleepovers, or anytime you want to impress guests with something fun and different.
- Crowd-Pleaser: Both kids and adults literally light up when they see these on the table. They’re bite-sized, easy to eat, and just plain adorable.
- Unbelievably Delicious: The combination of chocolatey Oreo “rice,” creamy filling, and optional fruity “sushi” centers is pure comfort food—but with a playful twist.
What really sets this Oreo sushi rolls dessert apart is the technique: instead of just smashing cookies, you blend them into a soft, rollable dough. The filling is ultra-creamy (thanks to whipped cream cheese and powdered sugar), and you can jazz it up with your favorite candies or fruit strips for that classic sushi look. I’ve tried a few versions, but this one nails the texture and flavor every time. It’s the kind of dessert that makes you close your eyes and savor the first bite.
Even better—there’s no actual baking involved. So, if you’re a little nervous about cookies spreading or cakes sinking, this one’s foolproof. It’s a go-to for busy parents, tired college students, or anyone who just wants a fun treat without a ton of fuss. Trust me, once you try these, you’ll be making them for every occasion (and maybe just because it’s Tuesday!).
What Ingredients You Will Need
This Easy Oreo Sushi Rolls Dessert proves you don’t need a long shopping list to whip up something impressive. All the ingredients are simple, familiar, and easy to substitute. Here’s what you’ll need to get rolling:
- For the Oreo “Rice”:
- 24 Oreo cookies (regular, not double-stuffed; about 255g) – You’ll be separating the filling from the cookies.
- 2 tablespoons milk (30ml) – Whole or 2% works best, but non-dairy milk is fine if you need it.
- For the Creamy Filling:
- 4 oz (115g) cream cheese, softened – I recommend Philadelphia for the best texture, but store brands work too.
- 2 tablespoons powdered sugar (15g) – Adds a touch of sweetness and helps set the filling.
- Reserved Oreo cream filling – Don’t toss those centers! They add extra flavor and richness.
- For the “Sushi” Center and Toppings (Optional, but fun!):
- Gummy candies (like gummy worms or strips) – For a playful, colorful “sushi” look. My kids love using rainbow belts.
- Fresh strawberries, sliced thin – For a slightly healthier twist and a pop of color.
- Fruit leather or fruit roll-ups – These mimic the look of nori (seaweed) if you want to wrap the rolls.
- Shredded coconut – For a “rice” look and extra texture.
- Melted white or dark chocolate – For drizzling or dipping. Adds richness and helps hold the rolls together if needed.
Ingredient Tips: I’ve found that off-brand sandwich cookies can work, but they don’t always blend as smoothly as Oreos (the filling might be a bit tougher). If you need a dairy-free version, swap the cream cheese for a non-dairy alternative and use plant-based milk. For gluten-free, use gluten-free chocolate sandwich cookies (they taste surprisingly close to the real thing!).
Don’t be afraid to get creative with the centers—mini marshmallows, thin apple slices, or even a dollop of Nutella work beautifully. The best part is, you can tweak the flavor to fit your mood or what’s in your pantry.
Equipment Needed
One of the best things about this Oreo sushi rolls dessert is that you really don’t need anything fancy. Here’s what I use every time (and a few alternatives if you’re missing something):
- Food processor or blender: For crushing the Oreos into a fine crumb. If you don’t have one, a heavy-duty zip-top bag and a rolling pin or mallet will do the trick (just takes a bit more elbow grease).
- Mixing bowls: At least one medium-sized bowl for mixing the Oreo dough and another for the filling.
- Silicone spatula or spoon: For mixing and spreading the creamy filling (I love a flexible spatula for getting every last bit out).
- Plastic wrap or parchment paper: Essential for rolling up the sushi and keeping it from sticking. Parchment works best if you’re planning to cut perfect slices.
- Sharp knife: For slicing the rolls cleanly. A serrated knife or even a piece of unflavored dental floss works wonders if you want super neat edges.
- Cutting board: For assembling and slicing your sushi rolls.
If you’re making these with kids, I suggest using a plastic knife (it’ll cut through the “dough” just fine and is safer for little helpers). I’ve tried both silicone baking mats and wax paper for rolling—honestly, parchment paper is my favorite for easy cleanup and less sticking. And don’t worry if your kitchen tools aren’t top-of-the-line; I’ve made this recipe in tiny college dorms and full-sized home kitchens with equal success.
How to Make Easy Oreo Sushi Rolls Dessert
-
Prepare the Oreos:
Separate the Oreo cookies—set the cream filling aside in a bowl, and place the cookies in your food processor. (If using a bag, place cookies inside and crush with a rolling pin.)
Pulse or crush until you have fine crumbs with no large pieces left. This usually takes about 30 seconds in a food processor. -
Make the Oreo Dough:
Pour the cookie crumbs into a medium mixing bowl. Add 2 tablespoons of milk (start with less—you can always add more if it’s too dry).
Mix until the crumbs come together into a soft, slightly sticky dough. If it’s too crumbly, add a teaspoon more milk at a time.
Sensory cue: The dough should hold together easily when pressed but not feel wet. -
Form the Dough Sheet:
Place a large sheet of parchment paper or plastic wrap on your work surface. Scoop the Oreo dough onto it.
Place another sheet on top, and use a rolling pin (or your hands) to flatten the dough into a rectangle about 8×10 inches (20×25 cm) and 1/4 inch (0.5 cm) thick.
Tip: If the dough sticks, chill it for 5 minutes before rolling. -
Make the Filling:
In a bowl, combine the softened cream cheese, powdered sugar, and reserved Oreo cream filling. Beat with a spoon or hand mixer until smooth and fluffy.
Pro tip: Taste the filling—add a bit more powdered sugar if you want it sweeter. -
Assemble the Sushi:
Spread the cream cheese filling evenly over the Oreo dough, leaving a 1/2-inch border on all sides.
Lay a few strips of gummy candy, fruit leather, or thinly sliced strawberries along one long edge (this will be the center “sushi” stripe). -
Roll It Up:
Using the parchment paper as a guide, gently roll the dough up (just like a jelly roll or cinnamon roll) into a tight log.
Note: If it cracks, don’t panic—just press it gently to seal, or patch with extra dough. -
Chill:
Wrap the log tightly in the parchment paper and refrigerate for at least 30 minutes. This helps it firm up for clean slicing.
Warning: Too impatient? The roll may squish or flatten if you try to cut it right away. -
Slice and Decorate:
Unwrap the chilled log and use a sharp knife to cut into 1/2- to 3/4-inch rounds.
For a true “sushi” vibe, wrap some pieces with fruit leather strips or sprinkle with shredded coconut.
Drizzle with melted chocolate if you like (it sets fast on cold rolls!). -
Serve and Enjoy:
Arrange your Oreo sushi rolls on a platter and watch them disappear. I love serving them with chopsticks for extra fun!
Troubleshooting Tips: If your dough is too sticky, add a bit more crushed cookies; if it’s too dry, add a splash more milk. If the roll cracks, a quick chill usually helps. And don’t stress about perfect sushi shapes—these are meant to be playful!
Pro Tips & Techniques for Perfect Oreo Sushi Rolls
I’ve made this Easy Oreo Sushi Rolls Dessert more times than I can count, and I’ve definitely had a few flops along the way. Here’s everything I’ve learned for consistent, delicious results:
- Crush Cookies Thoroughly: The finer your Oreo crumbs, the smoother your “sushi rice” dough. Big chunks can cause the dough to crack when rolling.
- Don’t Overdo the Milk: It’s tempting to add extra, but too much makes the dough sticky and hard to roll. Add just enough to bring everything together.
- Chill for Clean Slices: A quick chill in the fridge (or freezer for 10 minutes) makes the roll much easier to slice. If you skip this, the rounds can smoosh and lose their shape.
- Use a Sharp Knife: Clean the blade between cuts for perfect edges. A serrated knife or unflavored dental floss works wonders for super neat pieces.
- Multitasking: While the roll chills, prep your decorations—slice fruit, cut fruit leather strips, or melt your chocolate. Makes assembly a breeze!
Common Mistakes: Using double-stuffed Oreos can make the dough too soft and sticky (regular works best). If your roll cracks, it’s probably too cold or too dry—just let it sit for a couple of minutes and gently press back together. Don’t worry if they’re not sushi chef-perfect; honestly, the imperfections make them even cuter.
I once tried winging it with peanut butter instead of cream cheese and it turned out a little too gooey for slicing—but delicious nonetheless! If you want to experiment, start with a small batch and adjust as you go.
Oreo Sushi Rolls Variations & Adaptations
The beauty of this Oreo sushi rolls dessert is how customizable it is. Here are some of my favorite twists and adaptations:
- Gluten-Free Sushi Rolls: Swap in gluten-free chocolate sandwich cookies and check your fillings for hidden gluten. The texture is nearly identical and great for friends with sensitivities.
- Dairy-Free/Vegan Rolls: Substitute dairy-free cream cheese and use plant-based milk. There are even vegan sandwich cookies on the market now that taste just like the classic.
- Flavor Twists: Add a tablespoon of peanut butter or cookie butter to the filling for a nutty surprise. You can even use mint Oreos for a fresh flavor, or golden Oreos for a vanilla version.
- Seasonal Fun: In summer, try stuffing the center with thin mango or kiwi strips. In fall, use apple slices and a sprinkle of cinnamon in the filling.
- Chocolate Overload: Roll the sushi in mini chocolate chips or drizzle with extra melted chocolate for a decadent finish.
Personally, my favorite twist is adding a stripe of strawberry jam to the filling before rolling. It gives a little tartness that balances out the sweetness—plus, it looks gorgeous when sliced! Don’t be afraid to let your imagination run wild; mix and match fillings and toppings for a new “sushi” flavor every time.
Serving & Storage Suggestions
These Oreo sushi rolls are best served slightly chilled, but not ice cold. I love arranging them on a platter with a few fresh berries or a sprinkle of coconut for that real “sushi” presentation. If you’re feeling playful, serve with tiny bowls of melted chocolate for “dipping” and hand out chopsticks for the full effect.
For parties, you can make these a few hours ahead and keep them covered in the fridge. If you want to prep them the night before, just wait to slice until right before serving for the cleanest rounds.
Leftovers (if you have any!) can be stored in an airtight container in the refrigerator for up to 3 days. They freeze surprisingly well, too—just wrap the unsliced log tightly and thaw in the fridge before slicing and serving. The flavors meld beautifully as they sit, and the texture stays lovely and soft. To freshen them up, let sit at room temp for 10 minutes before serving.
Nutritional Information & Benefits
Each Oreo sushi roll dessert piece (about 1 inch/2.5cm thick) contains approximately 110 calories, 5g fat, 15g carbohydrates, and 1g protein. Of course, the numbers may vary based on your filling and decoration choices.
The main ingredients—Oreos and cream cheese—make this a treat, but there are a few perks! Using fruit for the center adds a little fiber and vitamins, and the portion-controlled bites make it easier to indulge mindfully. For dairy-free or gluten-free diets, simple swaps make this recipe accessible for almost everyone.
Potential allergens include wheat (in Oreos), dairy (in cream cheese), and possibly nuts if you add nut butter. Always check your labels if allergies are a concern. I love that this dessert brings a bit of joy and fun into snack time—sometimes, that’s the healthiest thing of all!
Conclusion
There’s something magical about a dessert that’s as fun to make as it is to eat—and this Easy Oreo Sushi Rolls Dessert fits the bill every time. It’s quick, playful, and a guaranteed hit with kids and grown-ups alike. You can mix and match fillings and toppings, getting creative for any season or occasion.
For me, this recipe is a reminder that the best kitchen memories don’t have to be complicated. Sometimes, it’s the simplest treats—shared with laughter and a little mess—that stick with you. I hope you’ll give these Oreo sushi rolls a try, customize them to your heart’s content, and make some sweet memories along the way.
If you try this recipe, let me know in the comments below! Did you add your own twist? Did your kids love it? I’d love to see your creations—tag me on social or share your Oreo sushi roll success stories. Happy rolling!
Frequently Asked Questions
How long do Oreo sushi rolls last?
Stored in an airtight container in the fridge, Oreo sushi rolls stay fresh for up to 3 days. You can also freeze the unsliced log for up to 1 month—just thaw before slicing and serving.
Can I make this recipe dairy-free or vegan?
Absolutely! Use dairy-free cream cheese and plant-based milk. Make sure your cookies are vegan (some brands are), and you’re all set for a tasty, animal-friendly treat.
What can I use instead of cream cheese for the filling?
If you don’t have cream cheese, try whipped mascarpone, peanut butter, or a thick Greek yogurt. Each gives a different flavor twist, so have fun experimenting.
Do I need a food processor to make this dessert?
Nope! While a food processor makes quick work of the Oreos, you can also crush them in a zip-top bag with a rolling pin or heavy can. Just make sure the crumbs are very fine for the best texture.
How can I make my Oreo sushi rolls look “authentic” like real sushi?
Wrap your sliced rolls with strips of fruit leather to mimic nori, and use colorful gummy strips or thin fruit slices in the center. A sprinkle of coconut on top looks just like sushi rice! Presentation is half the fun with this dessert.
Pin This Recipe!

Easy Oreo Sushi Rolls Dessert
- Total Time: 50 minutes
- Yield: 16-20 pieces 1x
Description
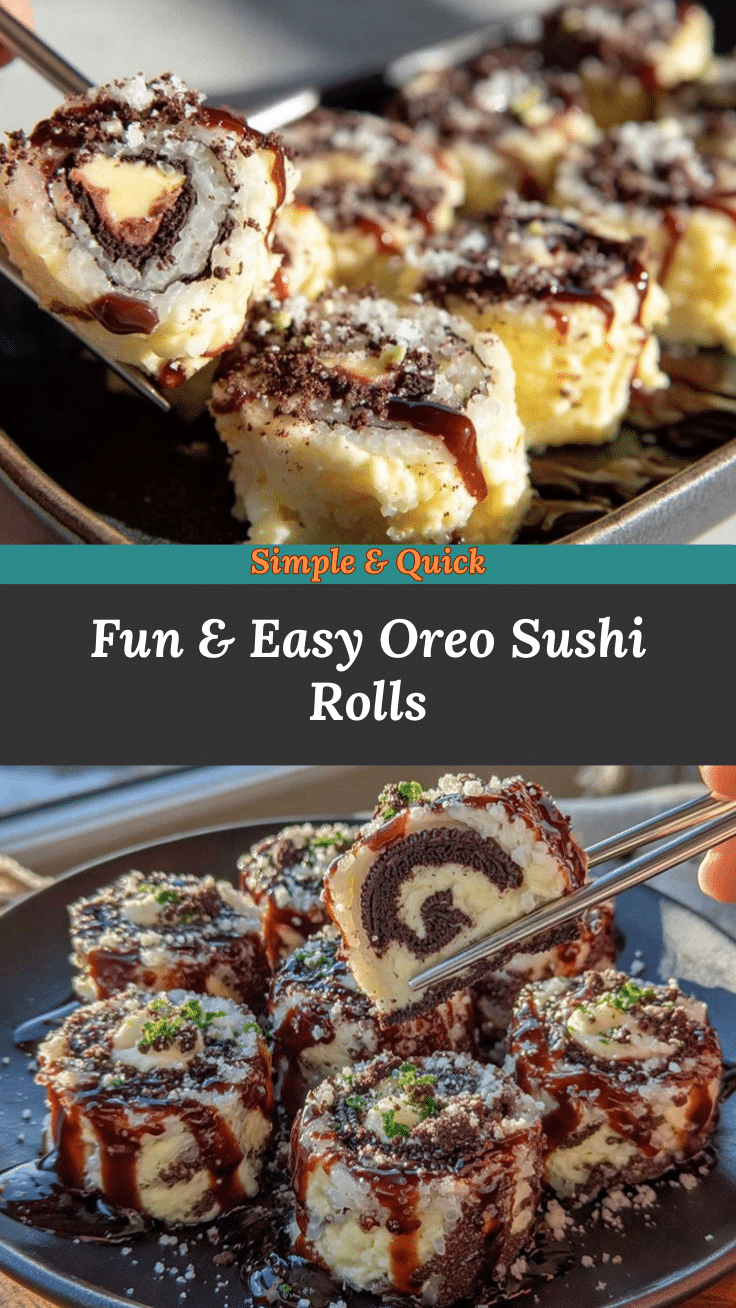
These playful, no-bake Oreo sushi rolls are a whimsical, chocolatey treat with a creamy center—perfect for kids, parties, or a fun kitchen project. They come together in just 20 minutes and are endlessly customizable with your favorite candies or fruit.
Ingredients
- 24 Oreo cookies (regular, not double-stuffed; about 255g)
- 2 tablespoons milk (whole or 2%, or non-dairy milk)
- 4 oz cream cheese, softened
- 2 tablespoons powdered sugar
- Reserved Oreo cream filling
- Gummy candies (like gummy worms or strips, optional)
- Fresh strawberries, sliced thin (optional)
- Fruit leather or fruit roll-ups (optional)
- Shredded coconut (optional)
- Melted white or dark chocolate (optional)
Instructions
- Separate the Oreo cookies—set the cream filling aside in a bowl, and place the cookies in your food processor. (If using a bag, place cookies inside and crush with a rolling pin.) Pulse or crush until you have fine crumbs with no large pieces left.
- Pour the cookie crumbs into a medium mixing bowl. Add 2 tablespoons of milk (start with less—you can always add more if it’s too dry). Mix until the crumbs come together into a soft, slightly sticky dough. If it’s too crumbly, add a teaspoon more milk at a time.
- Place a large sheet of parchment paper or plastic wrap on your work surface. Scoop the Oreo dough onto it. Place another sheet on top, and use a rolling pin (or your hands) to flatten the dough into a rectangle about 8×10 inches and 1/4 inch thick. Chill for 5 minutes if sticky.
- In a bowl, combine the softened cream cheese, powdered sugar, and reserved Oreo cream filling. Beat with a spoon or hand mixer until smooth and fluffy.
- Spread the cream cheese filling evenly over the Oreo dough, leaving a 1/2-inch border on all sides. Lay a few strips of gummy candy, fruit leather, or thinly sliced strawberries along one long edge.
- Using the parchment paper as a guide, gently roll the dough up (like a jelly roll) into a tight log. If it cracks, press gently to seal or patch with extra dough.
- Wrap the log tightly in the parchment paper and refrigerate for at least 30 minutes to firm up for clean slicing.
- Unwrap the chilled log and use a sharp knife to cut into 1/2- to 3/4-inch rounds. Wrap some pieces with fruit leather strips or sprinkle with shredded coconut. Drizzle with melted chocolate if desired.
- Arrange your Oreo sushi rolls on a platter and serve. Enjoy with chopsticks for extra fun!
Notes
For best results, use regular Oreos (not double-stuffed). Chill the roll before slicing for clean pieces. Get creative with fillings and toppings—try fruit, candies, or even a stripe of jam. For gluten-free or dairy-free, use suitable cookie and cream cheese substitutes. Store leftovers in the fridge for up to 3 days or freeze the unsliced log for up to 1 month.
- Prep Time: 20 minutes
- Cook Time: 0 minutes
- Category: Dessert
- Cuisine: American
Nutrition
- Serving Size: 1 sushi roll piece (
- Calories: 110
- Sugar: 9
- Sodium: 80
- Fat: 5
- Saturated Fat: 2.5
- Carbohydrates: 15
- Fiber: 0.5
- Protein: 1
Keywords: Oreo sushi, no-bake dessert, kids dessert, party treat, easy Oreo recipe, fun dessert, cream cheese filling, chocolate sushi, Oreo rolls
