
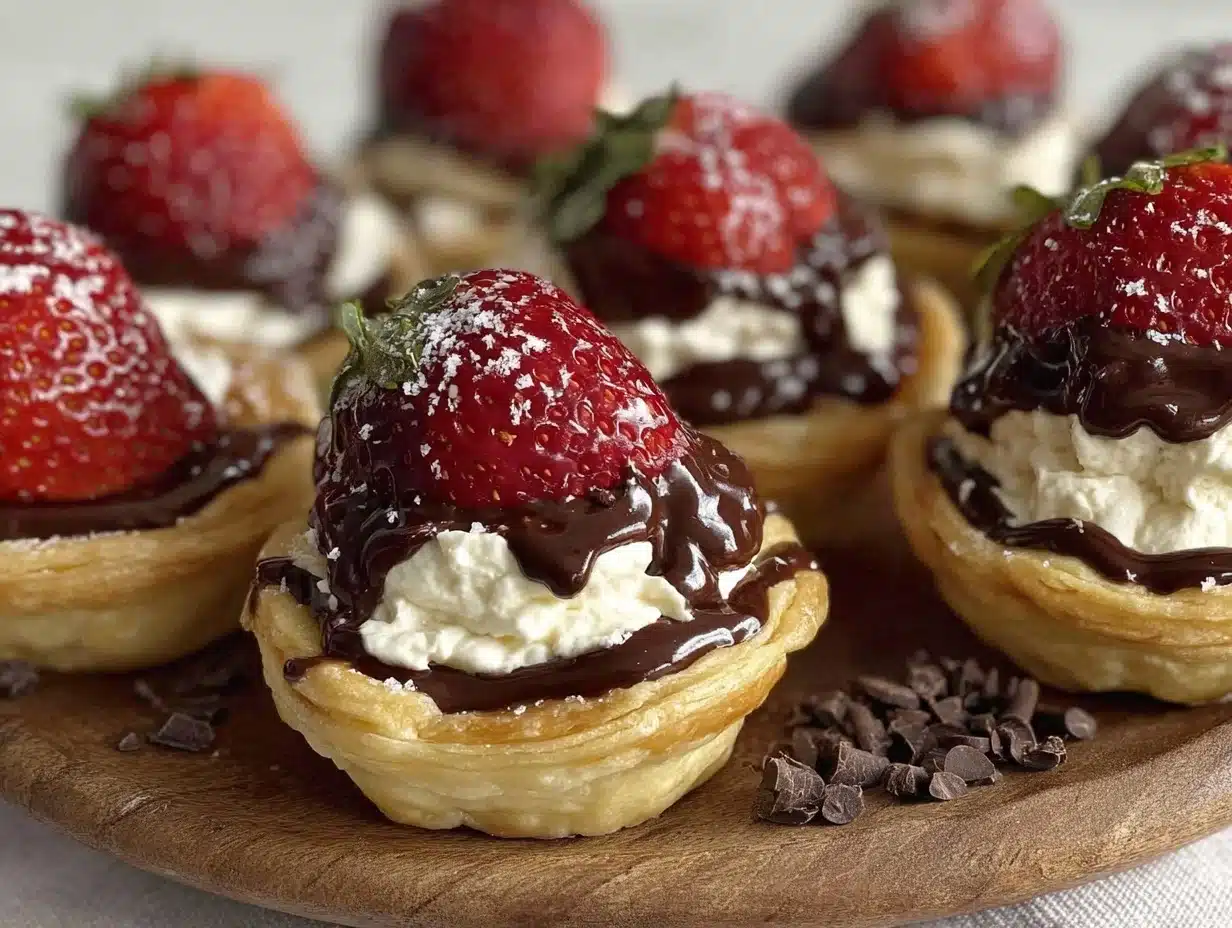
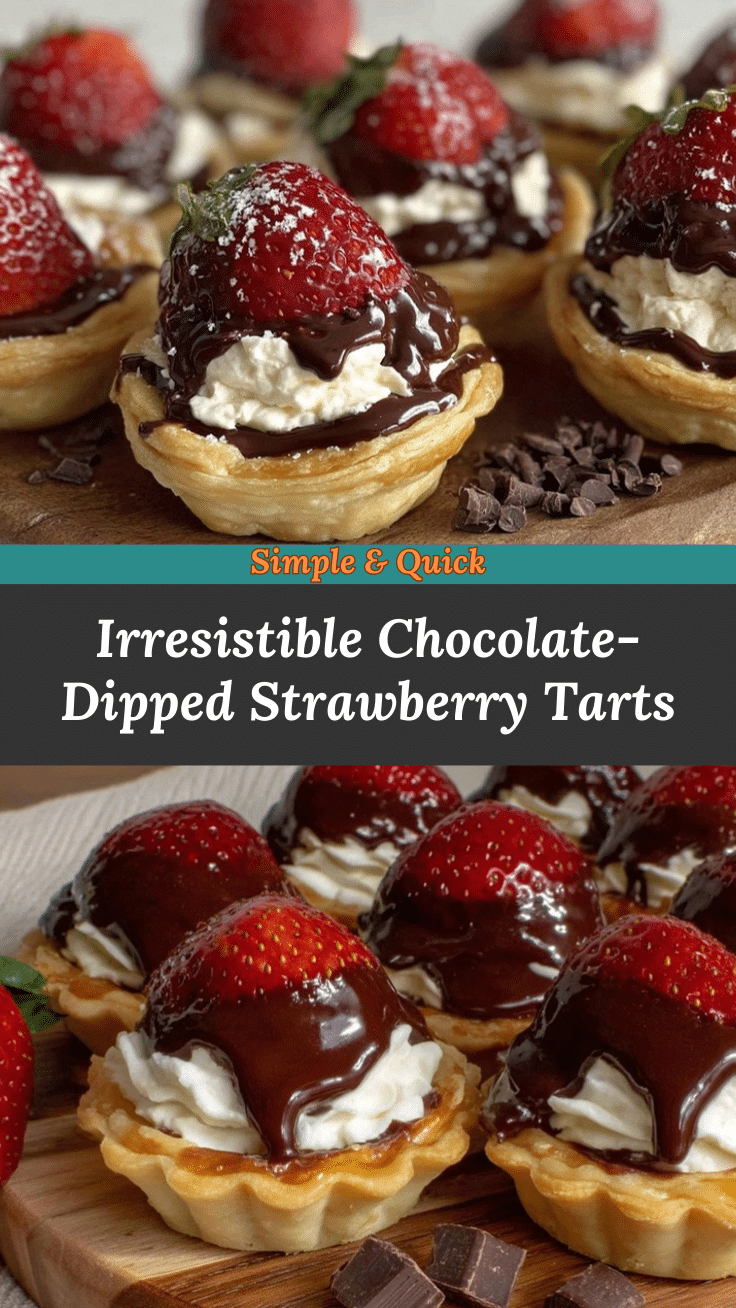
Picture this: the sun peeks through your kitchen window, a gentle breeze tickles your nose, and the aroma of chocolate and strawberries fills the air. There’s just something magical about the first bite of a Chocolate-Dipped Strawberry Whipped Tart—the snappy chocolate shell gives way to a cloud of sweet whipped filling, and then you hit that juicy, ruby-red strawberry. Honestly, it’s the kind of treat that makes you stop mid-bite, close your eyes, and think, “This is what spring tastes like.”
The first time I made these tarts, I was knee-high to a grasshopper, standing on a wobbly stool next to my grandma. We used to make little fruit tarts for every Sunday dinner, and I vividly remember the way her kitchen would smell—like butter, sugar, and just a hint of adventure. Years later, after a rainy spring afternoon left me craving that same cozy feeling, I decided to put a twist on her classic recipe. I dipped the tart shells in dark chocolate, whipped up a light-as-air filling, and crowned each with a fresh strawberry. Let me tell you, that first bite was a “pause and smile” moment if there ever was one.
Now, these Chocolate-Dipped Strawberry Whipped Tarts are a staple at our family gatherings. My kids can’t resist sneaking them off the platter before guests arrive (and I don’t blame them). They’re dangerously easy to assemble, but the payoff is pure, nostalgic comfort. Whether you’re brightening up your Pinterest cookie board, looking for a sweet treat for your next baby shower, or just want to surprise your family after dinner, this recipe fits the bill. I’ve tested and tweaked it more times than I can count—all in the name of research, of course! If you love desserts that feel like a warm hug, you’re going to want to bookmark this one.
Why You’ll Love This Recipe
When it comes to spring party desserts, these Chocolate-Dipped Strawberry Whipped Tarts check all the boxes—easy, stunning, and absolutely delicious. After dozens of trials (and a few hilarious mishaps, like whipped cream explosions), I can confidently say this recipe delivers every time. Here’s why you’ll fall head over heels for it:
- Quick & Easy: You can whip up a full batch in under 45 minutes, so it’s perfect for busy days or last-minute entertaining.
- Simple Ingredients: No need for a fancy grocery run—most of these items are probably already hanging out in your pantry and fridge.
- Perfect for Spring Parties: These tarts look like a million bucks on a dessert table, making them ideal for Easter brunch, Mother’s Day, or any springtime gathering.
- Crowd-Pleaser: Both kids and adults rave about the combo of crisp chocolate, fluffy whipped filling, and juicy strawberries. Trust me, they disappear fast.
- Unbelievably Delicious: The layers of flavor and texture…well, they’re what dessert dreams are made of. You get sweet, creamy, crunchy, and fruity all in one bite.
What sets these tarts apart from the rest? It’s that little twist of dipping the shells in chocolate for a crackly, rich base, plus a whipped filling that’s not too sweet, not too heavy—just right. I love blending a bit of cream cheese with the whipped cream for extra stability (a trick I picked up after several fillings melted on me during summer parties—oops). You also have total control over the sweetness and flavor, so you can adjust it to your taste.
This isn’t just another fruit tart recipe—it’s my go-to because it’s simple, adaptable, and always impressive. Whether you’re making them for a crowd or just treating yourself, these tarts bring that “close-your-eyes and sigh” feeling. They transform an ordinary day into something memorable, no stress required. And honestly, isn’t that what the best recipes are all about?
What Ingredients You Will Need
This recipe uses simple, wholesome ingredients to deliver bold flavor and satisfying texture without the fuss. You don’t need anything fancy—just a few springtime staples and a little chocolate magic. Here’s your shopping (or pantry-raiding) list:
- For the Tart Shells:
- 1 1/4 cups (160g) all-purpose flour
- 1/2 cup (115g) unsalted butter, cold and diced (I like Kerrygold for extra flavor)
- 1/4 cup (30g) powdered sugar
- 1/4 teaspoon salt
- 1-2 tablespoons (15-30ml) cold water, as needed
- For the Chocolate Coating:
- 6 oz (170g) high-quality dark chocolate, chopped (use semi-sweet or bittersweet—Ghirardelli is my favorite here)
- 1 teaspoon coconut oil (for shine and smooth dipping, optional)
- For the Whipped Strawberry Filling:
- 1 cup (240ml) heavy whipping cream, cold
- 4 oz (115g) cream cheese, softened (adds richness and stability)
- 1/4 cup (30g) powdered sugar
- 1 teaspoon pure vanilla extract
- 1/2 cup (75g) fresh strawberries, finely diced (plus more for topping)
- For Assembly & Garnish:
- 12-15 whole fresh strawberries, washed and patted very dry
- Extra melted chocolate for drizzling (optional, but why not?)
- Edible flowers or fresh mint leaves (totally optional, but makes them extra pretty)
Ingredient Notes & Swaps:
- For a gluten-free option, use a 1:1 gluten-free baking flour blend in the tart shells.
- Dairy-free? Try coconut cream instead of heavy cream and dairy-free cream cheese (like Kite Hill).
- Out of strawberries? Raspberries or blueberries work beautifully—just dice them up small.
- If you don’t want to make tart shells from scratch, store-bought mini tart shells or even phyllo cups will work in a pinch (I’ve done it and no one complained!).
- Chocolate chips can substitute for chopped chocolate, though the shell may not be as crisp.
I always recommend using the best chocolate you can find. The flavor really shines in something as simple as these tarts.
Equipment Needed
You don’t need a commercial bakery setup to make these Chocolate-Dipped Strawberry Whipped Tarts, but a few basic tools will make life a lot easier. Here’s what I use every time:
- Mini tart pans (12 count, 3-inch/7.5cm diameter): Removable bottoms are nice but not essential. No mini tart pans? A muffin tin lined with paper liners works too—you’ll just get a slightly different shape.
- Mixing bowls: At least two, preferably glass or metal for whipping cream.
- Electric mixer (hand or stand): For the whipped filling. You can whisk by hand (I’ve done it when my mixer went on the fritz!), but it takes muscle.
- Rolling pin: For rolling out tart dough. A sturdy drinking glass will do in a pinch.
- Baking sheet: If you need to chill or bake shells.
- Parchment paper or silicone baking mat: To keep things from sticking.
- Microwave-safe bowl or double boiler: Melting chocolate safely is key.
- Small offset spatula or spoon: For spreading chocolate and filling shells neatly.
- Piping bag or zip-top bag (optional): To pipe in the whipped filling. A spoon works fine too.
I’ve made these tarts with everything from high-end tart pans to thrift store muffin tins. As long as you grease your pans well and keep an eye on the baking time, you’ll be golden. Just don’t skip chilling the dough—it makes all the difference for a crisp tart shell!
Preparation Method

-
Make the Tart Shells:
In a large bowl, combine 1 1/4 cups (160g) flour, 1/2 cup (115g) cold diced butter, 1/4 cup (30g) powdered sugar, and 1/4 tsp salt. Use your fingers or a pastry cutter to blend until the mixture looks like coarse sand.
Add 1 tablespoon (15ml) cold water and mix gently. If the dough is still crumbly, add another tablespoon. Knead just until it comes together—don’t overwork!
Flatten into a disc, wrap in plastic, and chill in the fridge for 20 minutes. This helps keep the shells tender and flaky. -
Shape & Bake:
Preheat oven to 350°F (175°C). On a lightly floured surface, roll out the dough to about 1/8 inch (3mm) thick.
Cut circles to fit your tart pans. Press gently into the pans, trimming excess.
Poke the bottoms with a fork, line with parchment, and fill with pie weights or beans.
Bake for 12-15 minutes, or until lightly golden. Remove the weights and cool completely.
If using muffin tins, the baking time may be 1-2 minutes less—keep an eye out. -
Dip in Chocolate:
Melt 6 oz (170g) chocolate with 1 tsp coconut oil in a microwave-safe bowl (30-second bursts, stirring in between) or over a double boiler until smooth.
Carefully remove cooled tart shells from pans. Dip the rims (or the whole shell) into the melted chocolate, letting excess drip off.
Place on parchment and let set at room temperature, about 10-15 minutes. (If you’re in a hurry, pop them in the fridge for 5 minutes.) -
Make the Whipped Strawberry Filling:
In a clean bowl, beat 4 oz (115g) softened cream cheese with 1/4 cup (30g) powdered sugar and 1 tsp vanilla until smooth.
In a separate bowl, whip 1 cup (240ml) heavy cream to soft peaks.
Gently fold the whipped cream into the cream cheese mixture until just combined—don’t overmix!
Fold in 1/2 cup (75g) finely diced strawberries.
If the strawberries are super juicy, blot them dry first. This keeps your filling light and fluffy. -
Assemble the Tarts:
Spoon or pipe the whipped strawberry filling into the cooled, chocolate-dipped tart shells.
Top each with a whole fresh strawberry, pressing gently into the filling.
Drizzle with extra melted chocolate if you like, and add a mint leaf or edible flower for a springy touch. -
Chill & Serve:
Let the tarts chill in the fridge for at least 30 minutes before serving. This helps the filling set and the flavors meld.
Serve cold for best texture.
Troubleshooting Tips:
- If your tart shells crack, patch them with a bit of extra dough before baking.
- Filling runny? Make sure your cream cheese is softened but not warm, and don’t skip chilling the assembled tarts.
- Chocolate too thick? Add a touch more coconut oil for a smoother dip.
I always make a double batch because somehow half disappear during “taste testing”—it’s just part of the process!
Cooking Tips & Techniques
I’ve picked up a few tricks after making these Chocolate-Dipped Strawberry Whipped Tarts for nearly every spring event in recent memory:
- Cold Ingredients Are Key: For a super flaky shell and fluffy whipped filling, use cold butter and cream. I chill my mixing bowl and beaters before whipping cream—it makes a difference, trust me.
- Don’t Overwork the Dough: Handle the tart dough as little as possible. Overmixing leads to tough shells (I learned this the hard way—once, my shells doubled as hockey pucks!).
- Chocolate Dipping: Melt chocolate gently and add coconut oil for a smooth finish. If the chocolate seizes, add a splash more oil to rescue it.
- Prevent Soggy Bottoms: Make sure the tart shells are completely cool before dipping in chocolate or adding filling. The chocolate forms a barrier that keeps things crisp.
- Customize the Sweetness: Taste the filling before assembling. If your strawberries are extra sweet, you might want a little less sugar.
- Timing: You can make the shells and filling a day ahead, but assemble just before serving for the best texture. If you’re multitasking (like wrangling kids and baking), set up a little assembly line—it’s honestly kind of fun.
- Consistency: For perfectly even tarts, weigh your dough balls before pressing them into the pans. But if you’re like me and go by feel, they’ll still taste amazing!
The best advice I can give? Don’t stress about perfection—these tarts are meant to be a joyful, delicious mess of chocolate and berries. If one looks a little wonky, call it “rustic” and enjoy every bite.
Variations & Adaptations
One of my favorite things about this Chocolate-Dipped Strawberry Whipped Tarts recipe is how flexible it is. Here are a few fun ideas to change things up:
- Gluten-Free: Swap in your favorite 1:1 gluten-free flour blend for the shell. I’ve had great results with Bob’s Red Mill.
- Dairy-Free/Vegan: Use coconut cream and a dairy-free cream cheese substitute in the filling. For the shell, try a vegan butter. The flavor is still dreamy—promise!
- Seasonal Fruit: Mix things up with raspberries, blueberries, or blackberries. In the fall, diced apples with a sprinkle of cinnamon are amazing.
- Chocolate Lovers’ Version: Add a tablespoon of cocoa powder to the tart dough for a double chocolate hit. Or swirl a bit of Nutella into the whipped filling (dangerously good, just saying).
- Lemon Twist: Add lemon zest to the filling and top with a candied lemon slice for a bright, tangy variation.
- Nutty Crunch: Sprinkle chopped toasted almonds or hazelnuts over the chocolate layer before it sets.
I once made a version with passion fruit whipped cream and white chocolate shells for a friend’s birthday—let’s just say they were gone before I could grab seconds. Feel free to get creative and make these tarts your own!
Serving & Storage Suggestions
These Chocolate-Dipped Strawberry Whipped Tarts are best served well-chilled. I love presenting them on a pretty cake stand with a scattering of edible flowers—perfect for Instagram (or just making your table feel fancy).
- Serving: Serve straight from the fridge for the crispiest shells and fluffiest filling. They’re great as a centerpiece for dessert tables, afternoon tea, or brunch.
- Beverage Pairings: Pair with a glass of sparkling rosé, berry iced tea, or even a bold espresso for the grown-ups.
- Storage: Store assembled tarts in an airtight container in the fridge for up to 2 days. If you need to make them further ahead, keep the shells and filling separate, then assemble just before serving.
- Freezing: Unfilled tart shells can be frozen for up to a month. I don’t recommend freezing filled tarts, as the whipped filling can separate.
- Reheating: No reheating needed—just enjoy cold! If the shells lose a little crunch, pop them in a low oven (300°F/150°C) for 5 minutes before filling.
- Flavor Notes: The chocolate and berry flavors deepen after a few hours in the fridge, so don’t be afraid to chill them overnight if you can wait that long.
Leftovers are rare, but they do make a sweet midnight snack!
Nutritional Information & Benefits
Here’s a rough estimate per tart (assuming 12 tarts):
- Calories: ~200
- Fat: 12g
- Carbohydrates: 20g
- Protein: 2g
- Sugar: 12g
Strawberries bring vitamin C and fiber to the party, while using dark chocolate adds a little antioxidant boost. The filling is lighter than a traditional custard, and you can control the sugar to suit your needs. If you go gluten-free or dairy-free, the swaps are simple and still delicious. Just a heads-up for allergies: these tarts contain wheat, dairy, and possibly nuts if you add them as a topping.
I love knowing these tarts bring a little nutrition to the party, but honestly, they’re mostly about joy. And sometimes that’s the healthiest choice of all.
Conclusion
If you’re looking for a party-perfect dessert that’s equal parts gorgeous and delicious, these Chocolate-Dipped Strawberry Whipped Tarts are your answer. They’re easy enough for beginners, but fancy enough to wow your guests (or just make a Tuesday feel special). I love this recipe because it’s forgiving, flexible, and always a crowd-pleaser—plus, it’s one of those treats everyone asks for the recipe after one bite.
Don’t be afraid to put your own spin on them—whether you mix up the fruit, swap the chocolate, or make them mini for snacking. If you give these tarts a try, let me know in the comments below! Share your own adaptations, party stories, or even a kitchen blooper (I’ve had plenty). I hope they bring as much joy to your table as they have to mine. Happy baking, friends—you’ve got this!
FAQs About Chocolate-Dipped Strawberry Whipped Tarts
Can I use store-bought tart shells?
Absolutely! Store-bought mini tart shells or phyllo cups work in a pinch. Just make sure they’re sturdy enough to handle the chocolate dip and filling.
How far ahead can I prepare these tarts?
You can make the shells and filling a day in advance. Assemble them a few hours before serving for the best texture and flavor.
What’s the best chocolate to use for dipping?
I prefer a good-quality dark or semi-sweet chocolate (like Ghirardelli or Lindt). You can also use chocolate chips, but the shell might not be as crisp.
Can I make these tarts gluten-free or dairy-free?
Yes! Use a gluten-free flour blend for the shells and plant-based cream and cream cheese for the filling. They’re still delicious and party-worthy.
How do I keep the filling from getting runny?
Be sure your cream cheese is softened but not too warm, and chill the finished tarts well before serving. If your strawberries are juicy, blot them before mixing into the filling.
Pin This Recipe!

Chocolate-Dipped Strawberry Whipped Tarts
- Total Time: 45 minutes
- Yield: 12-15 tarts 1x
Description
These Chocolate-Dipped Strawberry Whipped Tarts feature crisp chocolate-lined tart shells, a light whipped strawberry cream filling, and a juicy fresh strawberry on top. They’re easy to make, stunning for spring parties, and always a crowd-pleaser.
Ingredients
- 1 1/4 cups all-purpose flour
- 1/2 cup unsalted butter, cold and diced
- 1/4 cup powdered sugar
- 1/4 teaspoon salt
- 1–2 tablespoons cold water, as needed
- 6 oz high-quality dark chocolate, chopped
- 1 teaspoon coconut oil (optional, for chocolate coating)
- 1 cup heavy whipping cream, cold
- 4 oz cream cheese, softened
- 1/4 cup powdered sugar
- 1 teaspoon pure vanilla extract
- 1/2 cup fresh strawberries, finely diced (plus more for topping)
- 12–15 whole fresh strawberries, washed and dried
- Extra melted chocolate for drizzling (optional)
- Edible flowers or fresh mint leaves (optional, for garnish)
Instructions
- Make the Tart Shells: In a large bowl, combine flour, cold diced butter, powdered sugar, and salt. Use your fingers or a pastry cutter to blend until the mixture looks like coarse sand. Add 1 tablespoon cold water and mix gently. If the dough is still crumbly, add another tablespoon. Knead just until it comes together—don’t overwork. Flatten into a disc, wrap in plastic, and chill in the fridge for 20 minutes.
- Shape & Bake: Preheat oven to 350°F (175°C). On a lightly floured surface, roll out the dough to about 1/8 inch thick. Cut circles to fit your tart pans. Press gently into the pans, trimming excess. Poke the bottoms with a fork, line with parchment, and fill with pie weights or beans. Bake for 12-15 minutes, or until lightly golden. Remove the weights and cool completely.
- Dip in Chocolate: Melt chocolate with coconut oil in a microwave-safe bowl (30-second bursts, stirring in between) or over a double boiler until smooth. Carefully remove cooled tart shells from pans. Dip the rims (or the whole shell) into the melted chocolate, letting excess drip off. Place on parchment and let set at room temperature, about 10-15 minutes (or chill in the fridge for 5 minutes).
- Make the Whipped Strawberry Filling: In a clean bowl, beat softened cream cheese with powdered sugar and vanilla until smooth. In a separate bowl, whip heavy cream to soft peaks. Gently fold the whipped cream into the cream cheese mixture until just combined. Fold in finely diced strawberries (blot dry if juicy).
- Assemble the Tarts: Spoon or pipe the whipped strawberry filling into the cooled, chocolate-dipped tart shells. Top each with a whole fresh strawberry, pressing gently into the filling. Drizzle with extra melted chocolate if desired, and add a mint leaf or edible flower for garnish.
- Chill & Serve: Let the tarts chill in the fridge for at least 30 minutes before serving. Serve cold for best texture.
Notes
For gluten-free, use a 1:1 gluten-free flour blend. For dairy-free, substitute coconut cream and dairy-free cream cheese. You can use store-bought tart shells or phyllo cups for convenience. Chill all ingredients and equipment for best results. Assemble just before serving for the crispiest shells. The recipe is flexible—try different berries or add lemon zest for a twist.
- Prep Time: 25 minutes
- Cook Time: 15 minutes
- Category: Dessert
- Cuisine: American
Nutrition
- Serving Size: 1 tart
- Calories: 200
- Sugar: 12
- Sodium: 60
- Fat: 12
- Saturated Fat: 7
- Carbohydrates: 20
- Fiber: 1
- Protein: 2
Keywords: chocolate dipped tarts, strawberry tarts, spring dessert, party dessert, whipped cream tart, easy tart recipe, mini tarts, chocolate strawberry dessert
