

Picture this: a chilly February evening, soft music humming in the background, and the air is thick with the heady aroma of rich melted chocolate mingling with the tart sweetness of fresh berries. The first time I made these Triple Berry Chocolate Cups, I remember the way the chocolate shimmered as it cooled, almost too beautiful to eat (almost!). That first bite—crisp chocolate shell yielding to a burst of tangy berries—was the kind of moment where you pause, take a deep breath, and just grin, because you know you’ve stumbled onto something truly special.
I came across the inspiration for these chocolate cups years ago, when I was knee-high to a grasshopper, watching my grandmother dip strawberries in dark chocolate for her Valentine’s Day parties. There was always laughter, sticky fingers, and a sense that maybe, just maybe, a little chocolate could fix just about anything. Fast forward to a rainy Valentine’s weekend, and there I was, craving that same nostalgic comfort, but with a little twist. Why settle for just strawberries when you can have a medley of berries, right?
Honestly, these Triple Berry Chocolate Cups are dangerously easy to assemble—so easy that my partner kept sneaking into the kitchen, “just to check if they’d set yet.” My kids have been known to “help” by eating half the berries before they even hit the chocolate. I can’t blame them—it’s pure, simple joy in every bite. These cups have become a staple for our family’s Valentine’s celebrations and romantic date nights at home. They’re perfect for gifting, for sharing, or for hoarding all to yourself (no judgment here!).
Whether you’re looking to brighten up your Pinterest dessert board, surprise your sweetheart, or just treat yourself to something sweet, you’re going to want to bookmark this one. I tested these cups more times than I care to admit (in the name of research, of course), and every time, they feel like a warm hug. Let’s face it: love comes in many forms, but chocolate and berries? That’s a combo you’ll want to keep close.
Why You’ll Love This Triple Berry Chocolate Cups Recipe
If you’re searching for a Valentine’s dessert that’s swoon-worthy yet simple, you’re in the right place. Over the years, I’ve tinkered with countless chocolate and berry desserts, but none have ever disappeared as fast as these Triple Berry Chocolate Cups. Here’s why you’ll love making—and devouring—them:
- Quick & Easy: These chocolate cups come together in under 30 minutes (plus a little chill time). Perfect for last-minute date nights, surprise guests, or when you just need a chocolate fix—fast.
- Simple Ingredients: No need for a fancy grocery run. If you’ve got chocolate, berries, and cupcake liners, you’re practically set. Most of the ingredients are pantry staples or easy-to-find produce.
- Perfect for Date Night: There’s something about sharing these hand-held treats that just sets the mood. They’re elegant enough for romantic evenings but fuss-free enough for casual nights in.
- Crowd-Pleaser: I’ve served these at family gatherings, book clubs, and even potlucks. Kids and adults both rave about the crisp chocolate shell and juicy berry filling. They vanish in a flash!
- Unbelievably Delicious: The combo of silky chocolate, sweet-tart berries, and a hint of vanilla is pure comfort food magic. Every bite is a little celebration.
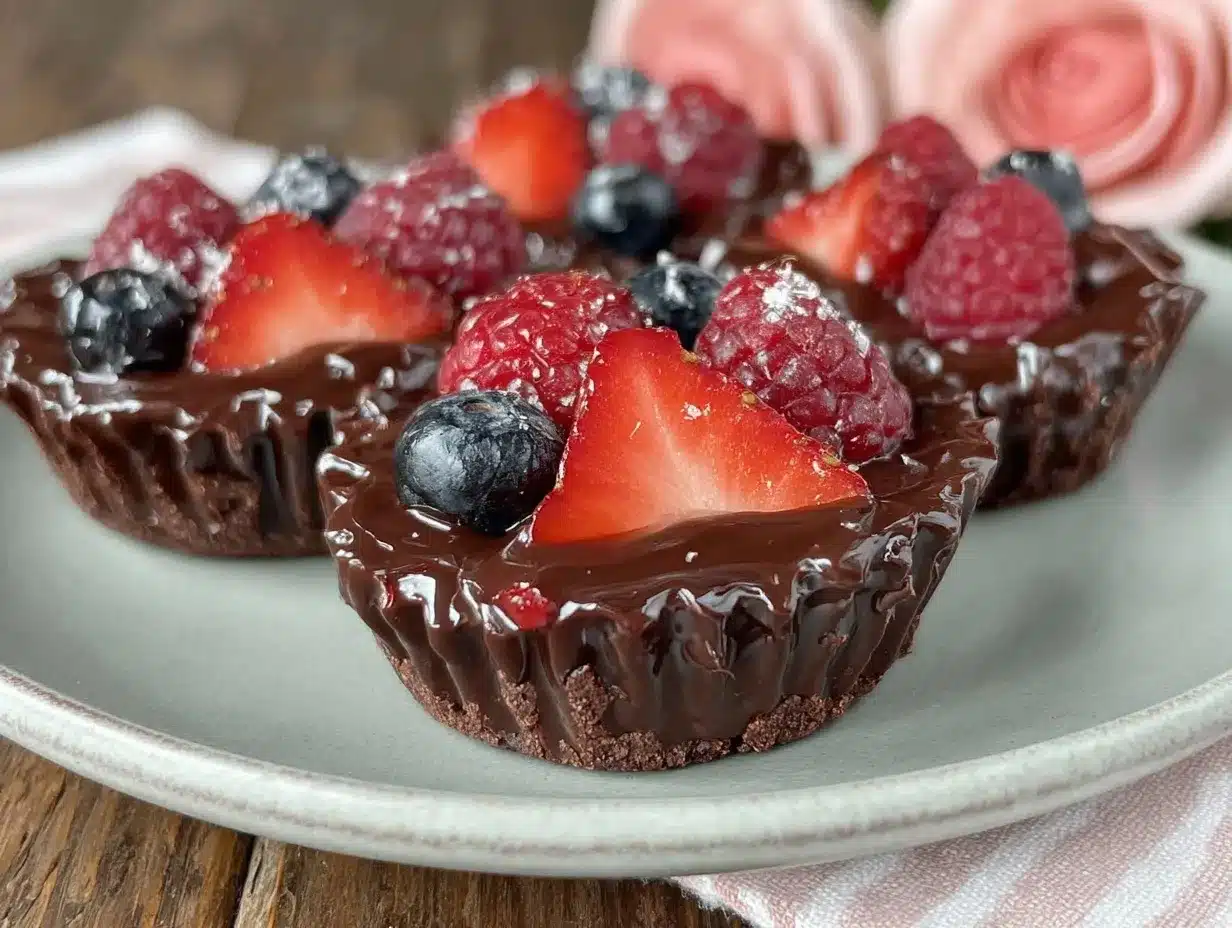
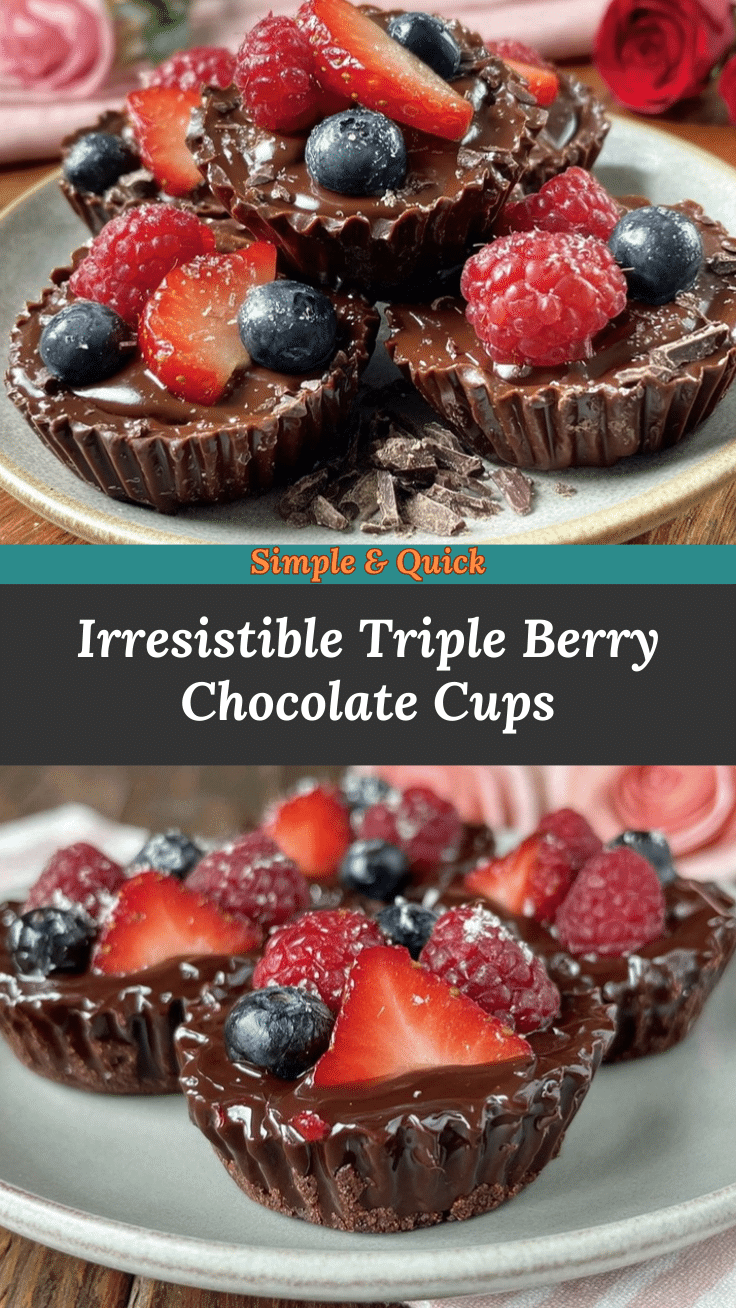
What sets this Triple Berry Chocolate Cups recipe apart? For starters, I use a blend of three berries—strawberries, raspberries, and blueberries—for a depth of flavor you don’t get with just one. The chocolate shell is made with real, high-quality chocolate (no candy melts here!), and a dash of vanilla brings everything together. I’ve tested all sorts of techniques, and this method gives you cups that are sturdy, snappy, and easy to unmold.
This isn’t just another chocolate-and-berry dessert. It’s the one that makes you linger over dessert, savoring every bite. It’s decadent but not heavy, sweet but balanced. You get that “oh wow” moment with the first taste—no stress, no fuss, just pure chocolatey joy. Whether you’re impressing someone special or just treating yourself (because let’s be honest, you deserve it), these berry chocolate cups deliver every time.
What Ingredients You Will Need
This recipe uses simple, wholesome ingredients to deliver bold flavor and satisfying texture—no fuss, no weird additives, just real food. Most of these are pantry staples, and the berries can be swapped based on what’s freshest or what you’ve got on hand.
- For the Chocolate Shell:
- 8 oz (225g) high-quality dark chocolate (60-70% cacao works beautifully; I like Ghirardelli or Lindt)
- 1 tbsp (15g) coconut oil (makes the chocolate easier to work with; use refined for a neutral taste)
- 1/2 tsp pure vanilla extract (adds warmth; optional but recommended)
- Pinch of sea salt (brings out the chocolate’s flavor)
- For the Triple Berry Filling:
- 1/2 cup (75g) fresh strawberries, diced small (for juiciness and color)
- 1/2 cup (60g) fresh raspberries, halved if large
- 1/2 cup (75g) fresh blueberries (adds a pop of sweetness)
- 1 tsp lemon zest (from about half a lemon, optional—adds brightness)
- 2 tsp honey or pure maple syrup (drizzle for extra sweetness; optional)
- For Garnish (Optional):
- Extra berries
- Shaved chocolate (use a vegetable peeler on a chocolate bar for curls)
- Dusting of powdered sugar
- Edible gold leaf or heart-shaped sprinkles (for a Valentine’s vibe)
Ingredient Notes & Substitutions:
- If you need these to be dairy-free, make sure your chocolate is vegan (Enjoy Life is a good brand).
- No coconut oil? Use a neutral oil like grapeseed or even melted butter (if dairy is okay).
- For a sweeter shell, use semi-sweet chocolate instead of dark. For extra rich, go for bittersweet.
- Frozen berries work in a pinch—just thaw and pat dry to avoid soggy cups.
- Swap honey for agave or skip it if your berries are super sweet.
- Try swapping in blackberries or pomegranate seeds for a seasonal twist.
Honestly, the beauty of these Triple Berry Chocolate Cups is their flexibility. Use what you have, and don’t stress if you’re missing an ingredient. I’ve made them with just strawberries and dark chocolate, and they’re still dreamy. It’s all about that crisp chocolate meets juicy berry magic!
Equipment Needed
- Microwave-safe bowl (for melting chocolate; a double boiler works too if you prefer more control)
- Silicone or paper cupcake liners (silicone makes unmolding a breeze, but sturdy paper works fine—just peel gently)
- Muffin tin (holds the liners steady while the chocolate sets)
- Spoon or pastry brush (for coating liners with chocolate—I’ve even used the back of a teaspoon in a pinch!)
- Small mixing bowl (for tossing berries with lemon zest and sweetener)
- Small offset spatula or butter knife (to help release cups from liners, if needed)
- Refrigerator space (you’ll need a flat spot to let your chocolate cups chill and set up)
Equipment Tips:
- If you don’t have a muffin tin, you can set the liners inside sturdy ramekins or even on a baking sheet, but be careful as they may spread a bit more.
- For budget-friendly tools, I’ve had great success with basic silicone cupcake molds from the dollar store—they clean up in a snap and last forever.
- To keep chocolate from seizing, make sure bowls and utensils are dry. A drop of water can be trouble!
- If you’re using paper liners, I recommend double-layering for extra sturdiness.
I’ve tried these with both silicone and paper liners—honestly, both work, but silicone is less fuss. Just wash them well with hot water and a little soap, and they’re good as new for next time.
Preparation Method
-
Prep Your Workspace (5 minutes):
Line a 12-cup muffin tin with silicone or sturdy paper liners. Make sure your berries are washed, dried, and prepped (dice strawberries, halve large raspberries). Set everything out—this goes quick once you start melting chocolate.
-
Melt the Chocolate (5 minutes):
Combine 8 oz (225g) chocolate and 1 tbsp (15g) coconut oil in a microwave-safe bowl. Microwave in 30-second bursts, stirring after each, until mostly melted (about 1–1.5 minutes total). Stir in 1/2 tsp vanilla and a pinch of sea salt. If using a double boiler, melt gently over simmering water. Troubleshooting tip: If chocolate looks grainy, add a little more coconut oil and stir until smooth.
-
Coat the Liners (10 minutes):
Spoon about 2 teaspoons of melted chocolate into each liner. Use the back of a spoon or a pastry brush to coat the bottom and up the sides about halfway. Work quickly, as chocolate sets fast. Tip: If chocolate thickens, zap it in the microwave for 10 seconds to loosen.
-
Chill the Shells (10 minutes):
Pop the muffin tin in the fridge for 10 minutes, or until the chocolate is set and firm to the touch. If you’re in a rush, the freezer works in half the time!
-
Prepare the Berry Filling (5 minutes):
In a small bowl, gently toss 1/2 cup each of diced strawberries, raspberries, and blueberries with 1 tsp lemon zest and 2 tsp honey (if using). You want the berries coated but not soggy. Important: Pat berries dry with a paper towel if they’re very juicy—liquid will break the chocolate shell.
-
Fill and Top Off (10 minutes):
Spoon a generous tablespoon of berry mix into each chocolate cup. Top with a little extra chocolate (about 1–2 teaspoons) to seal the berries in. Smooth the tops with a spatula or back of a spoon. Note: Don’t overfill with berries—leave a little room for the top shell to close.
-
Chill Until Set (15–20 minutes):
Return the tin to the fridge for at least 15 minutes, or until fully set. The cups should pop out of the liners with a gentle push. If they stick, run a butter knife around the edge.
-
Garnish and Serve:
Once set, top with extra berries, a dusting of powdered sugar, or a sprinkle of chocolate curls. Serve cold or let sit at room temperature for 5 minutes for a softer bite. Warning: On a hot day, keep these chilled until the last minute—they melt fast!
Efficiency Tip: Melt your chocolate while the berries dry, and use assembly-line style: coat, chill, fill, top, chill. It feels like a lot of steps, but each one is quick. Taste-testing along the way is strongly encouraged (for science, of course).
Cooking Tips & Techniques
- Use Good Chocolate: Trust me, the chocolate makes or breaks this recipe. Cheap chips can taste waxy or too sweet. Go for a bar you’d snack on plain—it’s worth it.
- Dry Berries Thoroughly: Water is chocolate’s enemy! After washing your berries, let them air-dry, then gently pat them with a paper towel. This keeps your shells crisp and prevents cracks.
- Don’t Overheat the Chocolate: Chocolate scorches fast in the microwave. Use short bursts and stir well. If it seizes, a splash more coconut oil can save it.
- Layer for Strength: If you want extra sturdy cups, use two coats of chocolate: brush the first, chill, then do a second. This is handy if you’re packing these for gifts or travel.
- Work Fast: Once the chocolate is melted, move quickly. If it starts to set, just warm it briefly again. Having all your fillings prepped makes this smooth sailing.
- Don’t Overfill: I’ve learned the hard way—if you mound the berries too high, the chocolate won’t seal and the cups will leak. A heaping tablespoon is just right.
- Room Temperature for Serving: These taste best slightly chilled but not ice-cold. Let them sit out for 5–10 minutes before eating for the perfect texture.
I’ve messed up a batch or two by rushing through or skipping the drying step—don’t be like me, take the time to pat those berries dry! And if your chocolate cups look a bit rustic, that’s okay. A little imperfection says homemade, and honestly, no one’s going to complain when there’s chocolate and berries involved.
Variations & Adaptations
- Gluten-Free: This recipe is naturally gluten-free, just double-check your chocolate for hidden additives. For extra crunch, try a sprinkle of gluten-free granola under the berries.
- Dairy-Free/Vegan: Use vegan chocolate and swap honey for maple syrup or agave. Coconut oil keeps the shell smooth without dairy.
- Nutty Crunch: Add a layer of chopped toasted almonds, pistachios, or hazelnuts with the berries. I’ve tried this with hazelnuts and wow—it’s like a homemade Ferrero Rocher, but fresher.
- White Chocolate Shell: Use white chocolate for a sweeter, creamier shell. It’s great with tart raspberries and a little orange zest.
- Seasonal Swaps: In summer, swap in blackberries or sliced cherries. In winter, dried cranberries or apricots work in a pinch—just chop small and soak in a bit of juice first.
- Alcohol-Infused: For an adult twist, toss the berries with a splash of Chambord (raspberry liqueur) or Grand Marnier before filling. Just a touch adds a special zing.
- Peanut Butter Lovers: Add a teaspoon of peanut butter or almond butter under the berries before sealing with chocolate. My kids adore this version!
Honestly, I’ve played around with all sorts of combos—my personal favorite is dark chocolate, raspberry, and pistachio for a salty-sweet pop. Don’t be afraid to get creative, and let your cravings be your guide. The base method works with almost any flavor combo you dream up!
Serving & Storage Suggestions
These Triple Berry Chocolate Cups are best served slightly chilled, with the chocolate just soft enough to give way under your teeth, but still snappy. Arrange them on a pretty platter, sprinkle with a little extra powdered sugar or chocolate curls, and toss a few fresh berries around for that “wow” factor. For a romantic night in, pair with a glass of sparkling rosé or hot coffee—the chocolate and berry flavors really shine.
Leftovers (if you manage to have any!) will keep in an airtight container in the refrigerator for up to 3 days. Lay parchment paper between layers to prevent sticking. For longer storage, freeze the cups; they’ll keep well for up to a month. To serve from frozen, let them thaw in the fridge for a few hours, or on the counter for about 20 minutes.
Reheating isn’t really needed, but if the chocolate gets too hard from the fridge, a minute or two at room temperature will bring them back to the perfect bite. Over time, the berry juices can soften the chocolate shell a bit—honestly, I love them even more on day two, when the flavors have mingled and mellowed. Just be sure to keep them cold, especially on warm days, or you’ll have a (delicious) mess on your hands!
Nutritional Information & Benefits
Each Triple Berry Chocolate Cup (assuming 12 servings) contains roughly:
- Calories: 110
- Fat: 6g (mostly heart-healthy fats from dark chocolate and coconut oil)
- Sugar: 9g (mainly from berries and chocolate; lower if you skip added honey)
- Fiber: 2g
- Protein: 1g
Berries are packed with antioxidants, vitamin C, and fiber, which makes this dessert a little bit of a guilt-free treat. Dark chocolate is loaded with flavonoids and can even give your mood a boost (I call it “instant happiness food”). This recipe is naturally gluten-free, and you can make it dairy-free or vegan with easy swaps.
Allergens to watch for: chocolate can sometimes contain traces of dairy or nuts, so check your labels if there are allergies in your household. From a wellness perspective, these are a smart choice for a sweet treat—satisfying, portion-controlled, and full of real ingredients. As always, moderation is key (but you might find it hard to stop at just one!).
Conclusion
There’s a reason these Triple Berry Chocolate Cups have become our go-to Valentine’s dessert—they’re quick, easy, and deliver a punch of chocolatey, berry-filled happiness in every bite. Whether you stick to the classic combo or try one of the fun variations, you’re in for a treat that’s as lovely to look at as it is to eat.
Don’t be afraid to make these your own—swap in your favorite berries, try a nutty twist, or get creative with garnishes. Honestly, I love these because they’re a little fancy without being fussy, and every time I make them, they remind me that the best desserts are the ones you share with people you love.
Give this recipe a try, and let me know how it turns out! Drop a comment below with your favorite berry combos, share your creations with friends, or pin this for your next cozy night in. Here’s to sweet moments, big smiles, and the magic of chocolate and berries. Happy Valentine’s Day!
Frequently Asked Questions About Triple Berry Chocolate Cups
Can I make these Triple Berry Chocolate Cups ahead of time?
Yes! You can prepare them up to two days in advance. Just store them in the fridge in an airtight container. They’ll stay fresh and delicious—perfect for prepping before your big night.
What’s the best chocolate to use for this recipe?
I recommend a high-quality dark or semi-sweet chocolate bar (like Ghirardelli or Lindt). Avoid chocolate chips if you can, since bars melt smoother and taste richer.
Can I use frozen berries instead of fresh?
Absolutely. Thaw the berries completely and pat them dry with paper towels to avoid extra moisture, which can make the chocolate shell crack.
Are these cups suitable for people with nut allergies?
The base recipe is nut-free, but always check your chocolate for “may contain” warnings. Avoid adding nuts or nut butters for strict allergies.
How do I get the chocolate cups out of the liners without breaking them?
If using silicone liners, just push gently from the bottom and they’ll pop out. For paper liners, peel slowly and carefully. If the chocolate sticks, let them warm up at room temperature for a few minutes first.
Pin This Recipe!

Triple Berry Chocolate Cups
- Total Time: 30 minutes
- Yield: 12 cups 1x
Description
These Triple Berry Chocolate Cups feature a crisp dark chocolate shell filled with a medley of fresh strawberries, raspberries, and blueberries. They’re quick, easy, and perfect for Valentine’s Day, date nights, or any time you crave a decadent yet simple dessert.
Ingredients
- 8 oz high-quality dark chocolate (60-70% cacao, such as Ghirardelli or Lindt)
- 1 tbsp coconut oil (refined for neutral taste, or substitute neutral oil or melted butter)
- 1/2 tsp pure vanilla extract (optional, recommended)
- Pinch of sea salt
- 1/2 cup fresh strawberries, diced small
- 1/2 cup fresh raspberries, halved if large
- 1/2 cup fresh blueberries
- 1 tsp lemon zest (optional)
- 2 tsp honey or pure maple syrup (optional, for extra sweetness)
- Extra berries (for garnish, optional)
- Shaved chocolate (for garnish, optional)
- Powdered sugar (for garnish, optional)
- Edible gold leaf or heart-shaped sprinkles (for garnish, optional)
Instructions
- Line a 12-cup muffin tin with silicone or sturdy paper liners. Wash, dry, and prep berries (dice strawberries, halve large raspberries).
- Combine chocolate and coconut oil in a microwave-safe bowl. Microwave in 30-second bursts, stirring after each, until mostly melted (about 1–1.5 minutes total). Stir in vanilla and sea salt.
- Spoon about 2 teaspoons of melted chocolate into each liner. Use the back of a spoon or a pastry brush to coat the bottom and sides about halfway up. If chocolate thickens, microwave for 10 seconds to loosen.
- Refrigerate the muffin tin for 10 minutes, or until the chocolate is set and firm. (Freezer works in half the time.)
- In a small bowl, gently toss strawberries, raspberries, and blueberries with lemon zest and honey or maple syrup (if using). Pat berries dry with a paper towel if very juicy.
- Spoon a generous tablespoon of berry mix into each chocolate cup. Top with 1–2 teaspoons of melted chocolate to seal the berries in. Smooth the tops with a spatula or back of a spoon.
- Return the tin to the fridge for at least 15 minutes, or until fully set. Remove cups from liners; if they stick, run a butter knife around the edge.
- Garnish with extra berries, powdered sugar, or chocolate curls as desired. Serve cold or let sit at room temperature for 5 minutes for a softer bite.
Notes
For best results, use high-quality chocolate and dry berries thoroughly before assembling. Double-coat the chocolate shell for extra sturdiness if gifting or transporting. These cups are naturally gluten-free and can be made dairy-free/vegan with vegan chocolate and maple syrup. Store in the fridge for up to 3 days or freeze for up to a month.
- Prep Time: 15 minutes
- Cook Time: 10 minutes
- Category: Dessert
- Cuisine: American
Nutrition
- Serving Size: 1 chocolate cup
- Calories: 110
- Sugar: 9
- Sodium: 10
- Fat: 6
- Saturated Fat: 4
- Carbohydrates: 13
- Fiber: 2
- Protein: 1
Keywords: chocolate cups, triple berry dessert, Valentine’s Day, date night dessert, easy chocolate recipe, gluten-free dessert, berry chocolate cups
