
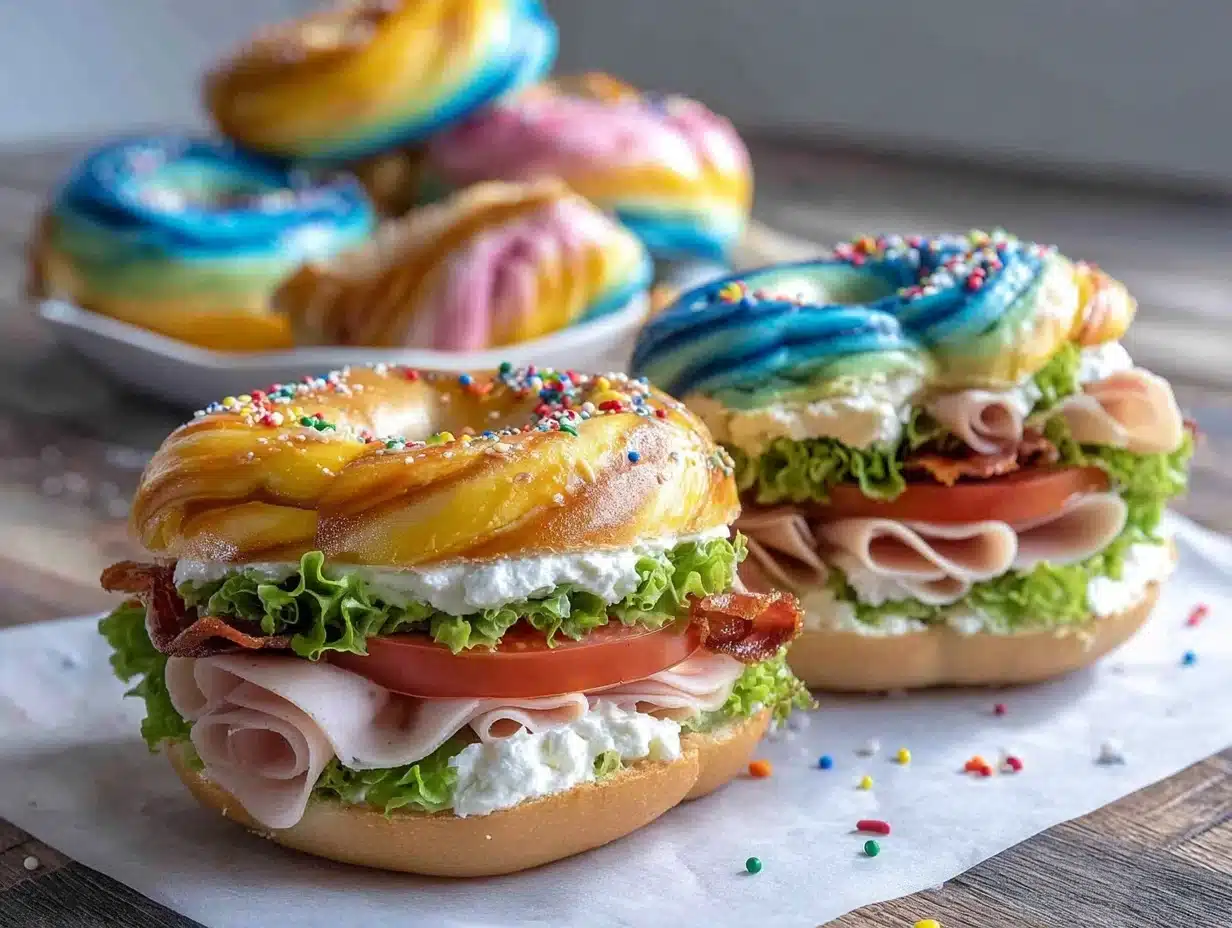
Let me set the scene: you open your lunchbox and, instead of the usual plain bagel, there’s a swirl of dazzling colors—vivid reds, bright blues, cheerful yellows, maybe even a pop of green—all twisted together in a bagel that looks straight out of a Dr. Seuss storybook. The scent of freshly baked bread mingles with a hint of cream cheese and crunchy veggies. Honestly, just looking at these Dr. Seuss Color Swirl Bagel Sandwiches makes me smile every single time. There’s something about food that’s playful and bold that brings out the kid in all of us—even when you’re not knee-high to a grasshopper anymore.
The first time I made these, I’ll never forget the look on my niece’s face—her eyes lit up like she’d just found a golden ticket. It was a rainy Saturday, and I’d promised her a “Seussical surprise” for lunch. I’d been itching to try swirling bagel dough with food coloring ever since I saw a viral photo online, and, well, we went all in. Kneading those colors together, giggling as our hands got messy, was one of those moments where you pause, take a deep breath, and just savor the simple joy of making something new (and a little bit silly) together.
These color swirl bagels are now a staple for birthdays, class parties, and “just because” days. My family can’t resist sneaking tastes—sometimes the bagels barely make it off the cooling rack! And I get texts from friends asking for “the magic bagel recipe” every time I post a lunchbox photo online. They’re dangerously easy to customize, and there’s pure, nostalgic comfort in every bite. Whether you need to brighten up a playdate, jazz up your Pinterest board, or just treat yourself to a little whimsy, these bagels deliver every time. I’ve tested this recipe more times than I can count (in the name of research, of course), and it’s earned a permanent spot in our lunch rotation. You’re going to want to bookmark this one—it’s a warm hug in technicolor bread!
Why You’ll Love These Dr. Seuss Color Swirl Bagel Sandwiches
I’ve been baking and packing lunches for years, and let me tell you—these Dr. Seuss Color Swirl Bagel Sandwiches are a certified crowd-pleaser. After plenty of kitchen experiments (and a few “well, that’s a learning experience” moments), here’s what makes this recipe shine:
- Quick & Easy: From mixing dough to slicing sandwiches, these bagels come together in well under two hours (with time to let the dough rise and colors work their magic). Perfect for busy mornings or spontaneous brunches.
- Simple Ingredients: There’s no wild ingredient list here. Most of what you need is probably already in your pantry—yeast, flour, sugar, and a little food coloring for the fun factor.
- Perfect for Parties: Imagine serving these at a birthday bash, Dr. Seuss-themed classroom party, or as a silly surprise for your kids’ lunch boxes. The “wow” factor is real.
- Crowd-Pleaser: Kids are obsessed with the colors, and adults love the soft, chewy texture. My husband, who’s usually all about “plain and simple,” even asks for these by name.
- Unbelievably Delicious: It’s not just about the looks! The slight sweetness of the dough, the classic chewy bagel crust, and the endless sandwich fillings make for a lunch that’s as tasty as it is fun.
What sets these bagels apart? For one, the swirling technique is pretty much foolproof. You don’t need fancy equipment—just a couple of bowls and a little patience. The colors don’t bleed or fade in baking, so you get those bold Seussian stripes every time. And the bagel dough itself? It’s soft, springy, and not overly dense, so it’s easy for little mouths to chew.
Honestly, this recipe is more than just a meal—it’s an experience. It’s the kind of lunch that makes you pause after the first bite and think, “Wow, that’s something special.” Whether you’re trying to impress picky eaters, add a pop of fun to your lunch rotation, or just put a smile on someone’s face, these color swirl bagel sandwiches are the answer. I’ve tested and tweaked this recipe so you don’t have to, and I can promise: once you try it, you’ll never look at regular bagels the same way again.
What Ingredients You Will Need
This Dr. Seuss Color Swirl Bagel Sandwich recipe uses everyday ingredients, but the way they come together is pure magic. Most of these are pantry staples—no wild goose chases required. Here’s what you’ll need:
For the Bagel Dough
- 4 cups (480g) bread flour (King Arthur or Bob’s Red Mill give the best chew)
- 2 teaspoons (7g) instant yeast
- 1 ½ teaspoons (9g) kosher salt
- 1 ½ tablespoons (18g) granulated sugar
- 1 ¼ cups (300ml) warm water (about 110°F/43°C)
- 1 tablespoon (15ml) neutral oil (like canola or vegetable, for extra softness)
For the Color Swirl
- Gel food coloring (red, blue, yellow, green—Americolor or Wilton work best for bold shades)
- Plastic gloves (optional, but saves your hands from a rainbow makeover!)
For Boiling
- 8 cups (2L) water
- 2 tablespoons (28g) honey or brown sugar (adds shine and a hint of sweetness to the crust)
For the Sandwich Fillings (choose your favorites!)
- Whipped cream cheese (plain, or try strawberry for a Seuss-style twist)
- Sliced turkey or ham
- Cheddar or provolone cheese
- Lettuce, cucumber, tomato, sprouts (fresh and crunchy!)
- Rainbow sprinkles (for a sweet breakfast version—why not?)
Ingredient Tips: For the flour, bread flour really does give the best chewy texture, but all-purpose works in a pinch (the bagels will just be a bit softer). If you’re coloring the dough, stick with gel food coloring—liquid will water things down and mute the hues. Want dairy-free? Use vegan cream cheese and skip the cheese slices.
Honestly, don’t overthink the fillings. The joy here is in the color and the mix-and-match fun. I’ve even done PB&J on these for a wild after-school snack. The only must? Have fun with it—Dr. Seuss would approve!
Equipment Needed
You don’t need a professional bakery setup to pull off these Dr. Seuss Color Swirl Bagel Sandwiches. Here’s what I use:
- Large mixing bowl (or a stand mixer with a dough hook—makes things easier if you have one)
- Plastic wrap or a clean kitchen towel (for covering the dough as it rises)
- Baking sheet (lined with parchment for easy cleanup)
- Food-safe gloves (optional, for kneading in color—saves on scrubbing hands afterward!)
- Small bowls for mixing each color of dough
- Pot (large enough to boil 3-4 bagels at once)
- Slotted spoon (for lifting bagels out of the water)
- Sharp knife or bagel slicer
- Cooling rack (not a must, but helps keep bagels from getting soggy bottoms)
I’ve made these with nothing more than a big bowl and my hands, but a stand mixer helps if you’re doing a double batch. If you don’t have a bagel slicer, just use a serrated bread knife—safer for little helpers, too. Cleanup tip: if you’re not using gloves for the food coloring, a little lemon juice rubbed on your hands helps lift any stains. And if you need a budget solution, most supplies can be found at any big-box store or dollar store—no need for fancy gadgets!
How to Make Dr. Seuss Color Swirl Bagel Sandwiches
- Mix the Dough: In a large bowl, combine 4 cups (480g) bread flour, 2 teaspoons (7g) instant yeast, 1 ½ teaspoons (9g) kosher salt, and 1 ½ tablespoons (18g) sugar. Stir gently. Pour in 1 ¼ cups (300ml) warm water and 1 tablespoon (15ml) oil. Mix until a shaggy dough forms, then knead (by hand or mixer) for 8-10 minutes, until smooth and elastic. If the dough sticks, sprinkle in a bit more flour (1 tablespoon at a time).
- Divide and Color: Cut your dough into 3 or 4 pieces (depending on how many colors you want). Place each piece in a separate bowl. Add a few drops of gel food coloring to each and knead until fully incorporated (wear gloves if you want to avoid rainbow palms). The dough should be vibrant—don’t be shy with the color! If you see streaks, knead a bit more.
- First Rise: Shape each colored dough into a ball, cover bowls with plastic wrap or a towel, and let rise in a warm spot for 45 minutes to 1 hour, or until doubled in size. It’s okay if one dough rises faster than the others—just wait until all are puffy.
- Shape the Swirls: Roll each colored dough ball into a long rope (about 12 inches/30 cm). Lay the ropes side by side and gently twist them together. Coil into a circle and pinch the ends closed, tucking under to secure. Use your fingers to gently widen the hole in the middle—bagels shrink as they rise, so bigger is better here!
- Second Rise: Place shaped bagels on a parchment-lined baking sheet. Cover with a towel and let rest for 15-20 minutes. They’ll puff up just a bit more.
- Boil the Bagels: Bring 8 cups (2L) water to a boil in a large pot. Stir in 2 tablespoons (28g) honey or brown sugar. Carefully drop 2-3 bagels at a time into the boiling water. Boil for 30 seconds on each side (they should float—if not, nudge them gently). Use a slotted spoon to transfer bagels back to the baking sheet.
- Bake: Preheat oven to 425°F (220°C). Bake bagels for 20-22 minutes, or until glossy and just golden at the edges. The colors will stay bright—if the tops brown too quickly, tent loosely with foil.
- Cool and Slice: Let bagels cool on a rack for at least 10 minutes before slicing. Warm bagels are extra soft—wait for best results!
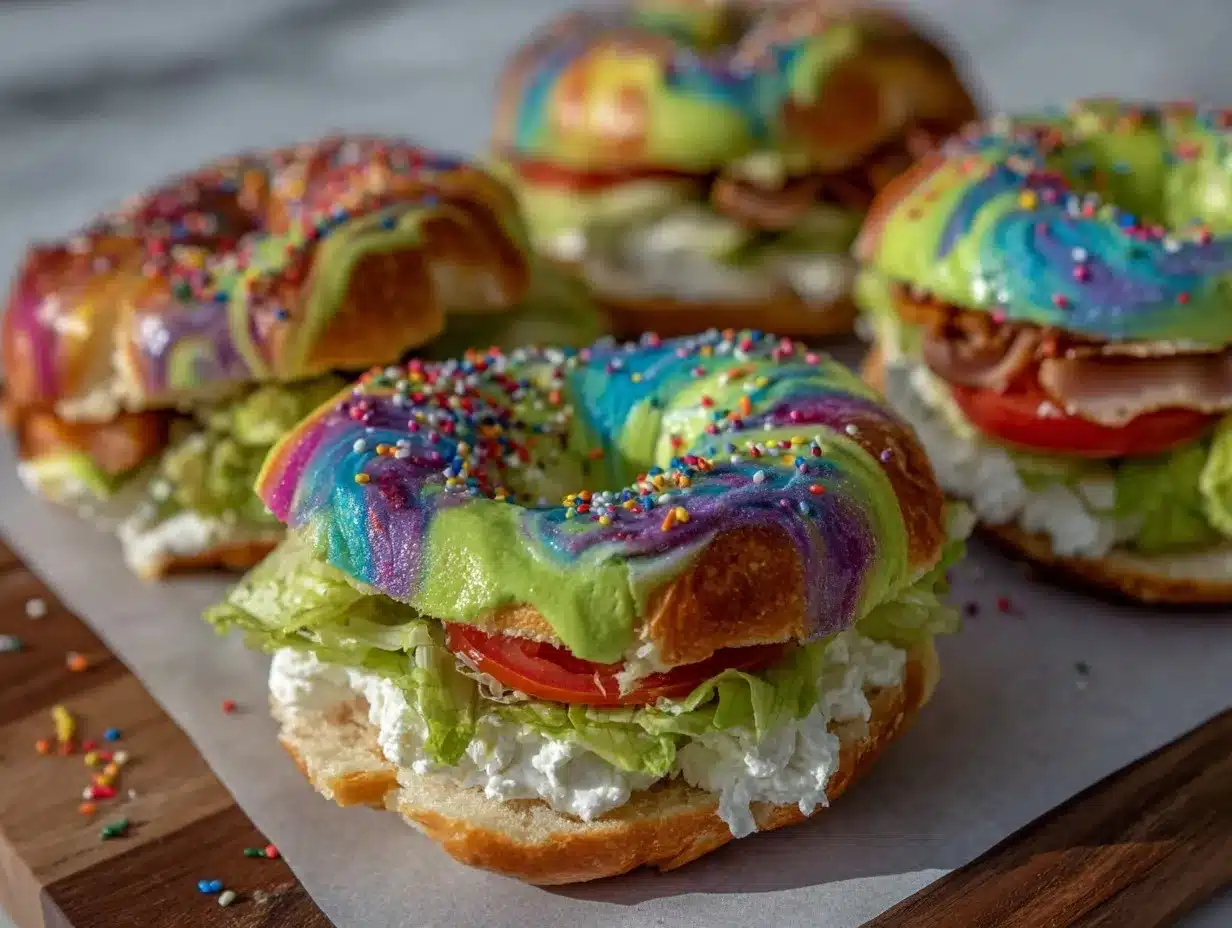
- Make Sandwiches: Slice cooled bagels in half. Spread with cream cheese, layer on turkey, cheese, crunchy veggies, or your favorite fillings. For sweet versions, try whipped cream cheese and rainbow sprinkles.
Troubleshooting: If your dough is too sticky, add flour a tablespoon at a time. If it’s dry, add water by the teaspoon. If your bagels sink in the water, let them rise a bit longer before boiling. And if the colors look dull after baking, you probably need more food coloring next time (don’t worry, it happens!).
Personal Tips: I like to prep my colors ahead of time and let kids help twist the ropes—it’s messy, but the giggles are worth it. And don’t be afraid to go bold with the swirls—more color means more fun at lunchtime!
Cooking Tips & Techniques
I’ve picked up a few handy tricks while making Dr. Seuss Color Swirl Bagel Sandwiches again and again. Here’s what I wish someone had told me the first time:
- Use Gel Food Coloring: Liquid coloring will water down your dough and give you pastel shades. Gel is thicker, more vibrant, and won’t mess with your dough’s texture.
- Don’t Over-Knead After Coloring: Once the color is mostly incorporated, stop kneading. Overworking makes bagels tough and can muddy the colors.
- Let the Dough Rest: If it gets too elastic and fights back when you try to roll ropes, let it rest for 5 minutes. This relaxes the gluten and makes shaping easier.
- Boiling is Key: That quick dip in honey water gives bagels their signature chewy crust and shiny finish. Don’t skip this step—even if you’re tempted!
- Don’t Crowd the Pot: Boil bagels in batches. If you cram too many in at once, they’ll stick and lose their shape.
- Bake Until Just Golden: Too much browning will dull those beautiful Seussian colors. Keep an eye on the oven, and tent with foil if needed.
- Let Bagels Cool Before Slicing: Hot bagels are soft and squishy. Wait 10-15 minutes for the best, cleanest slices.
I remember the first time I rushed the boiling and ended up with lumpy, faded bagels—so now I set a timer and only do a couple at a time. And if you want extra-swirly bagels, you can twist the ropes more than once before shaping. Don’t be afraid to let kids “help”—their wild twisting usually makes the best patterns! Finally, for easy lunch prep, you can make and freeze the bagels ahead of time—just pop them in the toaster to refresh before assembling sandwiches.
Variations & Adaptations
One of the best things about Dr. Seuss Color Swirl Bagel Sandwiches is how easy they are to customize. Here are a few of my favorite riffs:
- Gluten-Free Swirl Bagels: Substitute a 1:1 gluten-free baking flour (like Bob’s Red Mill) for the bread flour. The texture is a bit softer, but the colors and flavor are still spot-on.
- Vegan Version: Use non-dairy cream cheese (like Kite Hill or Tofutti) and skip the cheese slices or use a plant-based cheese. Swap honey in the boiling water for maple syrup.
- Seasonal Colors: Try orange and black for Halloween, red and green for Christmas, or pastels for spring. The technique works with any color combo—just match to your theme!
- Flavor Swirls: Mix a little cinnamon and cocoa powder into one dough piece for a marble effect, or add freeze-dried strawberry powder for a fruity pink swirl.
- Allergy Friendly: For nut allergies, stick to classic fillings like turkey, cucumber, and dairy cheese. For egg-free, don’t worry—this bagel dough is already eggless.
Personally, I love making a “rainbow garden” version with spinach, shredded carrots, and bell peppers tucked inside. It’s a fun way to sneak in veggies—and my kids eat every bite. Don’t be afraid to experiment; you might just stumble on your own signature swirl sandwich!
Serving & Storage Suggestions
These Dr. Seuss Color Swirl Bagel Sandwiches are best served fresh, at room temperature or lightly toasted. The colors are most vibrant the day they’re made, but they still look magical the next day!
- Presentation: Stack halves on a platter for a rainbow effect, or wrap sandwiches in wax paper for grab-and-go lunches. Add a Seussian toothpick flag for bonus smiles.
- Pairings: These go great with fruit kabobs, crunchy veggie sticks, or a fun smoothie. For a brunch spread, serve with scrambled eggs and yogurt parfaits.
- Storage: Store plain, cooled bagels in an airtight bag at room temperature for up to 2 days. For longer storage, freeze in a zip-top bag for up to 2 months. Thaw at room temp or toast straight from the freezer.
- Assembled Sandwiches: If you’re making lunchboxes ahead, keep fillings like lettuce and tomato separate and add just before eating to prevent sogginess.
- Flavor Note: The colors won’t bleed, but the bagels do dry out faster than store-bought. A quick toast brings them right back to life the next day!
Honestly, these bagels are meant to be seen—don’t hide them under a lid. Show them off on a big, colorful platter or tuck one in a bright lunchbox for the ultimate midday surprise.
Nutritional Information & Benefits
Each Dr. Seuss Color Swirl Bagel (plain, without fillings) has about 220 calories, 1g fat, 46g carbs, and 7g protein. Add cream cheese and deli meats for more protein and healthy fats, or stick with veggies for a lighter option.
Health Highlights: These bagels are made with simple, real ingredients—no preservatives or mystery additives. You control the fillings, so you can keep things as wholesome (or silly) as you like. For a higher-fiber version, swap 1 cup of bread flour for whole wheat. The recipe is naturally nut- and egg-free, and can easily be made dairy-free or gluten-free as noted above.
Keep in mind: food coloring is for fun, and there are natural options if you prefer (like beet or turmeric powder). As always, check ingredient labels if you’re baking for allergies. For me, these sandwiches are all about balance—a little fun, a little comfort, and a whole lot of color on your plate!
Conclusion
If you’re looking for a lunch that’s as joyful as it is delicious, these Dr. Seuss Color Swirl Bagel Sandwiches are an absolute must-try. They’re easy enough for a lazy Saturday, special enough for a party, and guaranteed to spark smiles—no matter your age. I love how they bring my family together (and turn ordinary lunches into something memorable).
Don’t be afraid to make them your own—try new colors, experiment with fillings, and have fun in the kitchen. There’s no “right” way to swirl! If you give these a whirl, let me know in the comments below—share your wildest color combos, or tag me with your creations. I can’t wait to see how you Seuss up your lunch routine.
So go ahead—grab your flour, roll up your sleeves, and make lunch a little more whimsical. You’ll be glad you did (and your lunchbox will thank you)!
Frequently Asked Questions
How do I keep the colors from blending into brown?
Use gel food coloring for bold, distinct colors. When twisting dough ropes, stop before the colors fully blend. Less kneading after adding color keeps the stripes bright and separate—just like in a Seuss book!
Can I make these bagels ahead of time?
Absolutely! Bake them a day in advance and store in an airtight bag at room temperature, or freeze for up to two months. Just toast before assembling your sandwiches for that fresh-baked taste.
Is there a way to make these without artificial food coloring?
Yes! Try natural color powders like beet (red), turmeric (yellow), spirulina (green), and blueberry (blue). The colors are a bit softer but still fun and safe for little ones.
What fillings work best for picky eaters?
Stick with classics like cream cheese, turkey, or plain cheddar. For extra fun, add cucumber slices or carrot shreds—they blend right in with the colorful theme and are easy to eat!
Can I use all-purpose flour instead of bread flour?
You can. The bagels will turn out a bit softer and less chewy, but they’ll still taste delicious and hold their shape for your sandwiches.
Pin This Recipe!

Dr. Seuss Color Swirl Bagel Sandwiches
- Total Time: 1 hour 45 minutes
- Yield: 8 bagels (8 sandwiches) 1x
Description
These whimsical, homemade bagels feature vibrant swirls of color and a classic chewy texture, perfect for fun lunches, parties, or a playful twist on your sandwich routine. Easy to customize with your favorite fillings, they’re a guaranteed crowd-pleaser for kids and adults alike.
Ingredients
- 4 cups bread flour (or all-purpose flour for a softer bagel)
- 2 teaspoons instant yeast
- 1 1/2 teaspoons kosher salt
- 1 1/2 tablespoons granulated sugar
- 1 1/4 cups warm water (about 110°F)
- 1 tablespoon neutral oil (canola or vegetable)
- Gel food coloring (red, blue, yellow, green)
- Plastic gloves (optional, for kneading in color)
- 8 cups water
- 2 tablespoons honey or brown sugar
- Whipped cream cheese (plain or flavored)
- Sliced turkey or ham
- Cheddar or provolone cheese
- Lettuce, cucumber, tomato, sprouts
- Rainbow sprinkles (optional, for sweet version)
Instructions
- In a large bowl, combine bread flour, instant yeast, kosher salt, and sugar. Stir gently.
- Pour in warm water and oil. Mix until a shaggy dough forms, then knead by hand or mixer for 8-10 minutes until smooth and elastic. Add more flour if dough is sticky.
- Divide dough into 3 or 4 pieces (depending on number of colors). Place each piece in a separate bowl. Add a few drops of gel food coloring to each and knead until fully incorporated (wear gloves if desired).
- Shape each colored dough into a ball, cover bowls with plastic wrap or towel, and let rise in a warm spot for 45-60 minutes, until doubled in size.
- Roll each colored dough ball into a long rope (about 12 inches). Lay ropes side by side and gently twist together. Coil into a circle and pinch ends closed, tucking under to secure. Widen the hole in the middle.
- Place shaped bagels on a parchment-lined baking sheet. Cover with a towel and let rest for 15-20 minutes.
- Bring 8 cups water to a boil in a large pot. Stir in honey or brown sugar. Carefully drop 2-3 bagels at a time into boiling water. Boil for 30 seconds on each side. Use a slotted spoon to transfer bagels back to the baking sheet.
- Preheat oven to 425°F. Bake bagels for 20-22 minutes, or until glossy and just golden at the edges. Tent with foil if tops brown too quickly.
- Let bagels cool on a rack for at least 10 minutes before slicing.
- Slice cooled bagels in half. Spread with cream cheese, layer on turkey, cheese, veggies, or your favorite fillings. For sweet versions, try whipped cream cheese and rainbow sprinkles.
Notes
Use gel food coloring for the brightest colors. Don’t over-knead after adding color to keep swirls distinct. Let dough rest if it’s too elastic. Boil bagels in batches for best shape. Bagels can be made ahead and frozen. For gluten-free, use 1:1 gluten-free flour; for vegan, use non-dairy cream cheese and cheese, and swap honey for maple syrup.
- Prep Time: 30 minutes
- Cook Time: 22 minutes
- Category: Lunch
- Cuisine: American
Nutrition
- Serving Size: 1 bagel sandwich
- Calories: 220
- Sugar: 4
- Sodium: 350
- Fat: 1
- Carbohydrates: 46
- Fiber: 2
- Protein: 7
Keywords: color swirl bagels, Dr. Seuss lunch, rainbow bagel sandwiches, fun kids lunch, homemade bagels, party food, Seuss birthday, colorful sandwich, easy bagel recipe
