

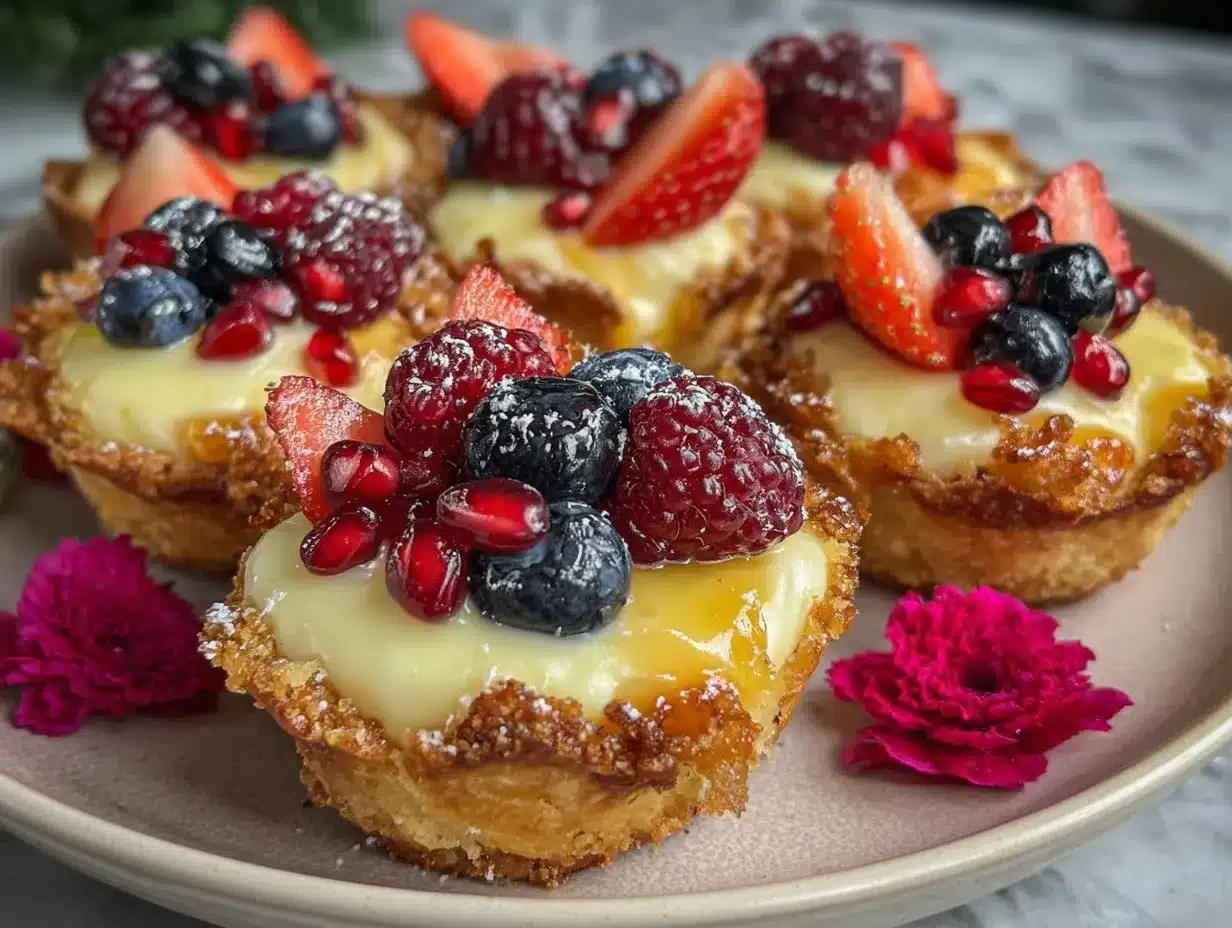
Picture this: the delicate crackle as you bite into a buttery tart shell, the cool rush of vanilla cream melting on your tongue, and a burst of sweet-tart fruit all in one perfect mouthful. The first time I assembled my Creamy Galentine’s Mini Fruit Tart Board, the kitchen was filled with that unmistakable aroma of freshly baked pastry mingling with ripe strawberries and juicy kiwi—it was pure, happy chaos. I remember pausing amid the giggles of my best friends, dusting a bit of flour off my cheek, and just soaking in the moment. There’s something about the combination of crisp shells, luscious filling, and vibrant fruit that feels like a celebration right on your taste buds.
Honestly, I stumbled upon this idea when I was knee-high to a grasshopper, helping my grandma prep for her legendary “ladies’ teas.” Years later, I wanted to recreate that magic for Galentine’s Day—because, let’s face it, nothing says “I love you, gal pals” like a board brimming with colorful, creamy mini fruit tarts. If I’d figured out how easy these are to throw together back in college, they’d have been my go-to for every potluck and study session. Now, they’re a staple for every Galentine’s brunch and a guaranteed hit at any festive gathering (trust me, not a single tart ever survives the party!).
My friends can’t resist sneaking these off the board—even before I’ve finished the final drizzle of glaze. There’s always that “just one more” moment. These tarts are dangerously easy to customize, ridiculously cute for your Pinterest board, and deliver pure, nostalgic comfort with every bite. Whether you’re hosting a crowd or just treating yourself, this Creamy Mini Fruit Tart Board is the kind of recipe that feels like a warm hug. I’ve tested (and taste-tested!) every single component, in the name of research, of course. You’re going to want to bookmark this one—it’s dessert magic, made for sharing.
Why You’ll Love This Creamy Galentine’s Mini Fruit Tart Board
Years of recipe testing and hosting have taught me: the best dishes are the ones that make everyone light up before the first bite. This Creamy Mini Fruit Tart Board checks all the boxes and then some! Here’s why you’ll fall in love:
- Quick & Easy: These mini tarts come together in under 45 minutes—no complicated steps, no chilling overnight, and definitely no pastry chef skills required. Perfect for spontaneous Galentine’s Day gatherings or a last-minute treat.
- Simple Ingredients: You probably have almost everything on hand. Basic pantry staples for the shells, a dreamy cream filling, and your favorite fruit make this a no-fuss wonder.
- Perfect for Galentine’s Day: The vibrant colors and customizable layout make this tart board a true showstopper. Guests can build their own, mixing and matching fruits and toppings. It’s a hands-on dessert experience—so fun for brunch, book club, or binge-watching rom-coms with friends.
- Crowd-Pleaser: Whether you’ve got picky eaters, fruit fanatics, or cream dessert devotees, these mini tarts have something for everyone. The board disappears in minutes—seriously, you’ll hear nothing but happy sighs and “can I have another?”
- Unbelievably Delicious: The crisp, buttery shells, silky vanilla cream, and juicy fruit are pure harmony. One bite and you’ll understand why my friends beg for this every year.
What sets my mini fruit tart board apart? It’s all about the extra-creamy filling (a blend of mascarpone and whipped cream for that cloud-like texture), a simple but perfectly balanced tart shell, and a rainbow selection of fruit. I’ve tried countless versions—everything from store-bought crusts to fancy patisserie styles—but this one nails that “just right” mix of ease and wow-factor. It’s the kind of dessert that makes you close your eyes and smile, every single time. Comfort food, made festive—what more could you want?
And let’s not forget: this board is as fun to assemble as it is to eat. Set it up buffet-style at your gathering, and watch everyone create their dream tart. Less stress for you, more fun for everyone else. That’s my kind of celebration!
What Ingredients You Will Need
This recipe uses simple, wholesome ingredients to deliver bold flavor and that classic creamy-meets-fruity texture—without any fancy fuss. Most of these are pantry staples, and the rest are easy to find at your local store. Here’s your shopping checklist:
- For the Tart Shells:
- All-purpose flour (140g / 1 cup) – classic base for a tender shell
- Powdered sugar (30g / 1/4 cup) – for that delicate sweetness
- Unsalted butter, cold and cubed (85g / 6 tbsp) – makes the shells flaky (I love using Kerrygold for extra flavor!)
- Egg yolk (1 large) – binds everything together
- Pinch of salt – balances out the sweetness
- Ice water (as needed, 1-2 tbsp) – only if your dough feels too crumbly
- For the Creamy Filling:
- Mascarpone cheese (113g / 4 oz), softened – ultra-creamy and rich
- Heavy whipping cream (120ml / 1/2 cup) – whips up fluffy and light
- Powdered sugar (30g / 1/4 cup), sifted – sweetens and smooths the filling
- Pure vanilla extract (1 tsp) – that cozy, classic flavor (use a good-quality vanilla if you can!)
- For the Fruit Toppings:
- Fresh strawberries, sliced (about 1 cup) – for a pop of color
- Kiwi, peeled and sliced (2 small) – gorgeous green and tangy
- Raspberries (1/2 cup) – juicy and tart
- Blueberries (1/2 cup) – adds a burst of sweetness
- Mandarin orange segments (1/2 cup) – for sunshiney vibes
- Optional: blackberries, mango, or pomegranate arils (if you want extra variety)
- For the Glaze (Optional):
- Apricot jam (2 tbsp), warmed and strained – makes fruit glossy and helps it stick
- Or: honey (1 tbsp), thinned with a bit of water – works in a pinch
Ingredient Tips:
- If you’re short on time, store-bought mini tart shells or phyllo cups work great (I won’t tell!).
- Dairy-free? Swap mascarpone for your favorite plant-based cream cheese and use coconut cream instead of heavy cream.
- Gluten-free? Use a 1:1 gluten-free flour blend in the crust, or grab GF tart shells from the bakery section.
- Seasonal switch-ups: In summer, swap in peaches, plums, or fresh cherries. In winter, try thinly sliced pears and candied cranberries.
Gather your ingredients—it’s about to get deliciously festive!
Equipment Needed
- Mini tart pans or a mini muffin tin (for shaping tart shells) – nonstick is best, but silicone molds work too
- Mixing bowls – one medium and one large
- Electric mixer or hand whisk – for whipping the cream and mascarpone filling
- Rolling pin – for rolling out dough (a wine bottle works in a pinch!)
- Baking sheet – for baking tart shells if using loose tins
- Small offset spatula or spoon – to spread the filling evenly in each shell
- Sharp knife or mandoline – for slicing fruit thinly and beautifully
- Parchment paper – for easy cleanup
- Optional: Pastry brush – for glazing the fruit
If you don’t have mini tart pans, use a mini muffin tin and press the dough in with your fingers (that’s what I did the first time—still works great!). For the filling, a hand whisk gets the job done, but an electric mixer saves time and earns you fluffier results. Don’t worry if your tools are a little old or mismatched; I’ve used everything from dollar store spatulas to heirloom rolling pins and it always turns out delicious. Just give your pans a quick spritz of baking spray and line with parchment for easy release—less scrubbing, more celebrating!
Preparation Method
-
Make the Tart Shells:
In a medium bowl, whisk together 1 cup (140g) flour, 1/4 cup (30g) powdered sugar, and a pinch of salt. Add 6 tbsp (85g) cold, cubed butter. Cut the butter into the dry ingredients with your fingers or a pastry cutter until the mixture looks like coarse sand with pea-sized bits of butter. Work quickly (cold hands help!). Add the egg yolk and mix just until a dough comes together; add ice water, 1 tsp at a time, if needed. Knead gently and flatten into a disk. Wrap in plastic and chill for 15 minutes. -
Shape and Bake the Shells:
Preheat your oven to 350°F (175°C). Roll the dough out on a lightly floured surface to about 1/8-inch (3mm) thickness. Use a round cutter (2-3 inches / 5-8cm) to cut circles. Press each into a greased mini tart pan or mini muffin tin, gently molding up the sides. Prick the bottoms with a fork (prevents puffing!). Bake for 10-12 minutes, or until golden brown and crisp. Cool completely before removing from pans. -
Prepare the Creamy Filling:
In a large bowl, combine 4 oz (113g) mascarpone, 1/2 cup (120ml) cold heavy cream, 1/4 cup (30g) powdered sugar, and 1 tsp vanilla. Beat with an electric mixer on medium-high until fluffy, smooth, and soft peaks form (about 2-3 minutes). Do not overwhip or it’ll get grainy. Taste and add a little more sugar if you prefer it sweeter. Chill until ready to use. -
Slice and Prep the Fruit:
Wash and dry all fruit. Slice strawberries and kiwi thinly. Peel mandarins and separate segments. Leave raspberries and blueberries whole. If using larger berries (like blackberries), halve them for easier eating. Pat fruit dry with a paper towel to prevent soggy tarts. -
Assemble the Mini Tarts:
Spoon or pipe 1-2 teaspoons of creamy filling into each cooled tart shell. Smooth with an offset spatula or the back of a spoon. Top with sliced fruit, arranging artfully—don’t be afraid to get creative with patterns and color combos! -
Glaze for Shine (Optional):
Warm 2 tbsp apricot jam (or 1 tbsp honey with 1 tsp water) in the microwave for 10-15 seconds. Strain if needed. Brush lightly over the fruit with a pastry brush for a glossy finish. This step keeps fruit fresh longer and looks stunning in photos! -
Build Your Tart Board:
Arrange the finished tarts on a large wooden board or platter. Fill gaps with extra berries, edible flowers, or a few mint leaves for a festive touch. Serve immediately for best texture.
Prep Notes & Troubleshooting:
- If the tart dough cracks, just patch it with scraps—no one will see after filling.
- Shells getting too brown? Tent loosely with foil for the last few minutes.
- Shells stuck? Let them cool completely, then gently twist or tap the pan.
- Filling too loose? Chill it for 5-10 minutes. If you overwhip, fold in a bit more cream to rescue it.
Efficiency tip: Bake shells a day ahead and store airtight. Prep fruit and cream right before serving for maximum freshness. I’ve learned (the hard way) that assembling too early means soggy shells—don’t do it!
Cooking Tips & Techniques
- Keep Everything Cold: For the flakiest tart shells, use cold butter and chill your dough. I even pop my mixing bowl in the fridge before whipping cream for extra volume.
- Don’t Overfill: It’s tempting to load up the shells, but a heaping teaspoon of cream is just right. Too much, and things get messy fast (ask me how I know—the “cream avalanche” incident of 2022 still haunts me!).
- Fruit Prep Matters: Pat fruit dry with a paper towel. Wet fruit makes the filling runny and the shells soggy. Slice strawberries thinly for easy layering.
- Batch Baking: If you’re making a large board, bake shells in batches. Let them cool completely before stacking or storing to keep them crisp.
- Customize on the Board: If you’re hosting, set up the shells, cream, and fruit separately and let guests assemble. It keeps everything fresh and interactive—plus, zero pressure for you to make them “Pinterest perfect.”
- Watch Your Cream: Whip cream and mascarpone until just thickened. Overwhipping leads to a grainy texture, and underwhipping means your filling won’t hold up. If you go too far, gently fold in a splash more cream to smooth it out.
One time I tried using frozen fruit—big mistake! The tarts looked beautiful for five minutes, then turned into a watery mess. Always go with fresh fruit for best results. And don’t stress if the shells aren’t perfect circles; rustic edges are part of the charm. The more you make these, the easier (and prettier) they get. Practice makes delicious!
Variations & Adaptations
- Gluten-Free Mini Fruit Tarts: Swap all-purpose flour for a gluten-free 1:1 baking blend. Most store-bought mini tart shells are available gluten-free—just check the bakery freezer section.
- Dairy-Free/Vegan: Use plant-based butter in the crust, dairy-free mascarpone or thick coconut yogurt for the filling, and coconut cream instead of heavy cream. The flavor is a little different but still dreamy!
- Chocolate Lovers’ Twist: Add 2 tbsp unsweetened cocoa powder to the tart dough and use a chocolate ganache layer under the cream. Top with chocolate shavings and berries for a decadent treat.
- Seasonal Fruit Swaps: In fall, try roasted pears, spiced apples, or candied cranberries. In spring, use sliced apricots or cherries. The board is endlessly customizable—just use what’s in season or on sale.
- Nutty Crunch: Sprinkle chopped toasted pistachios or almonds on top for a little crunch (especially if you love textures like I do!).
Personally, my favorite adaptation was a summer version with fresh peaches, blueberries, and a swirl of lemon curd in the cream. Every time I try a new fruit combo, these tarts become a whole new dessert. So don’t be afraid to play—this board is meant for creativity!
Serving & Storage Suggestions
These creamy mini fruit tarts are best served chilled or at cool room temperature, right after assembling. Arrange them on a large wooden board, marble platter, or a pretty cake stand for maximum “wow” factor—perfect for those Instagram and Pinterest shots! Scatter extra berries and edible flowers around the tarts for a festive, photogenic look.
Pair with sparkling rosé, mimosas, or a pot of fruity herbal tea for the ultimate Galentine’s Day brunch. They also go well with a light salad or a cheese board if you’re hosting a full spread.
If you have leftovers (rare, but it happens), store the assembled tarts in an airtight container in the fridge for up to 2 days. The shells may soften a bit, but the flavor is still wonderful. For best results, keep shells, cream, and fruit separate and assemble just before serving. To re-crisp shells, pop them in a 300°F (150°C) oven for 3-4 minutes, then cool before filling. The flavors mellow and mingle overnight, so the cream tastes even dreamier the next day.
Nutritional Information & Benefits
Each mini fruit tart (assembled) contains approximately 120 calories, 7g fat, 12g carbs, and 2g protein. The recipe is a lighter dessert option—especially if you use fresh fruit and go easy on the glaze. Key ingredients like berries provide antioxidants, vitamin C, and fiber, while the mascarpone and cream offer a touch of calcium and protein.
This recipe can be made gluten-free or dairy-free with simple swaps, making it friendly for most dietary needs. Just watch out for common allergens (milk, eggs, wheat) in the standard version. Personally, I love that these tarts are portion-controlled—a little indulgence goes a long way, and they’re so satisfying you won’t miss the heavy cakes or pies. Sweet, fresh, and just the right size for a treat!
Conclusion
If you want a dessert that’s as fun to make as it is to eat, this Creamy Galentine’s Mini Fruit Tart Board is your new secret weapon. It’s the kind of recipe that brings people together—no fancy skills, just good ingredients, great company, and a whole lot of happy memories. I love how easy it is to customize, and how every board looks a little different (but always beautiful!).
Try this for your next Galentine’s Day, brunch, or anytime you want to make folks feel special. Tweak the flavors, swap the fruit, or let everyone assemble their own creation. That’s the magic—make it yours. If you give this a try, I’d love to hear how it went! Drop a comment below, share your board photos, or tag me if you post your masterpiece. Wishing you sweet moments, lots of laughter, and the perfect bite every time!
FAQs about Creamy Mini Fruit Tart Board
Can I make the tart shells ahead of time?
Yes, you can bake the tart shells up to 2 days in advance. Store them in an airtight container at room temperature. Wait to fill and decorate until just before serving for best texture.
What other fruits can I use?
Use whatever’s fresh or in season! Try peaches, plums, cherries, pomegranate seeds, or even thinly sliced grapes. The board is all about variety and color.
Can I use store-bought tart shells?
Absolutely! Store-bought mini tart shells or phyllo cups save time and work just as well. I use them often when I’m short on prep time.
How do I keep the tarts from getting soggy?
Pat fruit dry before assembling, and only fill the shells right before serving. If you need to prep ahead, keep shells, cream, and fruit separate until party time.
Can I make this dessert gluten-free or dairy-free?
Yes! Use a gluten-free flour blend or store-bought GF shells for gluten-free. Swap mascarpone and cream for your favorite dairy-free alternatives to make it vegan-friendly.
Pin This Recipe!
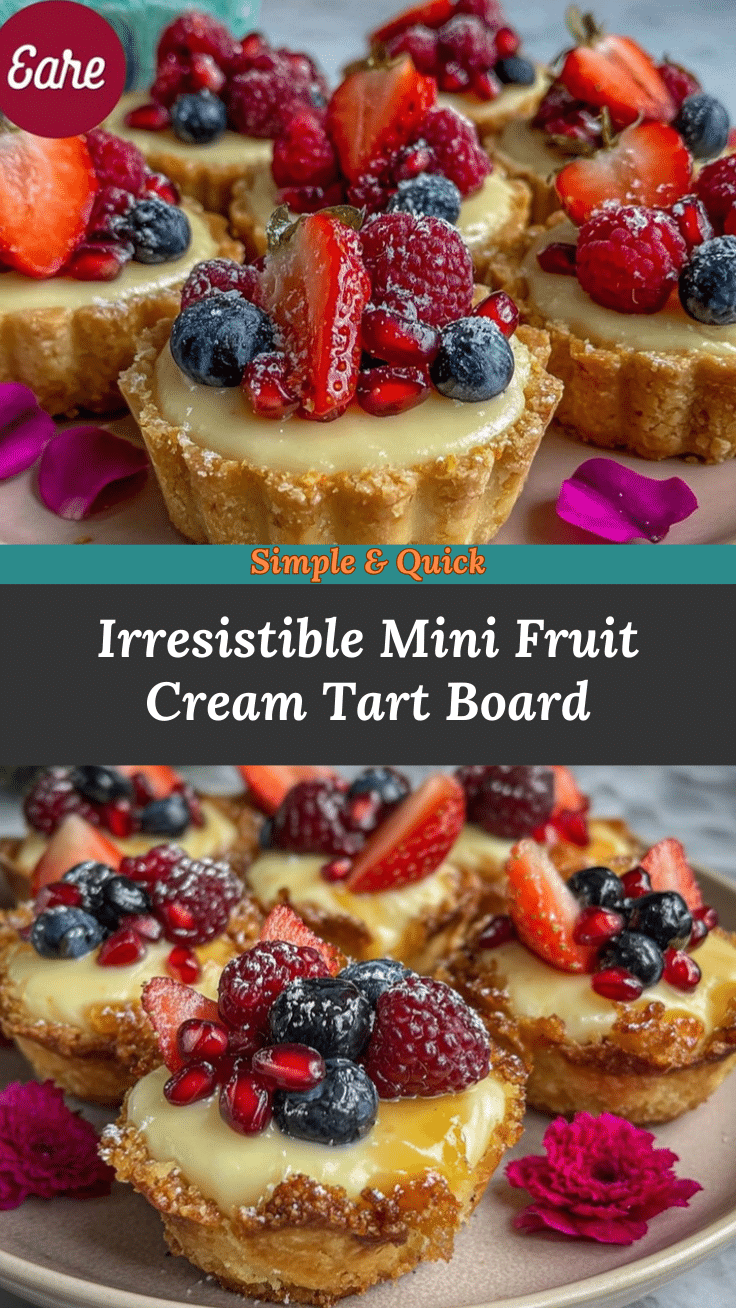

Creamy Mini Fruit Tart Board
- Total Time: 45 minutes
- Yield: 18-24 mini tarts 1x
Description
A festive and customizable dessert featuring buttery mini tart shells, creamy mascarpone filling, and a rainbow of fresh fruit. Perfect for Galentine’s Day, brunches, or any celebration with friends.
Ingredients
- 1 cup all-purpose flour (140g)
- 1/4 cup powdered sugar (30g)
- 6 tbsp unsalted butter, cold and cubed (85g)
- 1 large egg yolk
- Pinch of salt
- 1–2 tbsp ice water (as needed)
- 4 oz mascarpone cheese, softened (113g)
- 1/2 cup heavy whipping cream (120ml)
- 1/4 cup powdered sugar, sifted (30g)
- 1 tsp pure vanilla extract
- 1 cup fresh strawberries, sliced
- 2 small kiwi, peeled and sliced
- 1/2 cup raspberries
- 1/2 cup blueberries
- 1/2 cup mandarin orange segments
- Optional: blackberries, mango, or pomegranate arils
- 2 tbsp apricot jam, warmed and strained (optional glaze)
- or 1 tbsp honey, thinned with a bit of water (optional glaze)
Instructions
- Make the Tart Shells: In a medium bowl, whisk together flour, powdered sugar, and salt. Add cold, cubed butter and cut into the dry ingredients until the mixture resembles coarse sand with pea-sized bits of butter. Add egg yolk and mix just until a dough forms; add ice water, 1 tsp at a time, if needed. Knead gently, flatten into a disk, wrap in plastic, and chill for 15 minutes.
- Shape and Bake the Shells: Preheat oven to 350°F (175°C). Roll dough out on a lightly floured surface to 1/8-inch thickness. Cut circles with a 2-3 inch cutter and press into greased mini tart pans or mini muffin tin. Prick bottoms with a fork. Bake for 10-12 minutes until golden brown and crisp. Cool completely before removing from pans.
- Prepare the Creamy Filling: In a large bowl, combine mascarpone, cold heavy cream, powdered sugar, and vanilla. Beat with an electric mixer on medium-high until fluffy, smooth, and soft peaks form (about 2-3 minutes). Chill until ready to use.
- Slice and Prep the Fruit: Wash and dry all fruit. Slice strawberries and kiwi thinly. Peel mandarins and separate segments. Leave raspberries and blueberries whole. Pat fruit dry with a paper towel.
- Assemble the Mini Tarts: Spoon or pipe 1-2 teaspoons of creamy filling into each cooled tart shell. Smooth with an offset spatula or spoon. Top with sliced fruit, arranging artfully.
- Glaze for Shine (Optional): Warm apricot jam (or honey with water) in the microwave for 10-15 seconds. Strain if needed. Brush lightly over the fruit with a pastry brush for a glossy finish.
- Build Your Tart Board: Arrange finished tarts on a large board or platter. Fill gaps with extra berries, edible flowers, or mint leaves. Serve immediately for best texture.
Notes
For gluten-free, use a 1:1 GF flour blend or store-bought GF shells. For dairy-free, swap mascarpone and cream for plant-based alternatives. Bake shells ahead and assemble just before serving to avoid soggy crusts. Pat fruit dry before topping. Customize with seasonal fruit or add nuts for crunch.
- Prep Time: 20 minutes
- Cook Time: 12 minutes
- Category: Dessert
- Cuisine: American
Nutrition
- Serving Size: 1 mini tart
- Calories: 120
- Sugar: 7
- Sodium: 40
- Fat: 7
- Saturated Fat: 4
- Carbohydrates: 12
- Fiber: 1
- Protein: 2
Keywords: mini fruit tart, Galentine's Day dessert, mascarpone tart, brunch dessert, easy tart recipe, fruit tart board, party dessert, customizable dessert
