

Imagine the sweet, buttery scent of pancakes swirling through your kitchen, but not just any pancakes—these are bright, fluffy, and practically bursting with Whoville whimsy. The first time I flipped a batch of these Dr. Seuss Whoville Pancake Rollups, my kitchen looked (and smelled) like a scene straight out of a storybook. The colors were so cheery, I almost expected the Grinch himself to peek in through the window, tempted by the swirls of pink and blue. There’s this magical moment when you see the pancake batter puff up, the edges turning golden, and you just know you’ve created something special—a breakfast that makes everyone pause, grin, and reach for seconds (or thirds, let’s be honest).
These pancake rollups started as a last-minute idea when I wanted to surprise my kids on a rainy Saturday morning. I was searching for something playful but easy, something that would spark joy and maybe coax a few giggles from sleepy faces. (If you’ve ever tried to get kids excited about breakfast on a weekend, you know that’s no small feat!) The first time I served these, the colors alone were enough to cause a kitchen stampede. My little ones couldn’t stop sneaking bites while I was still rolling them up—they called them “rainbow burritos,” and the name stuck for months!
I wish I’d discovered these years ago—when I was knee-high to a grasshopper, I would have begged for these at every sleepover. Now, they’re my secret weapon for birthday brunches, lazy holidays, or just brightening a Monday. These rollups are so dangerously easy, you’ll find yourself whipping them up “just because.” My family’s official verdict? A new staple. I’ve tested this Dr. Seuss Whoville Pancake Rollup recipe more times than I care to admit (all in the name of research, of course), and every time, it feels like a warm, technicolor hug. Bookmark this one, because you’re about to become the breakfast hero of your house!
Why You’ll Love This Recipe
Let’s face it: Dr. Seuss Whoville Pancake Rollups aren’t your average breakfast. They’re whimsical, ridiculously soft, and the kind of recipe that makes everyone at the table grin from ear to ear. Years of pancake experiments (and a few flops) have taught me what truly matters in a kid-approved breakfast, and these rollups check all the boxes. Here’s why you’ll want this recipe on repeat:
- Quick & Easy: Ready in under 30 minutes—perfect for busy mornings or last-minute “Mom, I’m hungry!” moments.
- Simple Ingredients: You probably already have everything in your pantry, and if not, there’s nothing here you can’t find at your local market.
- Perfect for Celebrations: These are a slam dunk for birthday mornings, Seuss-inspired parties, or just to bring a little color to a dreary day.
- Crowd-Pleaser: Kids, teens, grownups—even the pickiest eaters—can’t resist the fluffy texture and the fun swirls.
- Unbelievably Delicious: Soft, pillowy pancakes with just the right hint of vanilla and a playful pop of color. Pure comfort, with a dash of Seussical magic.
What sets these Dr. Seuss Whoville Pancake Rollups apart? It’s all about the technique. Instead of thick, stodgy pancakes, you’ll get ultra-fluffy, flexible crepe-style cakes that roll up without tearing. A splash of buttermilk keeps things tender, while a little melted butter adds that melt-in-your-mouth texture. And the colors? I use gel food coloring for vibrant, non-fade hues (trust me: liquid color just doesn’t cut it for Whoville flair).
This isn’t just a breakfast—it’s an experience. It’s the kind of meal that sparks laughter, starts conversations, and makes even the sleepiest kids perk up. Whether you’re serving these on a Saturday morning or as a surprise after-school treat, you’re not just feeding bellies. You’re creating memories. And honestly, seeing your kids light up with that first bite? That’s what makes this recipe my go-to for special mornings (and ordinary ones, too).
What Ingredients You Will Need
This Dr. Seuss Whoville Pancake Rollup recipe is all about simple, family-friendly staples that come together for maximum fun and flavor. Most of these are probably in your kitchen right now, and a few make-ahead tricks mean you can whip these up whenever the craving hits.
- For the Pancake Batter:
- 1 1/2 cups (190g) all-purpose flour (King Arthur is my go-to for consistent results)
- 2 tablespoons (25g) granulated sugar (for just a hint of sweetness)
- 1 teaspoon (5g) baking powder
- 1/2 teaspoon (2.5g) baking soda (ensures extra fluffiness)
- 1/2 teaspoon (2.5g) fine sea salt
- 1 1/4 cups (300ml) buttermilk (or whole milk + 1 tablespoon lemon juice, if you’re in a pinch)
- 2 large eggs, room temperature (they blend in smoother—trust me!)
- 3 tablespoons (45g) unsalted butter, melted and slightly cooled
- 1 teaspoon (5ml) pure vanilla extract (for that classic pancake aroma)
- For the Whoville Colors:
- Gel food coloring in your favorite Whoville shades (I use vibrant pink, blue, yellow, and green—Wilton or AmeriColor work best for bold color)
- For Filling & Topping (Optional but fun):
- Whipped cream (store-bought or homemade, for swirly finishing touches)
- Fresh berries (strawberries, blueberries, raspberries—whatever your kids love)
- Powdered sugar (for dusting, if you want a little “snow” effect)
- Maple syrup or honey (classic, but you could try strawberry syrup for extra zing)
- Sprinkles (because, well, why not?)
Ingredient Tips & Swaps:
- If you need a gluten-free option, swap the flour for a 1:1 gluten-free blend (Bob’s Red Mill works nicely).
- No buttermilk? Use 1 cup milk plus 1 tablespoon vinegar or lemon juice—let it sit for 5 minutes before using.
- For dairy-free pancakes, substitute melted coconut oil for butter and almond milk (with a splash of lemon juice) for buttermilk.
- Want extra protein? Sneak in a scoop of vanilla protein powder and reduce the flour by 2 tablespoons.
With these ingredients, you’ll have a breakfast that’s as photogenic as it is tasty. Don’t be afraid to get creative—Dr. Seuss would approve!
Equipment Needed
You don’t need a professional kitchen to whip up these Dr. Seuss Whoville Pancake Rollups. Here’s what I use (with a few handy swaps if you’re short on gadgets):
- Large non-stick skillet or griddle (at least 10 inches/25cm wide is ideal for rolling—if you don’t have one, a regular frying pan works, but make smaller rollups)
- Medium and small mixing bowls (one for the dry ingredients, one for the wet, plus a few for dividing and coloring the batter)
- Whisk (a balloon whisk makes the batter extra fluffy—fork works in a pinch)
- Measuring cups and spoons (for accuracy—pancakes are forgiving, but it helps to measure)
- Heatproof spatula (flexible silicone is my favorite for easy flipping)
- Food-safe gel coloring (using toothpicks to add color—less mess!)
- Ladle or 1/3 cup measuring cup (for pouring even-sized pancakes)
- Cooling rack (optional, but helps keep pancakes soft while you work in batches)
- Rolling pin (optional for really thin pancakes, but I rarely need it)
If you don’t have a non-stick pan, brush your skillet with a little extra butter or oil between pancakes. I’ve used everything from electric griddles to thrift store pans, and as long as you keep the heat even and low, you’ll be golden. Clean your tools quickly after using food coloring—it can stain plastic, but a quick scrub with baking soda usually does the trick. No need for fancy gadgets—just a bit of patience and a splash of color!
How to Make Dr. Seuss Whoville Pancake Rollups
- Mix the dry ingredients. In a medium bowl, whisk together 1 1/2 cups (190g) flour, 2 tablespoons (25g) sugar, 1 teaspoon (5g) baking powder, 1/2 teaspoon (2.5g) baking soda, and 1/2 teaspoon (2.5g) salt. This ensures everything is evenly distributed (no salty bites!).
- Combine wet ingredients. In a separate bowl, whisk 1 1/4 cups (300ml) buttermilk, 2 large eggs, 3 tablespoons (45g) melted butter, and 1 teaspoon (5ml) vanilla until smooth and creamy. The melted butter may clump if your eggs are cold—bring them to room temp if you can for best results.
- Make the batter. Pour the wet mixture into the dry ingredients. Whisk gently until just combined—some lumps are totally fine (overmixing can make pancakes tough). If the batter seems too thick (should flow easily but not be runny), add a splash more buttermilk, one tablespoon at a time.
- Divide and color. Split your batter evenly into 3–4 small bowls (one for each color). Add a drop or two of gel food coloring to each and stir until vibrant. Use separate spoons to avoid muddy colors. (If using liquid coloring, go easy or the batter can get watery.)
- Preheat your skillet. Place a non-stick skillet or griddle over medium-low heat. Let it warm up for 2–3 minutes. Lightly grease with butter or oil. To test if it’s ready, sprinkle a few drops of water—they should sizzle and dance!
- Cook the pancakes. For each pancake, pour about 1/3 cup (80ml) of one colored batter onto the skillet. Use a spatula or the back of a spoon to gently spread it into a thin, even circle (about 7–8 inches/18–20cm across). Cook for 1–2 minutes, until the surface bubbles and the edges look set.
- Flip carefully. Slide your spatula under the pancake and flip. Cook another 30–60 seconds until just golden. The pancake should be flexible but not too soft. Stack finished pancakes on a plate with a towel or on a cooling rack.
- Repeat with remaining colors. Grease the skillet as needed between batches and adjust the heat lower if pancakes brown too quickly.
- Roll ‘em up. Lay each pancake flat, spread with a little whipped cream or jam if you like, then gently roll from one end to the other. Secure with a toothpick or serve seam-side down.
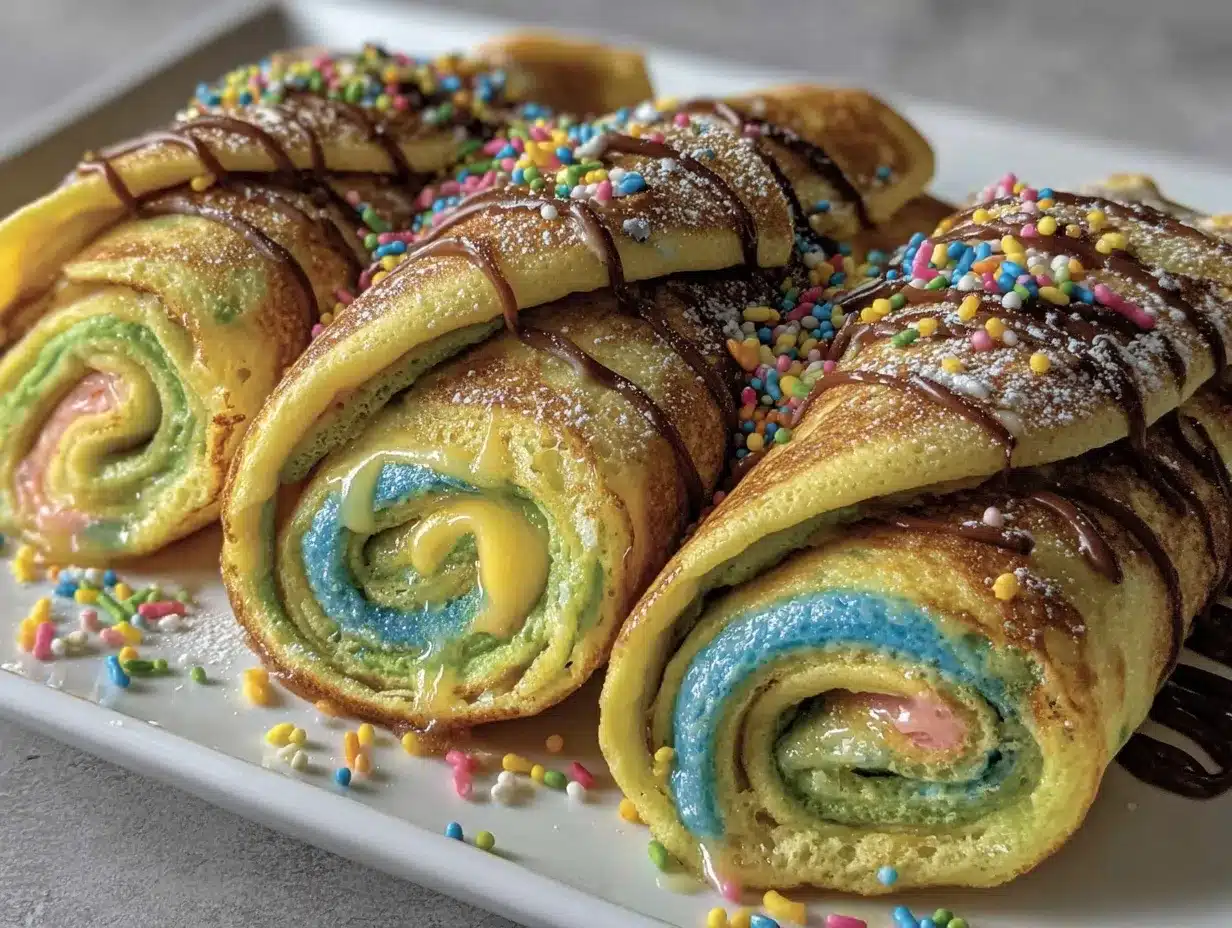
- Serve with toppings. Dust with powdered sugar, scatter berries, drizzle syrup, and finish with sprinkles for that Whoville look!
Troubleshooting & Tips: If pancakes tear, they’re probably too thin or undercooked—let them set a few seconds longer. If the color fades, use more gel coloring. Pancakes too stiff? Add a touch more milk to the next batch. I like to keep finished pancakes warm in a low oven (200°F/90°C) while I cook the rest—it keeps them soft and rollable.
Cooking Tips & Techniques
Anyone can make basic pancakes, but these Dr. Seuss Whoville Pancake Rollups have a few tricks up their sleeves. Here’s what I’ve learned (sometimes the hard way!):
- Low and slow is your friend. Cooking these on low to medium-low heat gives them time to puff up without burning or getting tough. If your pan smokes, it’s too hot—reduce the heat and wipe it out with a paper towel before continuing.
- Use gel food coloring. Liquid coloring can make the batter watery and pale. Gel gives you bright, Instagram-worthy results (and kids love picking their favorite shades).
- Don’t overmix the batter. Lumps are okay! Overmixing develops gluten, which means chewy pancakes instead of fluffy ones. Stir just until everything is combined—it’s fine if you see a few streaks.
- Keep them warm. Finished pancakes stay soft if you pop them on a cooling rack in a warm oven. Stacking them directly on a plate can make them soggy, especially with whipped cream.
- Roll while warm. Pancakes are most flexible right off the skillet. If they cool too much, microwave for 10 seconds before rolling to prevent cracking.
- Test for doneness. Edges should look set and a little dry before you flip. If you try to flip too soon, they’ll tear. A thin spatula helps—metal is best for a clean lift.
- Let kids help. Give them each a bowl of batter to color, or let them choose their toppings—it’s messy, but worth it for the smiles.
I’ve had my share of pancake fails—burned edges, tough insides, sad colors. But with these tricks, you’ll get soft, bright pancakes every time. Remember: even the “oops” ones taste good!
Variations & Adaptations
One of my favorite things about Dr. Seuss Whoville Pancake Rollups? They’re endlessly customizable. Here are some fun ways to mix things up:
- Gluten-Free: Use a 1:1 gluten-free flour blend and add an extra tablespoon of milk if the batter seems thick. This swaps seamlessly for a wheat-free treat.
- Vegan: Replace eggs with flax eggs (2 tablespoons ground flax + 6 tablespoons water, mixed and rested for 5 minutes), use almond milk plus lemon juice for buttermilk, and swap butter for coconut oil. You’ll still get fluffy, colorful results!
- Chocolate Swirl: Divide batter and add 2 tablespoons cocoa powder to one portion—layer or swirl for a marbled effect that’s half chocolate, half vanilla.
- Seasonal Fruit: In summer, fold in blueberries or diced strawberries for a fruity twist. In fall, add a pinch of cinnamon and nutmeg with a few apple bits.
- Allergy-Friendly: For nut-free, make sure your coloring and toppings are certified nut-free. For dairy-free, use oat or soy milk and dairy-free whipped topping.
- Mini Rollups: Make smaller pancakes and roll up with a toothpick—perfect for party platters or little hands.
I once tried stuffing these with a thin layer of strawberry cream cheese—oh my, total hit! Don’t be afraid to let kids choose their colors or fillings (I’ve even seen green eggs and ham rollups for Seuss Day at school). These pancakes adapt to whatever your family loves.
Serving & Storage Suggestions
These Dr. Seuss Whoville Pancake Rollups are best served fresh and warm, but you can absolutely prep ahead for busy mornings.
- Serving: Pile rollups on a platter, dust with powdered sugar, and add a swirl of whipped cream on top. A few fresh berries or sprinkles turn them into a breakfast showstopper! Serve with warm maple syrup or a side of sweetened yogurt for dipping.
- Pairings: These go well with scrambled eggs, crispy bacon, or a fresh fruit salad. For drinks, try orange juice, strawberry milk, or a simple smoothie.
- Storing: Leftover pancakes (unfilled and unrolled) can be stacked between sheets of parchment, then stored in an airtight container in the fridge for up to 3 days or frozen for up to 2 months.
- Reheating: Microwave individual pancakes for 15–20 seconds, or warm a batch in a 300°F (150°C) oven for 5–8 minutes. Roll and fill just before serving to keep them soft and flexible.
- Flavor Bonus: The colors stay vibrant even after reheating, and some say the pancakes taste even better the next day—like all good comfort food.
These rollups are a crowd-pleaser at brunch parties, but they’re also perfect for lunchboxes. Just pack them plain and let kids dip them in yogurt or jam at school. (They’ll be the envy of the cafeteria—trust me!)
Nutritional Information & Benefits
Here’s the scoop on what’s inside a serving (about two rollups, without toppings):
- Calories: Around 220
- Protein: 7g (eggs and milk pack a punch)
- Carbs: 32g
- Fat: 7g
- Fiber: 1g
- Sugar: 7g
Key benefits? These pancakes offer a nice balance of carbs for energy and protein for satiety, and you can easily add fruit for extra vitamins and fiber. They’re nut-free as written (just watch your toppings), and with a quick swap, can be made gluten- or dairy-free. Egg allergies? Use a substitute as suggested above. I love that you can sneak in whole grains or even spinach puree for a nutrition boost—kids rarely notice! Breakfast should bring smiles, and these rollups do just that, with a little bonus goodness inside.
Conclusion
If you’re searching for a breakfast that delivers on taste, fun, and a big dose of family joy, these Dr. Seuss Whoville Pancake Rollups are your answer. They’re easy enough for a weekday, special enough for a birthday, and endlessly adaptable for picky eaters or allergy needs. I honestly make these whenever we need a bit more color in our lives—and they never disappoint.
Go ahead and experiment with your favorite colors, fillings, or toppings. Our family loves these pancakes because they turn ordinary mornings into something magical (and let’s be honest, who doesn’t need more magic at breakfast?). I hope they become a favorite in your house too.
Try them out, snap a photo, and tell me how your crew liked them in the comments below. Any wild color combos or creative fillings? I want to hear about it! Happy cooking, and may your breakfasts always be bright and fluffy.
FAQs About Dr. Seuss Whoville Pancake Rollups Kids Adore
How do I get bright colors without making the pancakes too runny?
Use gel food coloring instead of liquid—it’s concentrated, so you only need a tiny bit for bold, vibrant pancakes without thinning your batter.
Can I make the batter the night before?
Yes! Mix the batter, divide, and color as usual. Store covered in the fridge overnight. Give each color a quick stir in the morning before cooking—this makes breakfast a breeze.
Are these pancakes suitable for a gluten-free diet?
Absolutely. Swap in a good 1:1 gluten-free flour blend. You may need to add a tablespoon or two more liquid if the batter seems thick, but the results are still soft and rollable.
What fillings work best inside the rollups?
Classic whipped cream, jam, or sweetened cream cheese are favorites. Fresh fruit or even a little Nutella is a hit with kids. Just avoid heavy or chunky fillings—they can make rolling tricky.
How do I keep leftovers fresh?
Cool pancakes completely, layer with parchment, and store in an airtight container in the fridge for up to 3 days. Reheat gently in the microwave or oven before rolling and serving.
Pin This Recipe!


Dr. Seuss Whoville Pancake Rollups Kids Love – Easy Fluffy Breakfast
- Total Time: 25 minutes
- Yield: 8 rollups (serves 4) 1x
Description
Bright, fluffy, and whimsical pancake rollups inspired by Dr. Seuss’s Whoville, these colorful breakfast treats are soft, flexible, and perfect for kids. They’re easy to make, endlessly customizable, and guaranteed to bring smiles to your breakfast table.
Ingredients
- 1 1/2 cups all-purpose flour
- 2 tablespoons granulated sugar
- 1 teaspoon baking powder
- 1/2 teaspoon baking soda
- 1/2 teaspoon fine sea salt
- 1 1/4 cups buttermilk (or whole milk + 1 tablespoon lemon juice)
- 2 large eggs, room temperature
- 3 tablespoons unsalted butter, melted and slightly cooled
- 1 teaspoon pure vanilla extract
- Gel food coloring (pink, blue, yellow, green)
- Whipped cream (optional, for filling/topping)
- Fresh berries (optional, for topping)
- Powdered sugar (optional, for dusting)
- Maple syrup or honey (optional, for serving)
- Sprinkles (optional, for topping)
Instructions
- In a medium bowl, whisk together flour, sugar, baking powder, baking soda, and salt.
- In a separate bowl, whisk buttermilk, eggs, melted butter, and vanilla until smooth.
- Pour wet ingredients into dry ingredients and whisk gently until just combined; some lumps are fine.
- Divide batter evenly into 3–4 small bowls. Add a drop or two of gel food coloring to each and stir until vibrant.
- Preheat a non-stick skillet or griddle over medium-low heat and lightly grease with butter or oil.
- Pour about 1/3 cup of colored batter onto the skillet for each pancake. Spread into a thin, even circle (about 7–8 inches across).
- Cook for 1–2 minutes, until the surface bubbles and edges look set.
- Flip carefully and cook another 30–60 seconds until just golden. Stack finished pancakes on a plate or cooling rack.
- Repeat with remaining colors, greasing skillet as needed.
- Lay each pancake flat, spread with whipped cream or jam if desired, then gently roll from one end to the other. Secure with a toothpick or serve seam-side down.
- Serve with powdered sugar, berries, syrup, and sprinkles.
Notes
For gluten-free, use a 1:1 gluten-free flour blend. For dairy-free, substitute coconut oil for butter and almond milk with lemon juice for buttermilk. Pancakes are most flexible when rolled warm. Use gel food coloring for vibrant colors. Keep finished pancakes warm in a low oven while cooking batches. Let kids help with coloring and toppings for extra fun.
- Prep Time: 10 minutes
- Cook Time: 15 minutes
- Category: Breakfast
- Cuisine: American
Nutrition
- Serving Size: 2 rollups
- Calories: 220
- Sugar: 7
- Sodium: 350
- Fat: 7
- Saturated Fat: 4
- Carbohydrates: 32
- Fiber: 1
- Protein: 7
Keywords: Dr. Seuss, Whoville, pancake rollups, kids breakfast, colorful pancakes, easy breakfast, brunch, party food, birthday breakfast, fluffy pancakes
