
Last spring, I decided my cluttered pantry was crying out for a fresh start. The decor was outdated, and nothing seemed to have a proper place. I craved that cozy-yet-polished look you see in magazine spreads—the kind of transitional farmhouse pantry organization where rustic charm meets clean lines and clever storage. After researching, sketching plans, and rolling up my sleeves, I transformed our chaotic shelves into a stunning, organized space that truly works for my family. Did you know that 70% of homeowners say a well-organized pantry helps reduce food waste and saves money? I can absolutely vouch for that! With a few simple changes and a bit of creativity, your pantry can become the showpiece of your kitchen and a joy to use every day. Let’s dig into the dreamy world of transitional farmhouse pantry organization, and I’ll share everything I learned along the way—including my messy moments and the little wins that changed the way we live.
What Defines Transitional Farmhouse Pantry Organization?
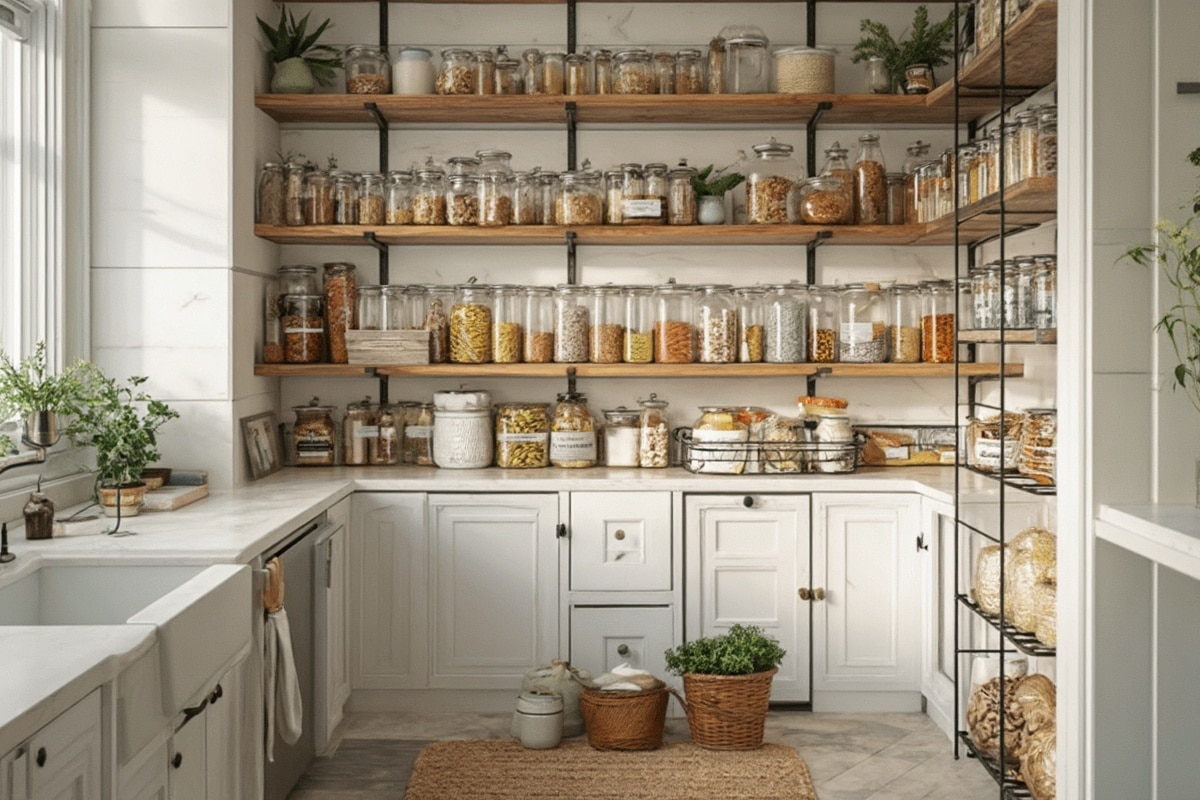
Transitional farmhouse design blends the best of old and new. In the pantry, this means mixing classic farmhouse elements—like shiplap, warm woods, and vintage hardware—with contemporary touches such as sleek baskets, glass jars, and clean open shelving. The goal is to create a space that feels inviting and lived-in, but also streamlined and practical.
This style is all about balance: think creamy whites (like Behr Swiss Coffee, #12), soft grays, black accents, and natural textures. The atmosphere is welcoming—like walking into a friend’s country kitchen, but with the organization and polish of a modern home. The origins of transitional farmhouse stem from American rural homes, but it’s become hugely popular due to design icons like Joanna Gaines and the approachable luxury seen in Reese Witherspoon’s kitchen. Open shelving, sliding barn doors, and wire baskets are all signature moves.
What’s trending now? Clean lines, matte black fixtures, labeled glass jars, and rustic wood shelving remain favorites. People crave spaces that feel authentic but uncluttered. Social media is brimming with stunning pantries that mix old breadboards with new pull-out drawers, or vintage crates with modern lazy Susans. This look isn’t just about pretty shelves—it’s about making your pantry a functional, beautiful extension of your kitchen.
How Do You Plan and Visualize a Transitional Farmhouse Pantry?
Start by honestly assessing your pantry space. Measure every wall, noting awkward corners or existing shelves. Sketch a simple floor plan, marking door swings and outlets. Ask yourself: What’s not working? For me, it was deep shelves swallowing up cans and snacks. I set goals: better visibility, easier access, and decor that made me smile every time I opened the door.
Defining your preferences comes next. Do you love the look of open shelving, or do you prefer the neatness of closed cabinets? Are you drawn to whitewashed wood, or do you want the warmth of reclaimed oak? Gather inspiration—Pinterest, Instagram, and magazines are your best friends. I recommend creating a physical or digital mood board. Cut out paint chips, print photos, and collect fabric swatches. Seeing your ideas together helps clarify your vision and spot any clashing elements before you buy a thing.
When making design decisions, think about how you use your pantry. Do you bulk buy? Bake often? Need a snack zone for kids? Use the “zone” method: group similar items together and assign each a spot. For example, devote a shelf to baking supplies, another for breakfast foods, and a basket for snacks. If you’re stuck, ask yourself: “Can I see and reach everything I use daily?” If not, tweak your layout.
From my experience, don’t rush this stage. I once bought a set of deep wire baskets that looked great, but they didn’t fit my shelves and ended up on Facebook Marketplace. Take time to map out your plan, and you’ll thank yourself later.
What Materials and Decor Items Do You Need for a Farmhouse Pantry Makeover?

- Open wood shelving (try 1″x12″ boards, stained or painted)
- Glass storage jars with airtight bamboo lids
- Wire and wicker baskets in various sizes
- Lazy Susans for corners (12″–16″ diameter)
- Clear acrylic bins for grouping snacks
- Chalkboard or custom printed labels
- Matte black or antique brass hardware (hooks, handles)
- Sliding barn door kit (optional for entry)
- Farmhouse-style light fixture (Edison bulb or schoolhouse pendant)
- Small step stool (folding, wood or metal)
For budget-friendly options, IKEA and Target have great glass jars and baskets. Thrift stores are goldmines for wooden crates, breadboards, and vintage jars. Watch for seasonal sales at HomeGoods or Wayfair, especially during spring and fall. If you’re handy, make your own shelves or barn-style doors. I saved over $200 building simple shelves from pine boards and leftover stain.
How Do You Organize a Pantry Farmhouse-Style? Step-by-Step Guide

- Clear Out and Clean (1 Day):
Start by emptying every shelf. Toss expired food, donate what you won’t use, and wipe down surfaces with a mild cleaner. Don’t rush—this is the foundation for your entire project. - Measure and Sketch Your Layout (1-2 Hours):
Use a tape measure for every shelf and wall. Sketch a quick diagram, and decide where each “zone” will sit (baking, snacks, canned goods, etc.). Mark shelf heights—12” for cereal boxes, 8” for canned goods, and 5” for spices. - Install or Adjust Shelving (2-4 Hours):
If you’re adding new shelves, use sturdy brackets and 1″x12″ wood boards. Paint or stain them for a farmhouse look. I used Minwax Weathered Oak for a soft gray-brown finish. Let them dry overnight before loading up. - Group and Decant (2-3 Hours):
Sort your food items by category. Pour dry goods (flour, sugar, pasta) into clear glass jars and add chalkboard labels. This not only looks beautiful but keeps food fresh and easy to find. - Arrange Baskets and Containers (1-2 Hours):
Place wire baskets on lower shelves for potatoes, onions, and snacks. Use wicker baskets for bread and napkins. Keep heavier items on the bottom and lighter ones up high. - Add Turntables and Pull-Outs (1 Hour):
Place lazy Susans in corners for oils and sauces. Consider installing pull-out bins for kids’ snacks or pet food. I added a pull-out wire drawer for my baking supplies—game changer! - Label Everything (1 Hour):
Use matching labels for jars, baskets, and bins. Print custom labels or use a chalk marker for a homespun look. This step instantly makes your pantry feel intentional and finished. - Style and Accessorize (1 Hour):
Hang a small farmhouse sign or vintage breadboard. Add a cozy rug or a pop of color with a small plant. Swap the light fixture for something with character. - Final Touches and Maintenance Plan (30 Minutes):
Step back and review. Adjust anything that feels awkward. Set a reminder to do a quick tidy every month—I keep a sticky note inside my pantry door as a gentle nudge.
Troubleshooting tips: If you run out of space, use over-the-door organizers or stackable bins. For deep shelves, add risers so nothing gets lost in the back. If your pantry is dark, battery-operated LED puck lights work wonders. My biggest lesson? Don’t aim for perfection—a little imperfection keeps your pantry real and lived-in.
What Are the Best Styling Tips and Design Techniques for a Farmhouse Pantry?
Professional designers recommend layering textures—mixing rough wood shelves with smooth glass jars, soft baskets, and metal accents. Balance is key: don’t crowd every shelf. Leave “breathing room” so special pieces stand out. Proportion matters, too—don’t put a tiny basket on a huge shelf or vice versa.
Avoid common mistakes like putting all the tall containers together. Instead, vary heights for visual interest. Place a cute breadboard or a row of spice jars at eye level. I once overloaded my top shelf with heavy jars, which nearly fell—lesson learned! Keep frequently used items handy and stash seasonal or rarely-used things up high.
For a magazine-worthy look, group jars in threes or fives, and use matching containers for a cohesive feel. Add a chalkboard or small art print for personality. If you have open shelves, consider painting the wall behind them a soft contrast color (like Sherwin Williams Sea Salt, #6204) for depth. Remember, it’s the little touches—like a gingham liner or handmade label—that make a pantry shine.
How Should You Combine Colors and Textures in Your Pantry?

Stick to a palette of warm whites, soft grays, natural wood tones, and a few black accents for that classic transitional farmhouse vibe. For example, use Benjamin Moore Simply White (#OC-117) on walls, pair with weathered oak shelves, and black iron brackets. Layer in woven baskets (honey or natural color), glass jars, and linen or cotton liners.
Mixing textures is where the magic happens. Combine rough-hewn wood with glossy glass, metal bins, and cozy textiles. For seasonal variety, swap in a sage green runner in spring, a buffalo check mat in fall, or a red-striped towel for the holidays. Accent colors—like deep navy (try Sherwin Williams Naval, #6244) or mustard yellow—work well in small doses, such as labels or a single painted crate.
My all-time favorite combo? Warm white walls, driftwood shelves, matte black hooks, clear jars, and a touch of greenery. It feels fresh but classic, and it’s so easy to keep looking tidy.
What Are the Most Common Pantry Design Mistakes to Avoid?
Many people make shelves too deep—anything over 14” is hard to keep organized. Shallow shelves (8”-12”) are best for most foods. Overcrowding is another trap: don’t fill every inch or your pantry will look messy, no matter how pretty the baskets are. Poor lighting is a biggie—if you can’t see, you won’t use what you have.
Ignoring flow is another mistake. Leave enough space to open doors and access every shelf. I once blocked a corner with a big bin, making half my pantry useless! Fix layout problems by keeping walkways clear and grouping items by use. If you struggle with scale—like tiny jars on a huge shelf—add risers or stack containers to fill space without clutter.
Finally, don’t forget about maintenance. Fancy systems won’t help if you can’t keep up. Make your organization realistic for your family’s habits, not just what looks pretty online.
How Can You Achieve a Farmhouse Look on a Budget?
You don’t need a huge budget for stunning pantry decor. Try DIY shelves from pine boards, or repurpose old crates as produce bins. Thrift stores often have glass jars, baskets, and even vintage breadboards for a few dollars each.
If you’re debating a splurge, invest in good-quality shelving or a farmhouse light fixture—then save on containers and baskets. Spray paint mismatched hardware black for a quick upgrade. My favorite tip: use printable labels from Etsy or Canva for a custom look on the cheap. The best part is telling friends about your $10 pantry makeover win!
Conclusion: Why Does Transitional Farmhouse Pantry Organization Work?
Transitional farmhouse pantry organization turns a messy storage area into a beautiful, practical heart of the home. The right decor and functional touches make every meal easier and every day a little brighter. You don’t have to do it all at once—start with one shelf or a basket, and build from there. I promise, the sense of calm and satisfaction from a well-organized pantry is real. You’ll find yourself opening the door just to admire your handiwork. Let your pantry reflect your style and needs. Ready to start your own transformation? Grab a tape measure, make a mood board, and dive in. Beautiful, organized spaces are within reach—one jar, one shelf, one moment at a time.
Frequently Asked Questions
How do I maintain my organized pantry long-term?
Set a monthly reminder to tidy, toss expired items, and re-label jars as needed. Keep a small “restock” list inside the pantry so you never run out of essentials. Consistency is key—make it a quick, regular habit.
What’s the best way to store bulk foods in a farmhouse pantry?
Use large glass jars with airtight lids for flour, sugar, rice, and oats. Keep heavier jars on lower shelves. For extra savings, buy in bulk and refill jars as needed. Label everything for easy access and a coordinated look.
How can I make a small pantry look bigger?
Stick with light wall colors and add open shelving to reduce visual clutter. Use clear containers and matching baskets to streamline the look. Mirrors or glass doors can also help reflect light and open up the space.
Are open shelves or closed cabinets better for pantry organization?
Open shelves make it easy to see and grab what you need, and they show off your pretty decor. Closed cabinets hide clutter and keep dust out. Many transitional farmhouse pantries use a mix of both for the best of both worlds.
What’s the easiest DIY pantry decor project to start with?
Start by making custom labels for your jars and baskets. It’s affordable, quick, and instantly upgrades your pantry. If you’re handy, adding a shelf or painting a feature wall is also a great beginner project.
