

Picture this: the aroma of melted chocolate swirling through your kitchen, the sweet tang of ripe strawberries, and the gentle crunch of a sugar cone in your hand. That’s the magic of Chocolate-Dipped Strawberry Cannoli Cones. The first time I whipped up a batch, I was instantly transported back to childhood summers—sticky fingers and all—when my grandma would let us sneak extra chocolate chips into our cannoli filling. It’s the kind of moment where you pause, take a deep breath, and just smile because you know you’re onto something truly special.
Years ago, I stumbled upon the idea for these cones after a failed attempt at making traditional cannoli shells (let’s just say my kitchen looked like a flour tornado hit). One rainy afternoon, craving that nostalgic cannoli cream but not the fuss, I spotted a box of sugar cones in my pantry. Lightbulb moment! I dipped those cones in chocolate, filled them with the dreamiest strawberry-speckled ricotta cream, and, honestly, never looked back. My family couldn’t stop sneaking them off the tray—even my picky eater nephew, who usually avoids anything “weird-looking,” was hooked after just one bite.
These Chocolate-Dipped Strawberry Cannoli Cones are dangerously easy, perfect for potlucks, summer parties, or when you want something that looks fancy but comes together in a flash. You know what? I wish I’d figured out this shortcut years ago. I’ve tested them countless times (in the name of research, of course), and they’ve become a staple for family gatherings, gifting, and “just because” weekends. If you’re looking for pure, nostalgic comfort and a treat that feels like a warm hug, you’re going to want to bookmark this one. Let’s face it—dessert should make you happy, and these cones deliver every single time.
Why You’ll Love These Chocolate-Dipped Strawberry Cannoli Cones
After years in the kitchen (and more than a few cannoli mishaps), I’ve landed on this recipe as my go-to for easy, crowd-pleasing desserts. Here’s why you’ll fall head-over-heels for these cannoli cones:
- Quick & Easy: Comes together in under 35 minutes—no frying, no complicated pastry work, just pure fun. Perfect for busy weeknights or last-minute get-togethers.
- Simple Ingredients: You probably have everything you need right in your kitchen. No wild goose chases for specialty items.
- Perfect for Any Occasion: Whether it’s a birthday bash, picnic, or just a Tuesday night, these cones fit right in. They’re also a hit for bridal showers, summer BBQs, and even Valentine’s Day!
- Crowd-Pleaser: Kids love the chocolatey crunch, adults swoon over the creamy filling. They disappear fast—trust me, you might want to double the batch.
- Unbelievably Delicious: The combination of crisp chocolate shell, cool strawberry-ricotta cream, and sweet cones is next-level comfort food. One bite and you’ll know why these are always first to vanish from the dessert table.
What makes these Chocolate-Dipped Strawberry Cannoli Cones different? For starters, the shortcut of using sugar cones means you get that classic cannoli crunch without the stress (or the oil splatters!). Blending the ricotta just right gives the cream an ultra-smooth, almost mousse-like texture. And the fresh strawberries? They add a burst of fruity brightness that makes the filling taste like summer in every bite.
Honestly, this isn’t just another “easy dessert” you forget about next week. It’s the kind of treat that makes you close your eyes for a second after your first taste—equal parts nostalgia and wow factor. I’ve made these for friends who claim to “not even like cannoli,” and they ask for seconds every time. If you want a show-stopping dessert that’s secretly low-stress, this is your ticket. Dessert should be fun, fuss-free, and utterly delicious, and these cones check all the boxes.
What Ingredients You Will Need
This recipe uses simple, wholesome ingredients to deliver bold flavor and that satisfying, classic cannoli texture—without the fuss of deep-frying. Most of these are pantry or fridge staples, and a few fresh finds at the grocery store will have you ready to go.
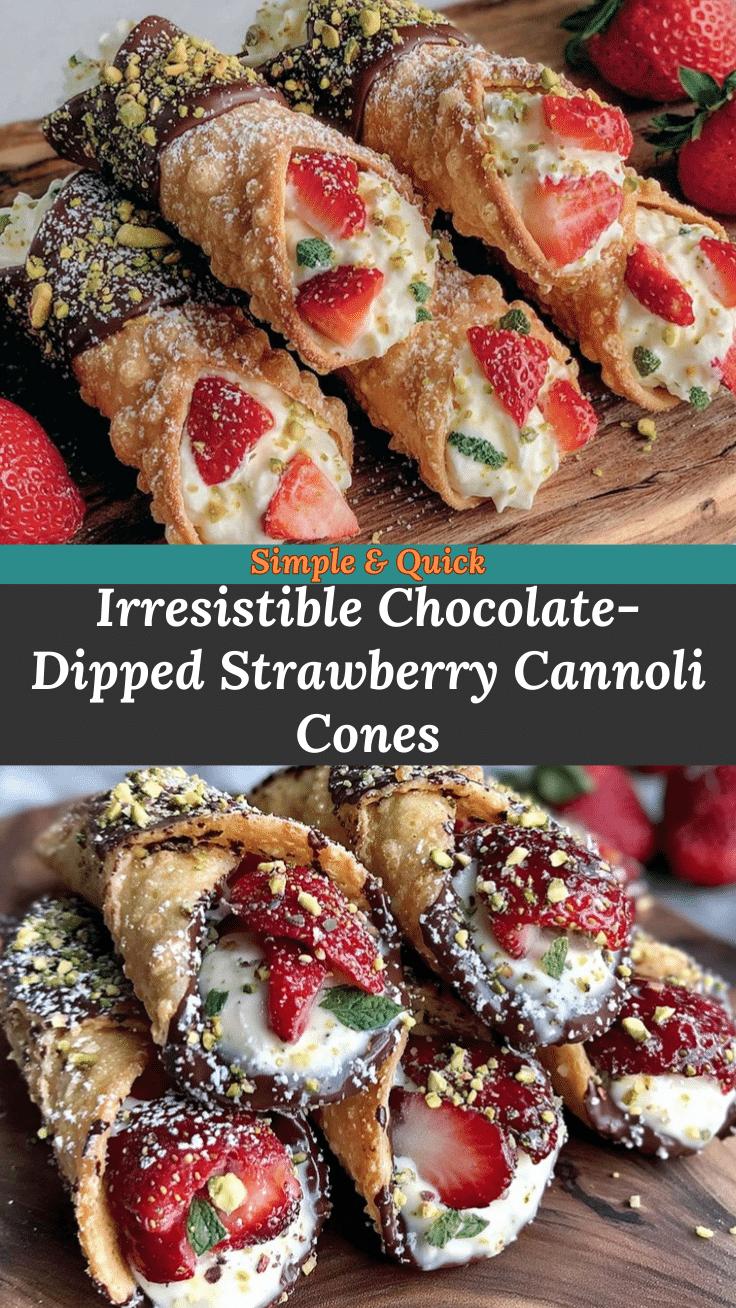
- Sugar cones (12 cones) – The classic ice cream cones, sturdy enough to hold the filling and provide a perfect crunch. You can use gluten-free cones if needed.
- Semi-sweet chocolate chips (1 cup / 170g) – For dipping the cones. I like Ghirardelli for a nice, smooth melt.
- Finely chopped pistachios or sprinkles (1/3 cup / 40g, optional) – For rolling the chocolate-dipped cones. Adds crunch and a pop of color.
For the Strawberry Cannoli Filling:
- Whole milk ricotta cheese (1 1/2 cups / 340g) – Drained well for the creamiest texture. Galbani is my go-to brand for consistent results.
- Mascarpone cheese (1/2 cup / 120g) – Adds richness and stability to the filling. You can substitute with cream cheese if you’re in a pinch.
- Powdered sugar (2/3 cup / 80g) – Sweetens the filling and keeps it smooth.
- Pure vanilla extract (1 teaspoon) – Rounds out the flavors. Use a good quality vanilla for best taste.
- Fresh strawberries (3/4 cup / 110g, finely diced) – Choose ripe, fragrant berries for the sweetest result. (In winter, thawed frozen strawberries work, just pat them dry!)
- Mini chocolate chips (1/4 cup / 40g) – For that classic cannoli crunch. Optional, but highly recommended.
- Pinch of salt – Just enough to balance the sweetness.
Ingredient Notes & Substitutions:
- Swap the sugar cones with gluten-free cones for an allergen-friendly dessert.
- If you can’t find mascarpone, use full-fat cream cheese (make sure it’s softened).
- Mix up the berries—raspberries or blueberries work great, too.
- Dark chocolate chips make the cones extra rich, but milk chocolate is lovely if you prefer things sweeter.
- For a nut-free version, skip the pistachios or try colored sugar crystals for a fun look.
- Want to cut sugar? Use a sugar substitute like Swerve confectioners for a lower-carb treat.
Honestly, the beauty of these Chocolate-Dipped Strawberry Cannoli Cones is how flexible they are. Don’t sweat it if you’re missing an ingredient—there’s always a tasty workaround!
Equipment Needed
You don’t need fancy bakery tools to make these cones—just basic kitchen gear and a few handy helpers. Here’s what I use every time:
- Microwave-safe bowl or double boiler – For melting chocolate. I usually go for a sturdy glass bowl and a quick zap in the microwave.
- Spatula – To stir chocolate and fold the filling together. A silicone spatula makes scraping every last bit easy.
- Small spoon or offset spatula – To help coat the cones with chocolate and fill them neatly.
- Electric hand mixer or stand mixer – Makes whipping the ricotta and mascarpone a breeze. You can do it by hand, but it takes more elbow grease (and time!).
- Paper towels or clean kitchen towel – For draining ricotta and drying strawberries. This step keeps the filling from getting watery.
- Parchment paper or wax paper – For placing dipped cones to set. Trust me, you don’t want chocolate stuck to your countertop.
- Piping bag or zip-top bag (optional) – For a pretty, bakery-style fill. If you don’t have one, a spoon works fine (I’ve done both!).
If you don’t own a mixer, a sturdy whisk and some arm power will do. I’ve made these at my cousin’s house with nothing but a fork and a bowl, and they still turned out great! When it comes to melting chocolate, a double boiler prevents scorching, but the microwave method is just fine for small batches. And don’t stress about buying a piping bag—snip the corner off a plastic sandwich bag and you’re golden.
Maintenance tip: If you love baking, keep your mixer attachments and spatulas squeaky clean between recipes—especially with sticky fillings like this. It keeps flavors pure and makes cleanup way less of a pain later on.
How to Make Chocolate-Dipped Strawberry Cannoli Cones

-
Drain the Ricotta:
Line a fine-mesh sieve with a few layers of paper towels and place it over a bowl. Add the ricotta (1 1/2 cups / 340g), cover, and let drain in the fridge for 30 minutes (or up to overnight). This step is key for a thick, creamy filling—don’t skip it, or your cannoli cream could turn runny. -
Prep the Strawberries:
Wash, hull, and dice the strawberries (3/4 cup / 110g) into tiny pieces. Lay them on a paper towel and gently pat dry. Removing excess moisture keeps your filling from getting soupy (learned this one the hard way!). -
Melt the Chocolate:
Place chocolate chips (1 cup / 170g) in a microwave-safe bowl. Heat in 30-second bursts, stirring between each, until smooth and glossy. (Or, use a double boiler if you prefer.) Don’t overheat—burnt chocolate is no fun. -
Dip the Cones:
Hold each sugar cone by the tip and dip the wide end into the melted chocolate, swirling to coat the edge about 1 inch deep. Immediately roll in chopped pistachios or sprinkles, if using. Lay on parchment paper to set. (If you’re in a hurry, pop them in the fridge for 10 minutes.) -
Make the Filling:
In a medium bowl, combine drained ricotta (1 1/2 cups / 340g), mascarpone (1/2 cup / 120g), powdered sugar (2/3 cup / 80g), vanilla (1 tsp), and a pinch of salt. Beat with an electric mixer on medium speed until smooth, about 1-2 minutes. Scrape down the sides for an even texture. -
Fold in the Mix-Ins:
Gently fold in diced strawberries and mini chocolate chips (1/4 cup / 40g) with a spatula. Go easy—you want to keep the filling light and fluffy. -
Fill the Cones:
Transfer filling to a piping bag, or use a zip-top bag with the corner cut off. Pipe or spoon the filling into each chocolate-dipped cone, mounding it slightly above the rim for a pretty finish. If you’re feeling fancy, sprinkle extra chocolate chips or pistachios on top. -
Chill and Serve:
Place filled cones upright in glasses or a cone holder and chill in the fridge for at least 30 minutes before serving. This helps the filling set and flavors meld. (If you’re in a rush, 15 minutes will do the trick—but the longer chill is worth it!)
Troubleshooting: If your filling seems too loose, chill it for 15 more minutes before filling the cones. If the chocolate hardens before you finish dipping, reheat in the microwave for 10 seconds. And if cones tip over, nestle them in a muffin tin for easy filling and chilling.
Personal tip: I prep the cones and filling ahead, then assemble just before serving for crunchiest results. Less stress, more wow factor!
Pro Tips & Techniques for Perfect Cannoli Cones
- Don’t rush draining the ricotta. A watery filling is the number one culprit for soggy cones. Even if you’re in a hurry, 20 minutes is better than nothing.
- Chop strawberries very fine. Big chunks of fruit can make piping messy and lead to uneven filling. Aim for tiny, uniform pieces for the best texture and look.
- Use a tall glass as a cone holder. If you don’t have a cone stand, line up a few tall glasses and stand the cones upright as you fill and chill them.
- Work in batches. Dip and fill a few cones at a time, especially if it’s warm in your kitchen. This keeps the chocolate from setting too quickly and the cones crisp.
- Seal cones well. If you’re prepping ahead, brush a little melted chocolate inside the tip of each cone—this creates a barrier that keeps the filling from making the cone soggy.
- Don’t overmix the filling. Once you add strawberries, fold gently. Overmixing can break down the berries and make the filling watery (been there, done that!).
- Serve soon after filling. The cones stay crispiest when filled just before serving. If you need to prep ahead, keep the filling and cones separate, then assemble right before dessert time.
Honestly, the most common mistake is not draining the ricotta enough—I’ve learned my lesson after a few “oops, cannoli soup” moments. And if you ever find the cones getting soft, a quick blast in the fridge helps firm everything right up. Trust your senses: the filling should be thick and hold its shape on a spoon, and the cones should feel light and crisp. Dessert is supposed to be joyful, not stressful—so have fun with it!
Variations & Adaptations
One of the best things about Chocolate-Dipped Strawberry Cannoli Cones is how easy they are to customize. Here are my favorite spins (and a few I make for friends with dietary needs):
- Gluten-Free Delight: Use gluten-free sugar cones (they’re widely available now!) and double-check that your chocolate is gluten-free. Everything else in the recipe is naturally free of gluten.
- Berry Swap: Switch out strawberries for raspberries, blueberries, or even chopped cherries. In summer, a mixed-berry blend is stunning—and so refreshing.
- Chocolate Overload: Add 2 tablespoons of unsweetened cocoa powder to the filling for a double-chocolate twist. Or, drizzle the finished cones with melted white chocolate before serving.
- Nut-Free: Skip the pistachios and use colored sugar or mini marshmallows for a festive, allergen-friendly finish.
- Dairy-Free/Vegan: Substitute vegan ricotta (like Kite Hill) and dairy-free cream cheese for mascarpone. Use coconut whipped topping for extra creaminess. Opt for dairy-free chocolate chips and cones.
- Low-Sugar: Use a powdered sugar substitute and reduce mini chocolate chips by half. The strawberries add plenty of sweetness on their own.
- Air Fryer Crunch: Want a warm, extra-crispy cone? Pop unfilled cones in the air fryer at 350°F (175°C) for 2-3 minutes before dipping in chocolate. Let cool before filling.
I’ve had good luck with these variations at family reunions—especially the gluten-free cones and mixed-berry filling. The kids love rolling the chocolate in sprinkles, and the adults always appreciate a lighter, fruitier twist. Don’t be afraid to experiment—half the fun is making these cones your own!
Serving & Storage Suggestions
To serve, I like to pile the filled cones upright in a tall glass or arrange them in a shallow bowl lined with parchment paper (it keeps them from tumbling over). They’re best served chilled, straight from the fridge—cool, creamy, and crisp. If you want to go over the top, dust with extra powdered sugar or drizzle with a little melted chocolate just before bringing them to the table.
Pair these Chocolate-Dipped Strawberry Cannoli Cones with a glass of cold milk, a cup of coffee, or a fruity sparkling cocktail for the adults. They’re a wonderful partner to light summer salads, grilled chicken, or any Italian-inspired meal. For parties, set up a “decorate your own” station with toppings like mini chips, sprinkles, or chopped nuts—the kids (and grown-ups) will love it.
To store, keep the cones and filling separate until you’re ready to serve. The filling will last up to 2 days in the fridge, tightly covered. Filled cones stay crisp for about 2 hours, but after that, they start to soften (still delicious, just a bit less crunchy). If you have leftovers, store them in an airtight container in the fridge and enjoy within a day. To freshen up slightly softened cones, pop them in the freezer for 10 minutes before eating—they’ll be cool and a bit firmer (almost like an ice cream treat!).
Nutritional Information & Benefits
Each Chocolate-Dipped Strawberry Cannoli Cone clocks in at around 220 calories, with about 10g fat, 5g protein, and 26g carbs (mainly from the cone and chocolate). You get a bonus of calcium and a little vitamin C from the ricotta and strawberries.
Ricotta cheese is a good source of protein and calcium, while strawberries pack antioxidants and fiber. If you use gluten-free cones or swap in sugar substitutes, this dessert can fit into a variety of eating plans. Be aware of allergens: these cones contain dairy, wheat (unless you use gluten-free cones), and may contain nuts if you use pistachios.
Honestly, dessert is about joy—but it’s nice to know you’re getting some real food benefits in every bite. I love sharing these cones knowing they’re a little lighter than traditional fried cannoli, but every bit as satisfying.
Conclusion
Chocolate-Dipped Strawberry Cannoli Cones are the kind of easy dessert recipe that brings people together—no fancy occasion required. With their crispy shell, creamy filling, and sweet strawberry surprise, they’re guaranteed to disappear fast. Whether you stick to the classic or mix up your own variation, you’ll find these cones are flexible, fun, and truly foolproof.
From family gatherings to lazy Sunday afternoons, these cones have become a regular request at my house. I hope you’ll love making (and eating) them as much as I do! Try your own twist—different berries, a sprinkle of cinnamon, or a drizzle of extra chocolate—and let your taste buds guide you.
If you make these, I’d love to hear how they turned out! Please leave a comment below, share your photos, or tell me your favorite flavor combos. Dessert is better when it’s shared—so pass this recipe along, and happy baking!
Frequently Asked Questions (FAQs)
How far in advance can I make the cannoli cones?
You can prepare the filling and dip the cones up to 2 days ahead. Keep them separate in the fridge and fill the cones just before serving for the best crunch.
Can I use frozen strawberries in the filling?
Yes! Thaw the berries and pat them very dry with paper towels before dicing. Too much moisture can make the filling runny, so dry them well.
Are these cones gluten-free?
The recipe as written uses regular sugar cones, which contain wheat. Use gluten-free sugar cones for an easy gluten-free adaptation—everything else is naturally gluten-free.
How do I keep the cones from getting soggy?
Drain your ricotta well and fill the cones just before serving. You can also brush melted chocolate inside each cone to create a barrier that keeps them crisp longer.
What can I substitute for mascarpone cheese?
Full-fat cream cheese works well in place of mascarpone. Make sure it’s softened for easy mixing and a creamy texture.
Pin This Recipe!

Chocolate-Dipped Strawberry Cannoli Cones
- Total Time: 35 minutes
- Yield: 12 cones 1x
Description
These Chocolate-Dipped Strawberry Cannoli Cones are a quick and easy dessert featuring crisp sugar cones dipped in chocolate and filled with a creamy, strawberry-studded ricotta filling. Perfect for parties, potlucks, or any occasion where you want a show-stopping treat without the fuss of traditional cannoli.
Ingredients
- 12 sugar cones
- 1 cup semi-sweet chocolate chips (170g)
- 1/3 cup finely chopped pistachios or sprinkles (optional, 40g)
- 1 1/2 cups whole milk ricotta cheese, drained well (340g)
- 1/2 cup mascarpone cheese (120g, or substitute cream cheese)
- 2/3 cup powdered sugar (80g)
- 1 teaspoon pure vanilla extract
- 3/4 cup fresh strawberries, finely diced (110g)
- 1/4 cup mini chocolate chips (40g, optional)
- Pinch of salt
Instructions
- Line a fine-mesh sieve with paper towels and place over a bowl. Add ricotta, cover, and drain in the fridge for 30 minutes (or up to overnight).
- Wash, hull, and finely dice strawberries. Pat dry with paper towels to remove excess moisture.
- Place chocolate chips in a microwave-safe bowl. Heat in 30-second bursts, stirring between each, until melted and smooth. (Or melt using a double boiler.)
- Hold each sugar cone by the tip and dip the wide end into melted chocolate, coating about 1 inch deep. Immediately roll in chopped pistachios or sprinkles if desired. Lay on parchment paper to set. Chill in the fridge for 10 minutes to speed up setting.
- In a medium bowl, combine drained ricotta, mascarpone, powdered sugar, vanilla, and a pinch of salt. Beat with an electric mixer on medium speed until smooth, about 1-2 minutes.
- Gently fold in diced strawberries and mini chocolate chips with a spatula.
- Transfer filling to a piping bag or zip-top bag with the corner cut off. Pipe or spoon filling into each chocolate-dipped cone, mounding slightly above the rim. Top with extra chocolate chips or pistachios if desired.
- Place filled cones upright in glasses or a cone holder and chill in the fridge for at least 30 minutes before serving.
Notes
For crispiest cones, fill just before serving. Drain ricotta thoroughly to prevent soggy filling. You can substitute gluten-free cones, cream cheese for mascarpone, or use other berries. To keep cones crisp longer, brush melted chocolate inside the cone before filling. Store filling and cones separately if making ahead.
- Prep Time: 25 minutes
- Cook Time: 10 minutes
- Category: Dessert
- Cuisine: Italian-American
Nutrition
- Serving Size: 1 filled cone
- Calories: 220
- Sugar: 16
- Sodium: 70
- Fat: 10
- Saturated Fat: 6
- Carbohydrates: 26
- Fiber: 1
- Protein: 5
Keywords: cannoli cones, strawberry cannoli, easy dessert, chocolate dipped cones, summer dessert, no bake, party dessert, ricotta dessert, Italian dessert
