
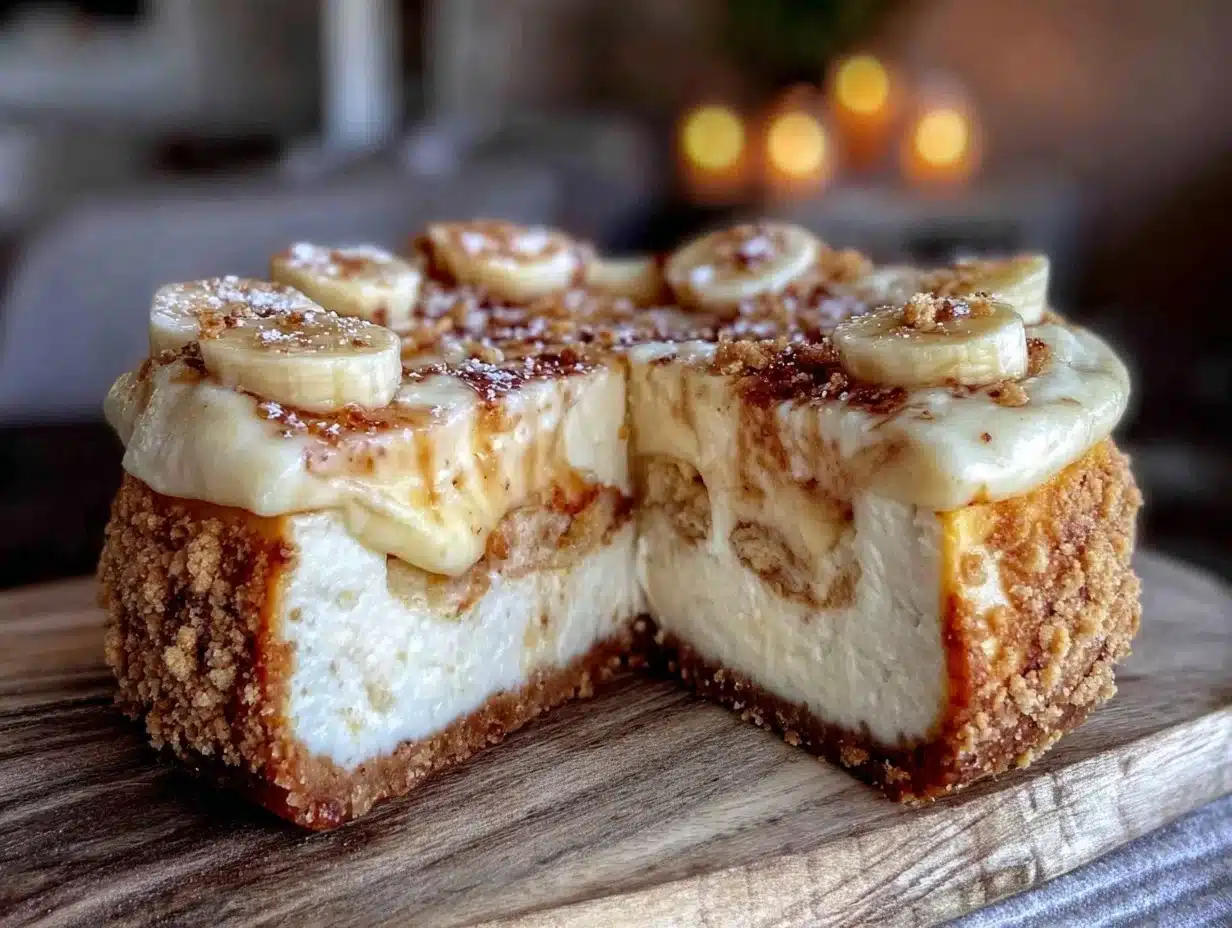
“You sure that’s gonna work?” my partner asked, eyeing the odd layer of vanilla wafers smashed into the springform pan, topped with what looked like a mix between pudding and cheesecake batter. Honestly, I was skeptical myself. I’d meant to make a simple banana pudding but somehow got sidetracked by a craving for cheesecake. So I thought, why not marry the two? The result was this creamy banana pudding cheesecake with a vanilla wafer crust — a total happy accident that’s since become my go-to dessert when I want something that feels homemade but a little fancy.
It all started on a late Sunday afternoon, the kind where you’re halfway through your to-do list and realize you forgot to plan dessert for dinner. With just bananas, cream cheese, and a box of vanilla wafers on hand, I threw this together. The crust’s buttery crunch paired with the velvety banana and cream cheese filling was unexpectedly perfect. The texture is smooth but not too dense, and the vanilla wafer crust carries a nostalgic note that makes the whole thing feel like a warm hug from childhood.
Since then, I’ve made this recipe so many times — honestly, more than I’d like to admit — tweaking and perfecting it until it hits just the right balance. It’s a kind of dessert that feels both indulgent and comforting, making it a favorite for sharing with friends or sneaking a slice after a long day. If you love classic banana pudding or cheesecake, this recipe brings you the best of both worlds without the fuss.
What stuck with me the most was how it managed to turn simple pantry staples into something unexpectedly special — no fancy ingredients, just smart layering and a little patience. I think that’s why this creamy banana pudding cheesecake with vanilla wafer crust keeps finding its way onto my dessert table, quietly promising a moment of delicious calm at the end of a busy day.
Why You’ll Love This Creamy Banana Pudding Cheesecake Recipe
From my many kitchen trials (and happy accidents), this creamy banana pudding cheesecake recipe has proven itself as a crowd-pleaser that’s both easy and satisfying. I’ve tested this recipe multiple times, each time refining the balance of flavors and textures, making it reliable for any home cook looking to impress without stress.
- Quick & Easy: Ready in about 1 hour and 15 minutes, with most of the time spent chilling — ideal for busy weeknights or spontaneous dessert plans.
- Simple Ingredients: No need for specialty stores — cream cheese, ripe bananas, and vanilla wafers are pantry staples you likely already have.
- Perfect for Gatherings: Whether it’s a potluck or a cozy family dinner, this cheesecake stands out with its nostalgic yet fresh twist.
- Crowd-Pleaser: Kids and adults alike love the creamy texture and familiar banana pudding flavor, with just the right amount of sweetness.
- Unbelievably Delicious: The vanilla wafer crust adds a buttery crunch that beautifully contrasts the smooth, luscious filling for a next-level dessert experience.
What sets this recipe apart is the way it brings together two classic desserts into one seamless bite. The trick is blending the cream cheese and pudding perfectly so the texture is silky but still retains that pudding’s comforting lightness. I also like to add just a hint of vanilla bean paste for an authentic flavor boost — little details that make it feel special without complicating the process.
Honestly, this isn’t just a banana pudding cheesecake; it’s the kind of recipe that makes you pause, close your eyes, and savor a simple pleasure. It’s like a nostalgic trip with a homemade flair, perfect for those moments when you want to treat yourself or impress guests without hours in the kitchen.
What Ingredients You Will Need for Creamy Banana Pudding Cheesecake with Vanilla Wafer Crust
This recipe uses straightforward, wholesome ingredients that come together to deliver bold flavor and a satisfying texture without fuss. Most of these are pantry staples, and substitutions are easy if you need them.
- For the Crust:
- 1 ½ cups vanilla wafer crumbs (about 50 wafers, crushed finely)
- 5 tablespoons unsalted butter, melted (I prefer Kerrygold for rich flavor)
- 2 tablespoons granulated sugar (adds subtle sweetness)
- For the Filling:
- 16 ounces (450g) cream cheese, softened (use full fat for creaminess)
- 1 cup granulated sugar
- 3 large eggs, room temperature
- 1 teaspoon vanilla bean paste or pure vanilla extract
- 1 cup sour cream (helps balance richness)
- 1 box (3.4 oz / 96g) instant vanilla pudding mix (adds that banana pudding vibe)
- 2 ripe bananas, mashed (fresh and sweet — not overripe)
- ¼ cup whole milk
- For the Topping:
- 1 cup heavy whipping cream, chilled
- 2 tablespoons powdered sugar
- Optional: vanilla wafer crumbs or sliced bananas for garnish
If you’re looking for a gluten-free option, almond flour mixed with crushed gluten-free vanilla cookies works well for the crust. For a dairy-free twist, swap cream cheese and sour cream with coconut-based alternatives, and use dairy-free pudding mix.
When selecting your bananas, firm but ripe is key — too mushy and the filling gets watery; too firm and you miss the sweetness. I’ve had the best results using bananas that are just starting to get a few brown spots. For pudding mix, I stick with Jell-O brand, which gives a nice smooth texture and flavor.
Equipment Needed
- 9-inch (23 cm) springform pan — makes removing the cheesecake easy without damaging the crust.
- Electric mixer or stand mixer — for smooth cream cheese blending and whipping the topping.
- Mixing bowls — at least two, one for crust and one for filling.
- Rubber spatula — essential for scraping down sides without deflating the batter.
- Measuring cups and spoons — accuracy matters for balance, especially sugar and pudding mix.
- Food processor or resealable bag with a rolling pin — to crush vanilla wafers finely for the crust.
If you don’t have a springform pan, a well-greased regular cake pan works, but slicing and serving can be trickier. For crushing vanilla wafers, I’ve used a zip-top bag with a rolling pin multiple times — no fancy food processor needed. Also, keeping your cream cheese at room temperature before mixing is a small but crucial tip to avoid lumps.
Preparation Method
- Prepare the crust: Preheat your oven to 325°F (163°C). Crush vanilla wafers finely using a food processor or place in a resealable bag and crush with a rolling pin. In a bowl, combine the vanilla wafer crumbs, melted butter, and sugar until evenly mixed. Press firmly into the bottom of your 9-inch springform pan, making sure it’s an even layer. Bake for 10 minutes, then remove and let cool while preparing the filling.
- Make the filling base: In a large mixing bowl, beat the softened cream cheese with an electric mixer on medium speed until smooth and creamy (about 2-3 minutes). Gradually add the sugar and continue mixing until fully combined and silky.
- Add eggs and flavor: Add eggs one at a time, beating well after each addition to incorporate fully. Mix in the vanilla bean paste or extract. Then, stir in the sour cream until smooth.
- Incorporate pudding mix and bananas: Sprinkle the instant vanilla pudding mix over the batter and fold in gently with a spatula until just combined — don’t overmix to avoid deflating the batter. Stir in the mashed bananas and milk; the batter should be smooth but slightly thick.
- Assemble and bake: Pour the filling evenly over the cooled crust, smoothing the top with a spatula. Place the springform pan on a baking sheet to catch any drips. Bake at 325°F (163°C) for 50-60 minutes, or until the edges are set but the center still jiggles slightly when you gently shake the pan.
- Cool and chill: Let the cheesecake cool at room temperature for about an hour. Once cooled, refrigerate for at least 4 hours, preferably overnight, to let the flavors meld and the texture set fully.
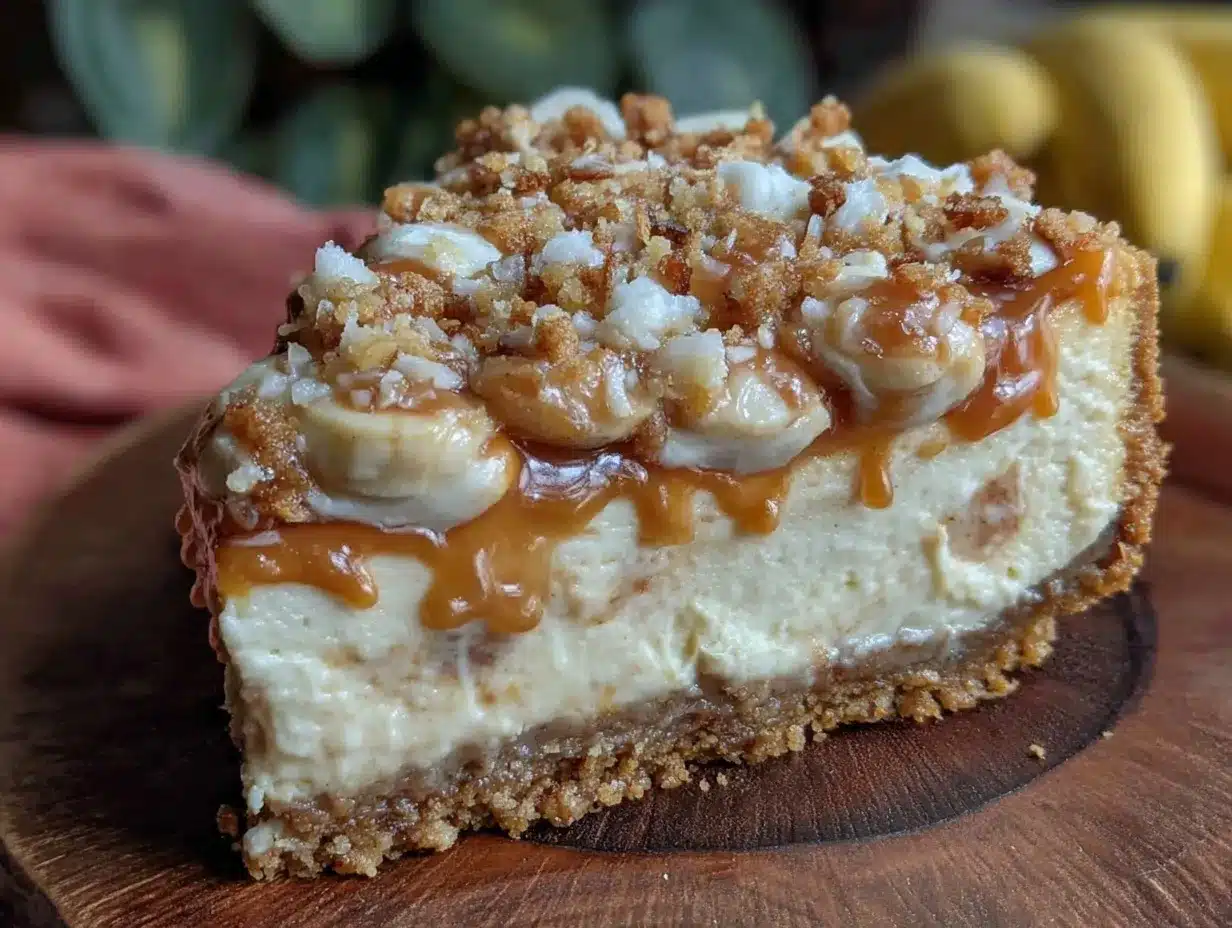
- Whip topping and serve: Just before serving, whip the heavy cream with powdered sugar until soft peaks form. Spread or pipe the whipped cream over the chilled cheesecake and garnish with extra crushed vanilla wafers or banana slices for a pretty finish.
Tip: Baking this cheesecake in a water bath can help prevent cracking on top, but I’ve found that careful mixing and cooling also keep it smooth. If cracks appear, cover with whipped topping — no one will notice!
Cooking Tips & Techniques
One thing I learned early on is to never rush softening the cream cheese — lumps are the enemy here. Let it sit at room temperature for at least an hour or zap it in 10-second bursts in the microwave if you’re pressed for time. Also, folding in the pudding mix gently preserves the light texture, so avoid overmixing after adding it.
When baking, watch the cheesecake closely near the end. The center should still have a slight wobble — it firms up as it chills. Overbaking leads to dryness, so err on the side of underdone. I usually set a timer for 50 minutes and then check every 5 minutes after.
For the crust, pressing the vanilla wafer crumbs firmly and evenly is key to prevent crumbling when slicing. I sometimes chill the crust for 15 minutes before baking to help it set better. If you want to experiment, swapping some wafers for crushed graham crackers adds a nice depth and crunch.
Finally, whipping the topping just before serving guarantees that light, airy contrast to the dense cheesecake. I like to toss a little vanilla in the whipped cream for extra flavor punch.
Variations & Adaptations
- Chocolate Banana Pudding Cheesecake: Add ½ cup melted semi-sweet chocolate into the batter for a chocolate twist. Top with chocolate shavings.
- Gluten-Free Crust: Substitute vanilla wafers with gluten-free cookies or almond flour mixed with a little sugar and butter for a safe alternative.
- Vegan Adaptation: Use dairy-free cream cheese and coconut cream instead of sour cream and heavy cream. Banana flavor shines well with coconut.
- Caramel Banana Pudding Cheesecake: Drizzle homemade or store-bought caramel sauce over the cheesecake and topping for a richer dessert.
- Mini Cheesecakes: For individual servings, try this recipe in muffin tins lined with cupcake liners — perfect for parties. Check out my mini cheesecake shooting board ideas for inspiration on serving small bites.
Personally, I once replaced the vanilla pudding mix with banana pudding mix for an extra banana punch — it was a fun experiment that took the flavor up a notch. The key is balancing sweetness so it doesn’t overpower the cream cheese richness.
Serving & Storage Suggestions
This cheesecake tastes best chilled, straight from the fridge, which helps the flavors meld and the texture stay creamy. Serve slices on a simple white plate with a dollop of whipped cream and a few vanilla wafers on the side for crunch. It pairs beautifully with a cup of black coffee or a light dessert wine.
If you want to add a fresh touch, sliced fresh strawberries or a berry compote on top provide a nice contrast to the sweet banana and vanilla notes. I often serve this alongside a comforting breakfast like fluffy rainbow pancake stacks when brunch guests arrive hungry for something special.
Store leftovers covered tightly in the refrigerator for up to 4 days. The flavors actually improve after 24 hours in the fridge. For longer storage, you can freeze the cheesecake (unwhipped) wrapped in plastic wrap and foil for up to 2 months. Thaw overnight in the fridge before serving, then add fresh whipped cream.
Reheating cheesecake isn’t recommended, but letting slices sit at room temperature for 15-20 minutes before eating softens the texture nicely.
Nutritional Information & Benefits
This creamy banana pudding cheesecake offers a moderate calorie count per slice (around 350-400 calories), balancing indulgence with familiar wholesome ingredients. Bananas provide potassium and vitamin C, while cream cheese and sour cream contribute calcium and protein.
Using real bananas and a touch of instant pudding mix keeps this dessert approachable and less processed than many store-bought options. For those watching carbs, swapping sugar for a natural substitute like monk fruit sweetener can reduce sugar content.
Keep in mind this recipe contains dairy, gluten (unless modified), and eggs, so it’s not suited for those with allergies to these ingredients. However, the adaptability means you can make dairy-free or gluten-free versions that still taste amazing.
From a wellness perspective, this cheesecake is a treat best enjoyed in moderation, but it brings a comforting, nostalgic satisfaction that sometimes feels just as important as nutrition.
Conclusion
If you’re looking for a dessert that feels special but is surprisingly simple to make, this creamy banana pudding cheesecake with vanilla wafer crust is your ticket. It’s one of those recipes that sneaks into your rotation without fanfare but quickly becomes a favorite for family dinners, celebrations, or solo indulgence.
Feel free to customize it — maybe a little chocolate swirled in, or a gluten-free crust — to suit your tastes and pantry. For me, it’s that perfect blend of creamy, crunchy, sweet, and nostalgic that keeps me coming back.
Give it a try, and don’t be surprised if it becomes the dessert everyone’s asking you to bring, much like the way my chocolate-covered strawberry scone sandwiches have over the years. I’m excited to hear how you make it yours!
Frequently Asked Questions about Creamy Banana Pudding Cheesecake
Can I make this cheesecake ahead of time?
Absolutely! It actually tastes better after chilling overnight, which helps the flavors meld and the texture set perfectly.
What if I don’t have a springform pan?
You can use a regular 9-inch cake pan but greasing well and lining with parchment paper is important. Serving might be trickier since you can’t remove the sides easily.
How ripe should the bananas be?
Use bananas that are ripe with a few brown spots but still firm. Overripe bananas can make the filling too watery.
Can I freeze leftover cheesecake?
Yes, wrap it tightly in plastic and foil, then freeze for up to 2 months. Thaw in the fridge before serving.
Is there a dairy-free version of this recipe?
Yes! Substitute cream cheese and sour cream with coconut-based alternatives and use dairy-free pudding mix and milk.
Pin This Recipe!


Creamy Banana Pudding Cheesecake Recipe Easy Homemade with Vanilla Wafer Crust
- Total Time: 5 hours 30 minutes
- Yield: 12 servings 1x
Description
A creamy banana pudding cheesecake with a buttery vanilla wafer crust that combines the best of both classic desserts into one indulgent, nostalgic treat.
Ingredients
- 1 ½ cups vanilla wafer crumbs (about 50 wafers, crushed finely)
- 5 tablespoons unsalted butter, melted
- 2 tablespoons granulated sugar
- 16 ounces (450g) cream cheese, softened
- 1 cup granulated sugar
- 3 large eggs, room temperature
- 1 teaspoon vanilla bean paste or pure vanilla extract
- 1 cup sour cream
- 1 box (3.4 oz / 96g) instant vanilla pudding mix
- 2 ripe bananas, mashed
- ¼ cup whole milk
- 1 cup heavy whipping cream, chilled
- 2 tablespoons powdered sugar
- Optional: vanilla wafer crumbs or sliced bananas for garnish
Instructions
- Preheat oven to 325°F (163°C). Crush vanilla wafers finely using a food processor or a resealable bag with a rolling pin.
- In a bowl, combine vanilla wafer crumbs, melted butter, and sugar until evenly mixed. Press firmly into the bottom of a 9-inch springform pan in an even layer.
- Bake crust for 10 minutes, then remove and let cool while preparing the filling.
- In a large mixing bowl, beat softened cream cheese with an electric mixer on medium speed until smooth and creamy (2-3 minutes).
- Gradually add 1 cup granulated sugar and continue mixing until fully combined and silky.
- Add eggs one at a time, beating well after each addition. Mix in vanilla bean paste or extract.
- Stir in sour cream until smooth.
- Sprinkle instant vanilla pudding mix over the batter and fold in gently with a spatula until just combined.
- Stir in mashed bananas and milk; batter should be smooth but slightly thick.
- Pour filling evenly over cooled crust, smoothing the top with a spatula. Place springform pan on a baking sheet.
- Bake at 325°F (163°C) for 50-60 minutes, until edges are set but center jiggles slightly when shaken gently.
- Let cheesecake cool at room temperature for about 1 hour.
- Refrigerate for at least 4 hours, preferably overnight, to let flavors meld and texture set.
- Just before serving, whip heavy cream with powdered sugar until soft peaks form.
- Spread or pipe whipped cream over chilled cheesecake and garnish with extra crushed vanilla wafers or banana slices.
Notes
Use bananas that are ripe with a few brown spots but still firm to avoid watery filling. Soften cream cheese at room temperature to avoid lumps. Fold pudding mix gently to preserve light texture. Baking in a water bath can prevent cracking but is optional. Whip topping just before serving for best texture.
- Prep Time: 20 minutes
- Cook Time: 1 hour 10 minutes
- Category: Dessert
- Cuisine: American
Nutrition
- Serving Size: 1 slice (1/12th of c
- Calories: 375
- Sugar: 22
- Sodium: 320
- Fat: 25
- Saturated Fat: 15
- Carbohydrates: 32
- Fiber: 1
- Protein: 6
Keywords: banana pudding cheesecake, vanilla wafer crust, creamy cheesecake, easy dessert, homemade cheesecake, banana dessert, pudding cheesecake
