

“You know, I wasn’t exactly planning to whip up a dessert that day,” my neighbor Tom confessed while fixing the squeaky gate one lazy Saturday afternoon. “I was just trying to make a quick snack for my dad’s birthday, but things got a little messy.” Honestly, it was one of those moments when the kitchen chaos turned into pure magic. Tom had grabbed the wrong cream cheese, and instead of baking the pie, he just chilled it overnight. The next day, he was sitting on his porch holding this ridiculously creamy, peanut buttery pie that tasted like a Reese’s candy bar melted into a cloud. I still remember the sun hitting the golden crust just right, and the way his dog barked at the fridge, begging for a slice.
Maybe you’ve been there—scrambling last minute before a special day, juggling work and family, and needing something that’s quick but impressive. This Creamy No-Bake Reese’s Peanut Butter Pie is exactly that kind of recipe. It’s effortless, but with a flavor that punches well above its weight. Plus, the best part? No oven necessary! I mean, who wants to heat up the kitchen on a sunny Father’s Day? Not me.
Tom’s accidental masterpiece has become my go-to for any time I want to wow Dad (or my own sweet tooth). The texture is dreamy—silky peanut butter filling with the perfect hint of chocolate crunch from that classic Reese’s twist. I still laugh remembering when Tom forgot to add the sugar and had to redo half the filling (he learned the hard way that peanut butter needs a little sweetness to sing). But that messy kitchen day gave me a recipe that’s now part of our family tradition, and I’m betting it’ll be yours too.
So, if you’re looking for a dessert that’s fast, fuss-free, and packed with that nutty, chocolaty goodness, stick around. This pie will bring some serious smiles to your Father’s Day table—and maybe a little happy kitchen chaos, too.
Why You’ll Love This Creamy No-Bake Reese’s Peanut Butter Pie Recipe
Having tested this recipe with a few picky eaters (including my skeptical brother who usually “doesn’t do peanut butter desserts”), I can say with confidence it’s a winner. It comes together in under 20 minutes, which means less time stressing and more time enjoying the day with Dad. Here’s why it’s become a staple in my dessert lineup:
- Quick & Easy: No baking, no complicated steps—just mix, chill, and serve.
- Simple Ingredients: Pantry basics plus that iconic Reese’s peanut butter cup magic. No hunting for rare items.
- Perfect for Father’s Day: It’s indulgent without being over the top, and a guaranteed crowd-pleaser for all ages.
- Crowd-Pleaser: Kids, teens, and adults all go back for seconds (and thirds, if you’re generous).
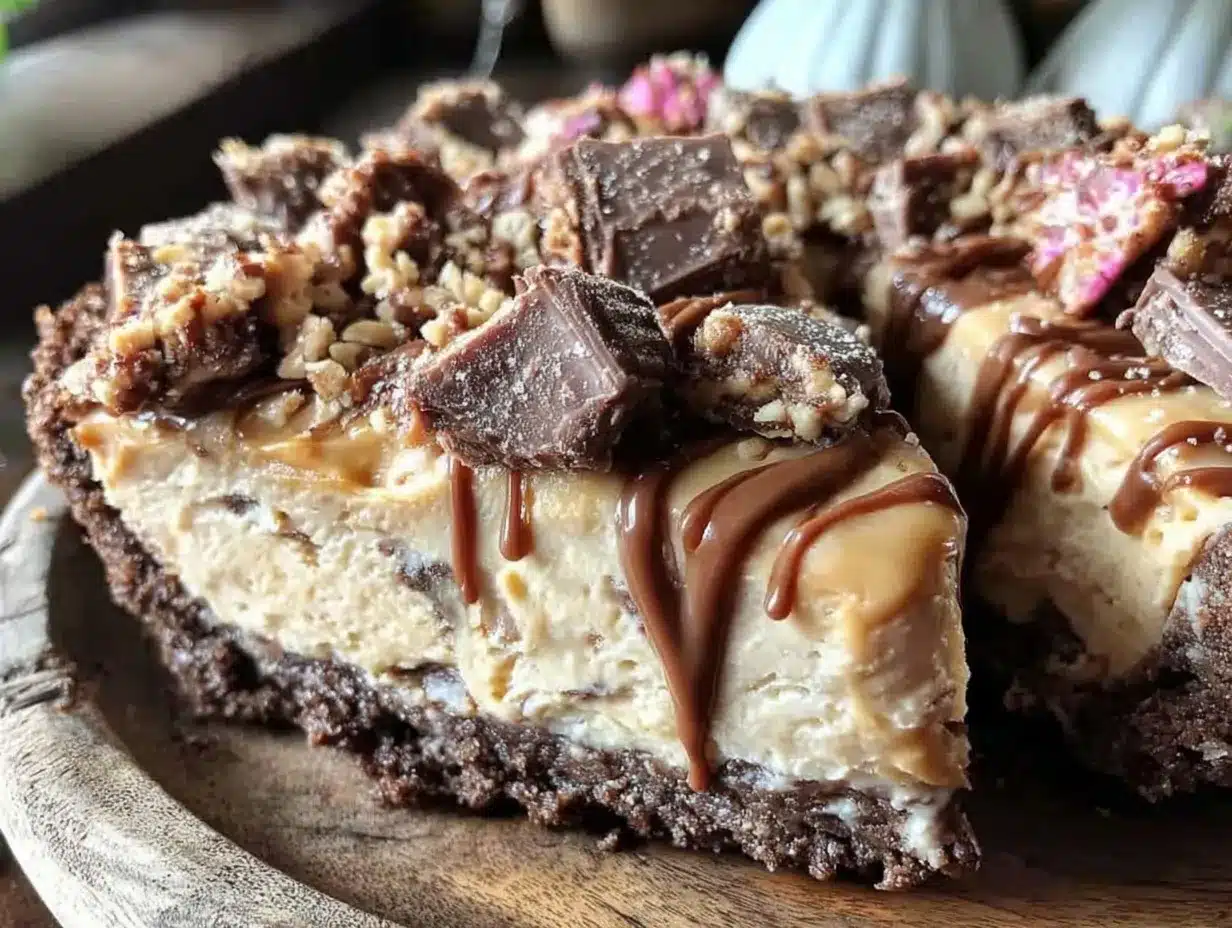
- Unbelievably Delicious: The creamy peanut butter contrasts beautifully with the chocolate crust and chopped Reese’s pieces for texture.
What makes this pie stand out? It’s the no-bake method that locks in a luscious, smooth filling without any risk of cracking or drying out—something that often happens with baked peanut butter pies. Plus, blending cream cheese and whipped topping creates that cloud-like texture that’s just so satisfying. If you’re like me, you’ll appreciate how it holds up well in the fridge but still slices cleanly. Honestly, it’s comfort food reimagined for busy days, and it’s one of those recipes that keeps Dad coming back for more.
Ingredients You’ll Need for the Creamy No-Bake Reese’s Peanut Butter Pie
This recipe calls for straightforward ingredients that work together to create layers of flavor and texture. Most of these you’ll find in your pantry or local grocery store, and if you want to swap a few out, I’ve got suggestions below.
- For the Crust:
- 1 ½ cups (150g) chocolate cookie crumbs (I like using Oreo crumbs without filling—easy to crush yourself or buy pre-made)
- 6 tablespoons (85g) unsalted butter, melted (adds richness and helps the crust hold)
- 2 tablespoons granulated sugar (balances the chocolate’s bitterness)
- For the Filling:
- 8 ounces (225g) cream cheese, softened (I prefer Philadelphia brand for smooth texture)
- 1 cup (250g) creamy peanut butter (smooth is best for that silky feel; Jif or Skippy work great)
- 1 cup (120g) powdered sugar (sweetens and stabilizes the filling)
- 1 teaspoon pure vanilla extract (boosts flavor depth)
- 1 ½ cups (360ml) heavy whipping cream, chilled (whipped to soft peaks for lightness)
- 1 cup chopped Reese’s Peanut Butter Cups (the star ingredient—use classic size, chopped roughly)
Substitution Tips: For a dairy-free option, swap cream cheese with a vegan alternative and use coconut cream instead of heavy cream. Gluten-free cookie crumbs can substitute for the crust, just press firmly. If you want less sugar, you can reduce powdered sugar to ¾ cup, but the texture may be a bit softer.
Equipment Needed
- 9-inch (23cm) pie dish or springform pan
- Mixing bowls (one large for filling, one medium for crust)
- Electric hand mixer or stand mixer (for whipping cream and blending filling smoothly)
- Measuring cups and spoons
- Rubber spatula (for folding whipped cream gently)
- Food processor or zip-top bag and rolling pin (for crushing cookies, if not pre-crumbled)
- Knife and cutting board (for chopping Reese’s cups)
If you don’t have a mixer, you can whisk the cream by hand—but it’ll take longer and a bit more arm work. I personally prefer a stand mixer because it whips the cream to perfect peaks without overdoing it. For budget-friendly options, a sturdy hand whisk and a good zip-top bag for cookie crushing work just fine. Just be sure to chill your cream bowl beforehand for easier whipping.
Preparation Method: How to Make This Creamy No-Bake Reese’s Peanut Butter Pie
- Prepare the crust: In a medium bowl, combine 1 ½ cups (150g) chocolate cookie crumbs, 6 tablespoons (85g) melted unsalted butter, and 2 tablespoons sugar. Mix well until crumbs are evenly coated and hold together when pressed. (About 3 minutes.)
- Press crust into pie dish: Transfer crumb mixture into a 9-inch (23cm) pie dish or springform pan. Use the back of a spoon or a flat-bottomed glass to press crumbs firmly and evenly into the bottom and slightly up the sides. Chill in the fridge for at least 10 minutes to set.
- Make the filling base: In a large mixing bowl, beat 8 ounces (225g) softened cream cheese with 1 cup (250g) creamy peanut butter until smooth and creamy (about 2-3 minutes). Add 1 cup (120g) powdered sugar and 1 teaspoon vanilla extract, then mix until well combined.
- Whip the cream: In a separate chilled bowl, whip 1 ½ cups (360ml) heavy cream until soft peaks form. (Tip: don’t overbeat or it will turn grainy.)
- Fold whipped cream into peanut butter mixture: Gently fold the whipped cream into the peanut butter mixture using a rubber spatula. Do this carefully to keep it light and airy—no rushing here!
- Add chopped Reese’s cups: Reserve about ¼ cup for topping. Fold the rest (¾ cup) into the filling evenly.
- Assemble the pie: Spoon the filling over the chilled crust, smoothing the top with a spatula. Sprinkle the reserved chopped Reese’s evenly on top.
- Chill the pie: Refrigerate for at least 4 hours or overnight to allow the filling to set properly. (I usually make mine the night before.)
- Serve: For clean slices, run a knife under hot water, dry it, and slice. Serve chilled and watch the smiles appear!
Note: If the crust feels too crumbly, add a tablespoon more melted butter next time. And if your filling feels too soft, chilling longer always helps firm it up.
Cooking Tips & Techniques for Perfect No-Bake Peanut Butter Pie
One thing I learned the hard way is that whipping the cream just right is key. You want soft peaks—not too loose, not too stiff. Overwhipping makes the filling grainy and dry, and underwhipping results in a runny pie. So, keep an eye on it. Also, letting your cream cheese soften fully at room temperature makes blending smoother and prevents lumps.
When folding the whipped cream into the peanut butter mixture, be gentle—use a spatula and fold in thirds, turning the bowl as you go. This keeps the filling airy and light, giving it that melt-in-your-mouth texture.
Another tip: chilling the pie overnight isn’t just about patience—it really helps the flavors meld and the texture to firm up. If you’re short on time, aim for at least 4 hours, but honestly, the next day tastes better.
Lastly, chopping the Reese’s cups by hand gives you control over chunk size. I like a mix of small bits and bigger pieces for a fun texture contrast. Avoid the food processor here unless you want peanut butter dust everywhere!
Variations & Adaptations to Suit Every Taste
- Chocolate Lovers’ Version: Swirl in some melted dark chocolate into the filling before folding in the whipped cream for a richer twist.
- Gluten-Free Option: Use gluten-free chocolate cookie crumbs or even crushed gluten-free pretzels for an added salty crunch.
- Healthier Swap: Replace heavy cream with full-fat coconut cream and use natural peanut butter with no added sugar (adjust powdered sugar to taste).
- Seasonal Twist: Add a few chopped roasted peanuts or sprinkle flaky sea salt on top for a salty-sweet balance.
- Personal Favorite: I sometimes add a teaspoon of instant espresso powder to the filling—it boosts the chocolate and peanut flavors spectacularly without tasting like coffee.
Serving & Storage Suggestions for Your Reese’s Peanut Butter Pie
This pie tastes best chilled and fresh but can hold up well in the fridge for up to 3 days. Keep it covered tightly with plastic wrap or in an airtight container to prevent it from absorbing any fridge odors.
For reheating, honestly, this is best served cold, but if you want it slightly softer, let it sit at room temperature for 15 minutes before slicing. Avoid microwaving as it’ll melt the filling and make a mess.
Serve slices with a dollop of whipped cream or a few extra chopped Reese’s for presentation. Pairing it with a cold glass of milk or a robust cup of black coffee really balances the sweetness.
Flavors develop subtly over time, so if you make it a day ahead, the peanut butter and chocolate notes deepen, making it even more irresistible.
Nutritional Information & Benefits
Each slice (based on 8 servings) contains approximately:
| Calories | 420 |
|---|---|
| Fat | 30g |
| Carbohydrates | 30g |
| Protein | 8g |
This pie is rich in protein and healthy fats from peanut butter, which can help keep you satisfied. The cream cheese adds calcium and a creamy texture without too many carbs. If you’re watching sugar intake, consider reducing powdered sugar or using natural peanut butter.
Note: Contains dairy, gluten (unless substituted), and peanuts, so it’s not suitable for those with allergies to these ingredients.
From my perspective, this pie strikes a nice balance between indulgence and nourishment—perfect for treating Dad without going overboard.
Conclusion
This Creamy No-Bake Reese’s Peanut Butter Pie is more than just a dessert; it’s a little celebration in every bite. It’s simple, fast, and packed with flavors that remind me of those perfectly imperfect kitchen moments—like Tom’s accidental masterpiece. Whether you’re a seasoned baker or a last-minute dessert rescuer, this recipe will fit right in.
Feel free to make it your own by adjusting sweetness, adding toppings, or trying one of the variations mentioned. I love how this pie brings people together—especially on Father’s Day when all you want is to show a little love with something delicious.
If you try it, drop a comment below and let me know how it went or what tweaks you made. Share it with your family, friends, or that special dad who deserves a slice (or two). Here’s to happy kitchens and even happier taste buds!
FAQs About Creamy No-Bake Reese’s Peanut Butter Pie
Can I make this pie ahead of time?
Yes! This pie actually tastes better when made a day ahead because the flavors meld and the filling sets perfectly. Just keep it covered in the fridge.
What can I use if I don’t have cream cheese?
You could try mascarpone cheese for a richer flavor or a dairy-free cream cheese alternative if needed, but the texture might vary slightly.
How do I prevent the crust from getting soggy?
Press the crust firmly and chill it well before adding the filling. If you want extra protection, you can brush the crust with melted chocolate and let it set before adding filling.
Can I freeze this pie?
Freezing isn’t recommended because the texture of the whipped cream and filling can become grainy after thawing. Best enjoyed fresh or refrigerated.
Is there a way to make this pie less sweet?
Absolutely. Reduce the powdered sugar to ¾ cup and use natural peanut butter with no added sugar. Taste as you go to find your perfect balance.
Pin This Recipe!


Creamy No-Bake Reese’s Peanut Butter Pie
- Total Time: 4 hours 15 minutes
- Yield: 8 servings 1x
Description
A quick and easy no-bake dessert featuring a silky peanut butter filling with a chocolate cookie crust and chopped Reese’s Peanut Butter Cups, perfect for Father’s Day or any occasion.
Ingredients
- 1 ½ cups (150g) chocolate cookie crumbs (Oreo crumbs without filling)
- 6 tablespoons (85g) unsalted butter, melted
- 2 tablespoons granulated sugar
- 8 ounces (225g) cream cheese, softened
- 1 cup (250g) creamy peanut butter
- 1 cup (120g) powdered sugar
- 1 teaspoon pure vanilla extract
- 1 ½ cups (360ml) heavy whipping cream, chilled
- 1 cup chopped Reese’s Peanut Butter Cups
Instructions
- In a medium bowl, combine chocolate cookie crumbs, melted unsalted butter, and sugar. Mix well until crumbs are evenly coated and hold together when pressed (about 3 minutes).
- Press crumb mixture firmly and evenly into the bottom and slightly up the sides of a 9-inch pie dish or springform pan. Chill in the fridge for at least 10 minutes to set.
- In a large mixing bowl, beat softened cream cheese with creamy peanut butter until smooth and creamy (about 2-3 minutes). Add powdered sugar and vanilla extract, then mix until well combined.
- In a separate chilled bowl, whip heavy cream until soft peaks form. Avoid overbeating.
- Gently fold whipped cream into the peanut butter mixture using a rubber spatula to keep it light and airy.
- Fold ¾ cup of chopped Reese’s cups into the filling, reserving ¼ cup for topping.
- Spoon the filling over the chilled crust and smooth the top. Sprinkle reserved chopped Reese’s evenly on top.
- Refrigerate the pie for at least 4 hours or overnight to allow the filling to set properly.
- For clean slices, run a knife under hot water, dry it, and slice. Serve chilled.
Notes
Whip cream to soft peaks to avoid grainy texture. Soften cream cheese fully at room temperature for smooth blending. Fold whipped cream gently to keep filling airy. Chill pie overnight for best flavor and texture. If crust is too crumbly, add more melted butter. For less sweetness, reduce powdered sugar to ¾ cup and use natural peanut butter.
- Prep Time: 15 minutes
- Cook Time: 0 minutes
- Category: Dessert
- Cuisine: American
Nutrition
- Serving Size: 1 slice (1/8 of pie)
- Calories: 420
- Fat: 30
- Carbohydrates: 30
- Protein: 8
Keywords: no-bake pie, peanut butter pie, Reese’s pie, easy dessert, Father’s Day dessert, creamy pie, chocolate peanut butter dessert
