

“You ever have one of those nights where the smell of sizzling burgers seems to haunt you from the neighbor’s yard, and you promise yourself, ‘Tonight, I’m making my own’? Well, that was me last Thursday. I had big plans for a fancy dinner, but then I got sidetracked—forgot to thaw the steaks, the kids were clamoring for something quick, and honestly, the thought of standing over a greasy stove felt exhausting.
So there I was, rummaging through my fridge and thinking, ‘How can I get that crispy, juicy smash burger magic without the usual flip-and-fuss on the stovetop?’ Then it hit me: why not bake them on a sheet pan and smash them right there in the oven? Sounds a bit wild, I know, but let me tell you, this method turned out to be a total revelation.
The best part? No flipping, no splattering grease, and almost zero mess. The burgers come out with that perfect crispy edge and tender center—like the best diner smash burger, but way easier. Maybe you’ve been there, craving that satisfying crunch and juicy bite but dreading the cleanup. This recipe saved me that night, and honestly, I’ve been making it nearly every week since. It’s simple, fast, and has become my go-to for those “I want a burger but I don’t want to sweat over the stove” moments.
Oh, and fair warning: I did forget to line the sheet pan the first time, so there was a little extra scrubbing later. But hey, we live and learn, right? This crispy no-flip sheet pan smash burger recipe stayed with me because it’s a no-nonsense, crowd-pleasing winner that feels both comforting and clever.
Why You’ll Love This Crispy No-Flip Sheet Pan Smash Burgers Oven Recipe
After testing this recipe a dozen times (yes, I counted), here’s why it stands out in my burger repertoire:
- Quick & Easy: Ready in under 30 minutes, perfect for those busy weeknights when you just want a satisfying meal without the fuss.
- Simple Ingredients: No fancy store runs necessary; you probably already have most of these in your pantry and fridge.
- Perfect for Casual Gatherings: Whether it’s a laid-back family dinner or a casual weekend hangout, these burgers hit the spot.
- Crowd-Pleaser: Kids, adults, picky eaters—everyone asks for seconds, mainly because of that irresistible crispiness.
- Unbelievably Delicious: The sheet pan method locks in juiciness while crisping the edges just right, giving you that iconic smash burger texture without flipping.
What sets this version apart? It’s the no-flip technique itself—smashing the patties right on the sheet pan and letting the oven’s heat do the work. Plus, the seasoning is spot on: a simple sprinkle of salt and pepper with a touch of garlic powder that brings out the beef’s natural flavor without overpowering it. Honestly, it’s comfort food made effortlessly, and the best part is you don’t even have to break a sweat at the stove.
This recipe isn’t just about convenience; it’s about getting that soul-satisfying burger experience with less mess and stress. I love how it delivers the crispy edges I crave while keeping the inside juicy and tender. Give it a try, and I bet you’ll find yourself making these crispy no-flip sheet pan smash burgers in the oven again and again.
What Ingredients You Will Need
This recipe relies on straightforward, wholesome ingredients to create that bold flavor and satisfying texture without any hassle. Most of these are pantry staples, and substitutions are easy if needed.
- Ground Beef (80/20 blend), 1 pound (450 g): The fat content is key for juicy, flavorful patties. I personally prefer meat from my local butcher or brands like Pat LaFrieda for the best texture.
- Salt, 1 teaspoon: Simple kosher salt works best for seasoning.
- Black Pepper, ½ teaspoon: Freshly ground adds a nice bite.
- Garlic Powder, ¼ teaspoon: Optional but highly recommended for subtle depth.
- Yellow Mustard, 1 tablespoon: Adds a tangy kick to the patty mixture or as a spread.
- Soft Hamburger Buns, 4: Brioche or potato buns work beautifully here.
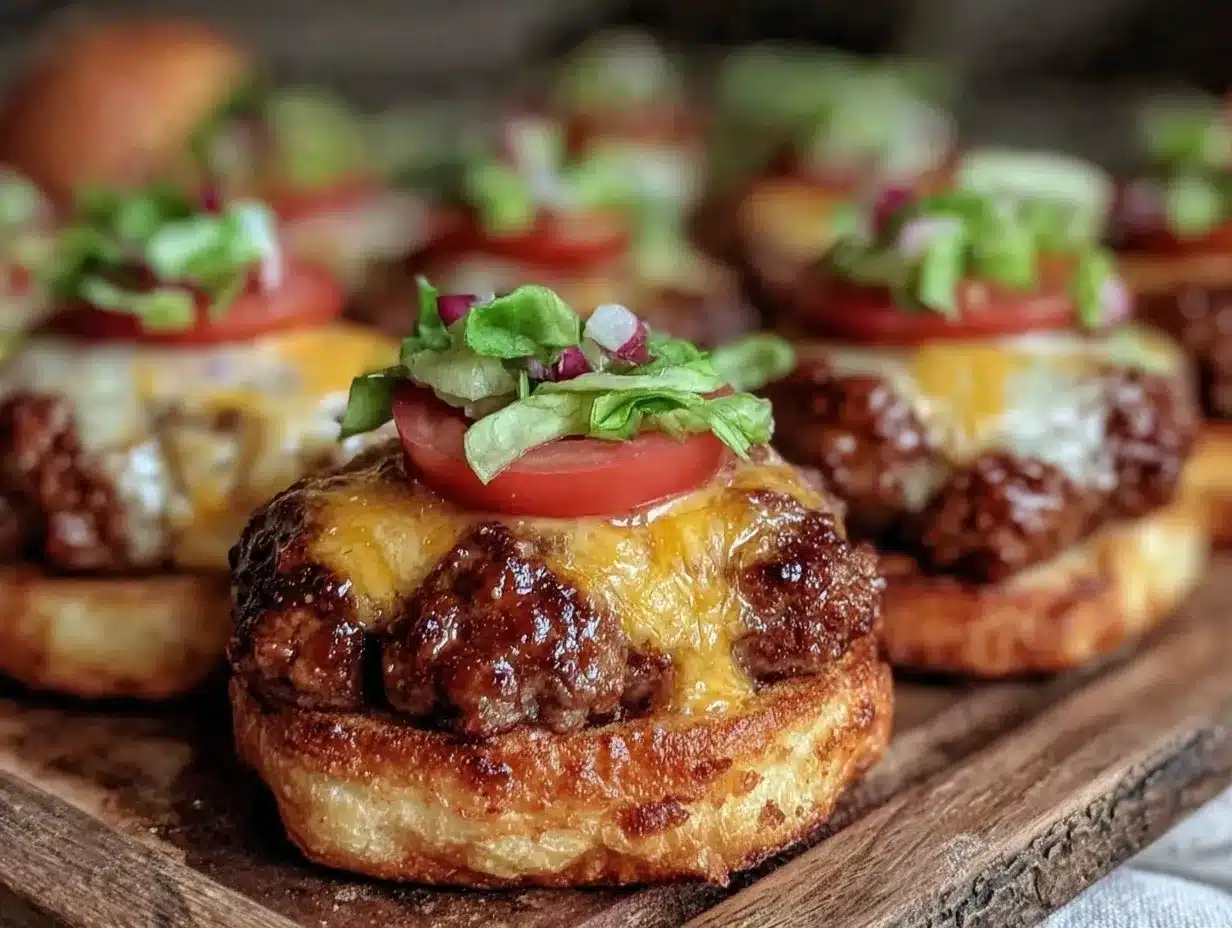
- Cheese Slices, 4 (American, cheddar, or your favorite): Melts perfectly right on the hot burger.
- Butter, 1 tablespoon, melted: For brushing buns, adds richness and helps crisp them up.
- Optional Toppings:
- Pickles
- Shredded lettuce
- Tomato slices
- Sliced red onions
- Ketchup and mayo
If you’re aiming for a gluten-free option, swap the buns for gluten-free ones or lettuce wraps. For dairy-free, pick your favorite plant-based cheese or skip it altogether. I find this recipe flexible, so don’t worry if you need to adjust ingredients to your pantry or diet.
Equipment Needed
- Large rimmed baking sheet (sheet pan): A sturdy, rimmed pan is crucial to catch any drippings and help the burgers crisp up nicely. I use a half-sheet pan, roughly 18×13 inches (46×33 cm).
- Parchment paper or silicone baking mat: Highly recommended to prevent sticking and ease cleanup. I always line my pan with parchment to avoid the mess I had the first time I tried this.
- Heavy spatula or metal scraper: For smashing the patties down firmly on the sheet pan.
- Mixing bowl: To season and gently combine the ground beef.
- Basting brush (optional): For brushing melted butter on buns before toasting.
If you don’t have a silicone baking mat, parchment paper works just fine. And if you’re on a budget, a simple rimmed baking sheet will do the job well. Just avoid thin pans that warp under heat; they make smashing tricky!
Preparation Method
- Preheat the oven to 450°F (230°C): Place a rack in the middle position to ensure even cooking. This high heat is essential for getting those crispy edges.
- Prepare your baking sheet: Line it with parchment paper or a silicone baking mat. This keeps cleanup easy and prevents sticking.
- Season the ground beef: In a large mixing bowl, gently combine 1 pound (450 g) of ground beef with 1 teaspoon salt, ½ teaspoon black pepper, and ¼ teaspoon garlic powder. Be careful not to overwork the meat—that can make the burgers tough. Just mix until evenly seasoned.
- Divide the meat into 4 equal portions: Roll each into loose balls about 4 ounces (113 g) each. Place them spaced evenly on the lined sheet pan.
- Smash the patties: Using a heavy spatula or metal scraper, press down firmly on each meatball to flatten it to about ½-inch (1.3 cm) thickness. The edges should spread out unevenly—that’s the magic crispy part forming.
- Bake the patties: Slide the sheet pan into the oven for 10 minutes. Around the 8-minute mark, check the edges—they should be crisp and caramelized. If not, give them another minute or two, but watch closely to avoid burning.
- Add cheese: After 10 minutes, remove the pan and immediately place a slice of cheese on each patty. Return the pan to the oven for an additional 2 minutes to melt the cheese.
- Toast the buns: While the cheese melts, brush the insides of the buns with melted butter (about 1 tablespoon) and place them on a separate baking sheet. Toast in the oven for 3-4 minutes until golden and slightly crisp.
- Assemble your burgers: Remove patties and buns from the oven. Layer your favorite toppings, sauces, and the crispy no-flip sheet pan smash burger patty on the buns.
- Serve immediately: This is best enjoyed hot for that perfect combination of juicy and crispy.
Quick tip: If your spatula isn’t heavy enough to smash well, press down with your hand (covered with a flat piece of parchment for hygiene) or a small cast-iron pan. Patience here pays off with that signature crisp.
Cooking Tips & Techniques for Perfect Smash Burgers
Getting the right balance of crispy edges and juicy insides without flipping can be tricky, but here are a few tricks I’ve learned:
- Don’t overwork the meat: Mixing too much will tighten the protein and dry out your burgers. Gentle seasoning is all you need.
- Smash firmly and evenly: The initial press on the sheet pan creates that beautiful crust. Use a heavy spatula and press straight down for best results.
- High heat is key: 450°F (230°C) oven temp ensures caramelization. Lower temps won’t crisp the edges properly.
- Use parchment or a silicone mat: I learned this the hard way—your sheet pan will thank you, and cleanup becomes a breeze.
- Timing matters: Keep an eye on the patties after 8 minutes to avoid burning. Every oven is a little different.
- Let the cheese melt quickly: Adding cheese off-heat and returning to the oven for just a couple of minutes prevents overcooking the patty.
- Toast buns separately: Brushing with butter and toasting gives a nice crunch and stops buns from getting soggy.
My first attempt was a bit of a mess because I didn’t press hard enough, so the patties stayed thick and didn’t crisp. Lesson learned: the smash is everything! So don’t be shy with that spatula.
Variations & Adaptations to Try
- Spicy Smash Burger: Add a pinch of cayenne or smoked paprika to the meat mixture for a smoky heat.
- Vegetarian Version: Use a plant-based ground beef substitute and follow the same smashing and baking method. Just watch the cooking time—it may be shorter.
- Seasonal Toppings: Swap the usual lettuce and tomato for pickled red onions in summer or sautéed mushrooms and caramelized onions in fall.
- Cheese Swap: Try pepper jack for a spicy kick or Swiss for a milder, nutty flavor.
- Gluten-Free Option: Use gluten-free buns or crisp romaine lettuce leaves instead of buns.
One variation I adore is adding a smear of garlic aioli under the cheese before baking. It melts into the patty and adds a luxurious flavor layer. Honestly, it made my husband a reluctant convert—he swore he didn’t like anything fancy on his burgers, but this one won him over!
Serving & Storage Suggestions
Serve these crispy no-flip sheet pan smash burgers immediately while the edges are still crunchy and the cheese is melty warm. They pair beautifully with classic sides like crispy oven fries, a tangy coleslaw, or simple mixed greens.
Store any leftovers wrapped tightly in the fridge for up to 2 days. To reheat, pop them briefly (about 3-4 minutes) in a toaster oven or under the broiler to revive the crisp edges. Avoid microwaving as it makes the burger soggy.
If you plan to meal prep, keep patties and buns separate until ready to assemble to maintain texture. Flavors actually deepen after resting overnight, so these can taste even better the next day.
Nutritional Information & Benefits
Each crispy no-flip sheet pan smash burger contains approximately:
| Nutrient | Amount per Serving |
|---|---|
| Calories | 450-500 kcal |
| Protein | 28 g |
| Fat | 35 g |
| Carbohydrates | 30 g |
| Fiber | 2 g |
This recipe offers a solid protein punch from quality ground beef, essential for muscle repair and satiety. Using 80/20 beef provides enough fat to keep the burgers juicy while satisfying cravings for comfort food. Opting for whole grain or gluten-free buns can add fiber and suit different dietary needs.
Keep in mind, it contains gluten and dairy if cheese and traditional buns are used. Substitutions are easy for those with allergies or sensitivities.
Conclusion
This crispy no-flip sheet pan smash burger recipe is a winner for anyone craving that diner-style burger without the stove-top mess or fuss. It’s easy, fast, and hits all the right notes: crispy edges, juicy meat, melty cheese, and a buttery toasted bun.
Feel free to tweak the toppings, cheese, and seasoning to suit your taste buds—this recipe welcomes your creative spin. I love it because it turns the humble burger into a simple, satisfying feast that doesn’t keep me tethered to the kitchen.
Give it a shot, and I’m curious—what will your favorite variation be? Drop a comment or share your experience. This burger deserves some love and a place on your regular rotation!
Frequently Asked Questions
Can I use leaner ground beef for this recipe?
Yes, but keep in mind leaner beef can result in drier burgers. You might want to add a touch of olive oil or a bit of grated onion to keep them moist.
Do I really not have to flip the burgers?
Nope! The high oven heat crisps the bottom and cooks through evenly, so flipping isn’t necessary. Just be sure to smash them well at the start.
Can I make these smash burgers ahead of time?
You can prepare the patties and bake them, then store in the fridge separately from buns. Reheat briefly in the oven before assembling for best texture.
What’s the best way to smash the patties evenly?
A heavy metal spatula or a flat metal scraper works best. Press straight down firmly and hold for a few seconds to get a thin, even patty.
Can I add seasoning other than salt and pepper?
Absolutely! Garlic powder, onion powder, smoked paprika, or even a dash of chili powder can add great flavor. Just don’t go overboard—let the beef shine.
Pin This Recipe!
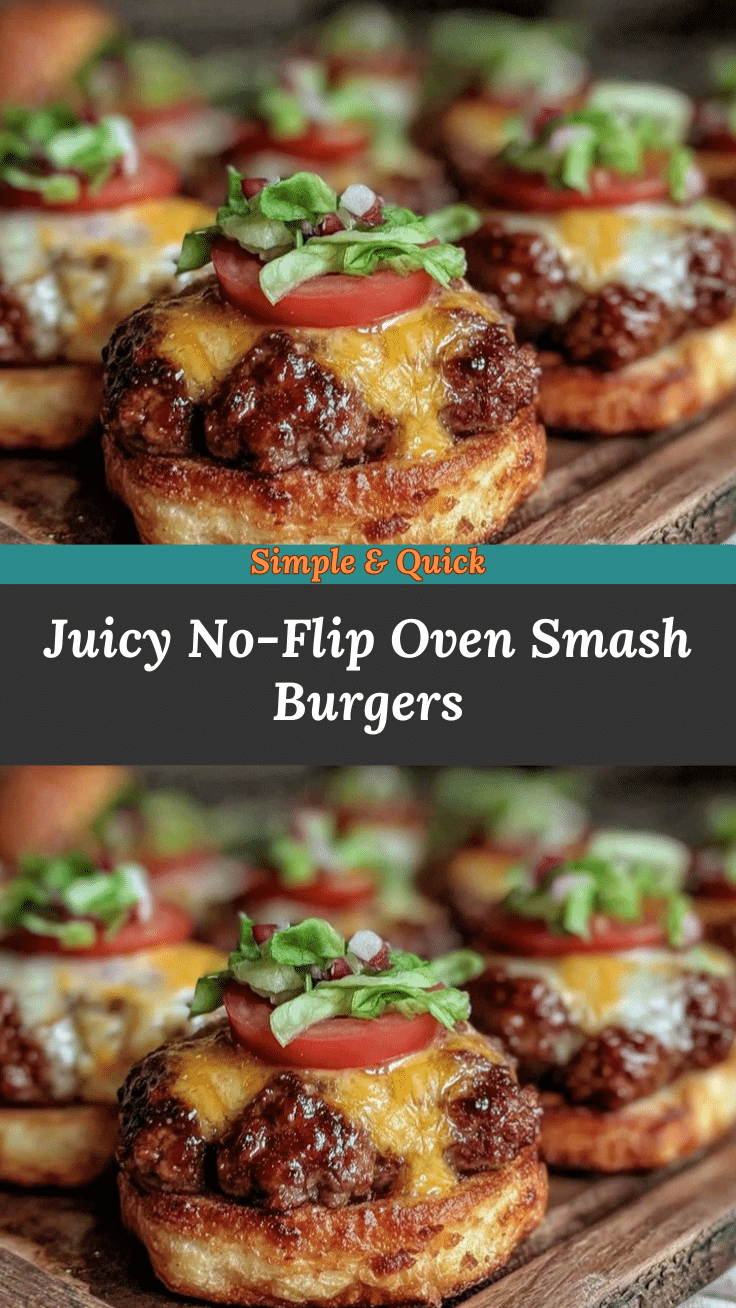

Crispy No-Flip Sheet Pan Smash Burgers Oven Recipe
- Total Time: 25 minutes
- Yield: 4 servings 1x
Description
This easy oven-baked smash burger recipe delivers crispy edges and juicy centers without flipping, perfect for quick weeknight meals with minimal mess.
Ingredients
- 1 pound (450 g) ground beef (80/20 blend)
- 1 teaspoon kosher salt
- ½ teaspoon freshly ground black pepper
- ¼ teaspoon garlic powder (optional)
- 1 tablespoon yellow mustard
- 4 soft hamburger buns (brioche or potato buns recommended)
- 4 cheese slices (American, cheddar, or favorite)
- 1 tablespoon melted butter (for brushing buns)
- Optional toppings: pickles, shredded lettuce, tomato slices, sliced red onions, ketchup, mayo
Instructions
- Preheat the oven to 450°F (230°C) and place a rack in the middle position.
- Line a large rimmed baking sheet with parchment paper or a silicone baking mat.
- In a large mixing bowl, gently combine ground beef with salt, black pepper, and garlic powder without overworking the meat.
- Divide the meat into 4 equal portions and roll each into loose balls about 4 ounces (113 g) each. Place them spaced evenly on the lined sheet pan.
- Using a heavy spatula or metal scraper, press down firmly on each meatball to flatten to about ½-inch (1.3 cm) thickness, creating uneven edges.
- Bake the patties for 10 minutes. Check edges around 8 minutes for crispness and caramelization; add 1-2 minutes if needed but avoid burning.
- Remove the pan and immediately place a slice of cheese on each patty. Return to oven for 2 minutes to melt the cheese.
- Brush the insides of the buns with melted butter and toast them on a separate baking sheet in the oven for 3-4 minutes until golden and slightly crisp.
- Assemble the burgers by layering patties and desired toppings on the toasted buns.
- Serve immediately while hot for the best crispy and juicy combination.
Notes
Do not overwork the meat to keep burgers tender. Use a heavy spatula to smash patties firmly and evenly. High oven heat (450°F) is essential for crispy edges. Line the pan to ease cleanup. Toast buns separately with butter for added crunch. Variations include adding spices like cayenne or smoked paprika, using plant-based meat substitutes, or swapping toppings seasonally.
- Prep Time: 10 minutes
- Cook Time: 15 minutes
- Category: Main Course
- Cuisine: American
Nutrition
- Serving Size: 1 burger with bun an
- Calories: 450500
- Fat: 35
- Carbohydrates: 30
- Fiber: 2
- Protein: 28
Keywords: smash burger, sheet pan burger, no-flip burger, oven burger, crispy burger, easy burger recipe, quick dinner
