

Picture this: the kitchen’s buzzing, the sun is pouring through the window, and the air is filled with sweet, creamy vanilla and a pop of berry aroma. The first time I pulled out a batch of these Dr. Seuss Blue & Red Ice Cream Swirl Pops, my kids’ faces lit up like it was Christmas morning – wide-eyed, giddy, unable to wait a single second for them to set. I remember that exact moment, standing there with sticky hands and a silly grin, thinking, “Well, this is the kind of treat that makes you want to dance around the kitchen with a spatula microphone.”
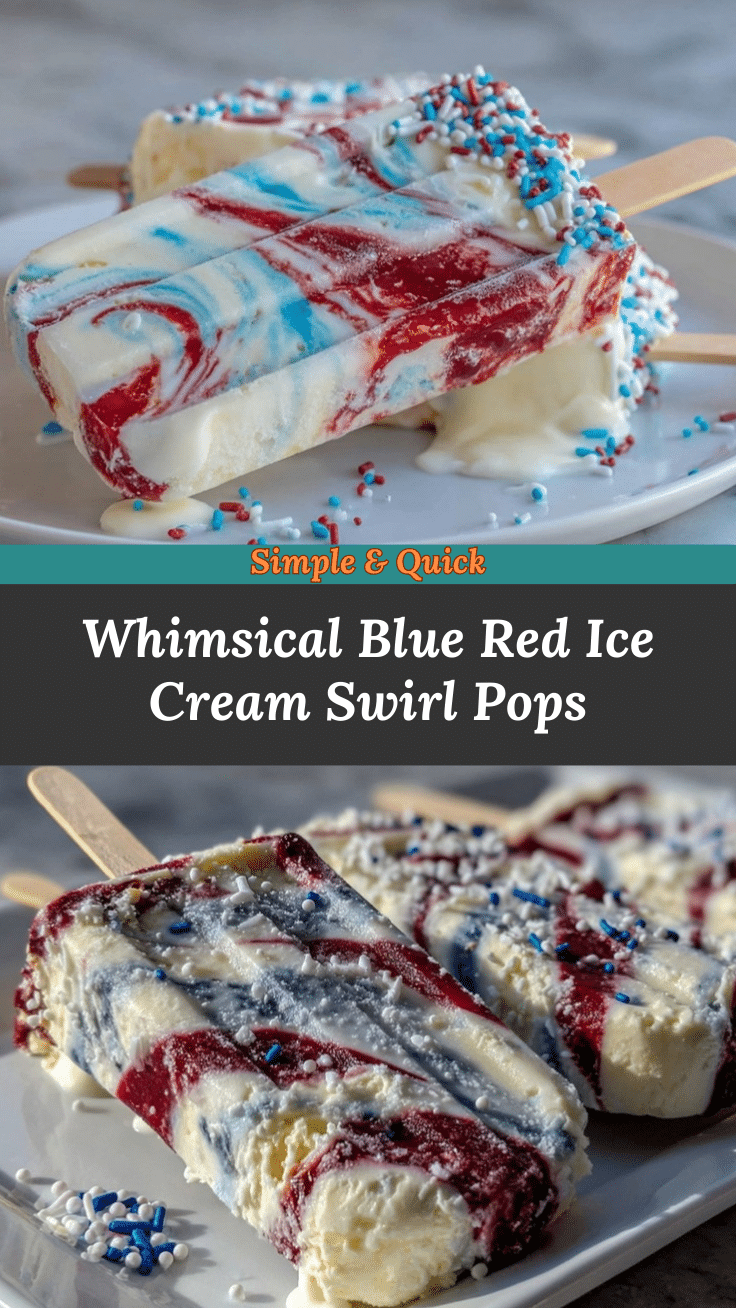
There’s something downright magical about the swirl of bold blue and cherry red, wrapped up in creamy ice cream—nostalgic, playful, and just a little bit mischievous. These pops are inspired by afternoons spent reading Dr. Seuss classics with my little ones, their laughter echoing with every rhyming page. You know, back when I was knee-high to a grasshopper, my grandma would whip up homemade popsicles on the hottest days, and I’d wait (impatiently) for those first frosty bites. I wish I’d thought of this whimsical swirl trick years ago—imagine all the birthday parties and rainy afternoons that could have been brightened!
Honestly, these ice cream pops are dangerously easy to make. I’ve made them for class parties, summer cookouts, and those “just because” days when everyone needs a little pick-me-up. My family can’t resist sneaking a pop straight from the freezer, and I don’t blame them one bit (I’m just as guilty). The colors are so vibrant, they practically beg to be snapped for Pinterest or Instagram. Whether you’re planning a Dr. Seuss birthday bash, a summer picnic, or just want to make dessert feel like a celebration, you’re in for a treat that’s as fun to make as it is to eat.
After testing this recipe more times than I care to admit (in the name of research, of course), it’s become our go-to for family gatherings and imaginative parties. These Dr. Seuss Blue & Red Ice Cream Swirl Pops feel like a cool hug on a sunny day—pure, nostalgic comfort in every bite. Trust me, you’re going to want to bookmark this one!
Why You’ll Love These Dr. Seuss Blue & Red Ice Cream Swirl Pops
When it comes to fun party treats, these pops really check every box. As someone who’s tested and tinkered with frozen desserts for years (and cleaned up more than a few sticky messes along the way), I can promise you—this recipe stands out from the crowd. Here’s why you’ll keep coming back:
- Quick & Easy: Prep takes just 20 minutes (plus freeze time), which means you can whip these up even on a busy weeknight or when you’ve got a houseful of kids to entertain.
- Simple Ingredients: Nothing fancy, nothing hard to pronounce—just good ol’ ice cream, swirls of fruity syrup, and classic food coloring. Most of it is right in your pantry or freezer already.
- Perfect for Parties: Whether you’re hosting a Dr. Seuss birthday, a pool party, or need a whimsical dessert for a book-themed baby shower, these pops have all the wow-factor without hours of fuss.
- Crowd-Pleaser: Kids, teens, and adults all light up when they see these. I’ve watched shy party guests grab seconds (no shame here) and little ones giggle when their tongues turn blue and red.
- Unbelievably Delicious: The combination of creamy vanilla and vibrant fruit is simple but so satisfying. The pops are soft enough for small mouths but sturdy enough to survive the backyard dash.
What really puts these Dr. Seuss Blue & Red Ice Cream Swirl Pops in a league of their own is the swirl technique—two colors, swirled by hand, gives each pop its own personality. No two look exactly the same, and that’s the fun of it! I use a gentle folding motion so the colors stay bold but don’t muddy together. It’s a little trick I picked up after a few early “purple popsicle” failures. You don’t need special molds or equipment, and you can tweak the flavors to suit your crew’s favorite tastes.
This isn’t just another run-of-the-mill frozen treat. It’s a conversation starter, a nostalgic wink to storybook memories, and a sweet surprise for anyone who gets their hands on one. I love that it brings people together—whether you’re making them with your kids or serving them at a big bash, you’re creating memories one swirl at a time. If you want a dessert that’s both easy and memorable, these Dr. Seuss Blue & Red Ice Cream Swirl Pops are the way to go.
What Ingredients You Will Need
Let’s talk ingredients—for these Dr. Seuss Blue & Red Ice Cream Swirl Pops, you only need a handful of kitchen staples and a couple of whimsical add-ins. The best part? You can swap things in and out depending on what’s in your fridge or on sale at the store.
- For the Ice Cream Base:
- 2 cups (475 ml) vanilla ice cream, slightly softened (I love Tillamook or Häagen-Dazs for a super creamy texture, but any good-quality vanilla works)
- 1/3 cup (80 ml) whole milk or heavy cream (this helps the ice cream swirl easily and keeps the pops scoopable straight from the freezer)
- For the Blue Swirl:
- 1/3 cup (80 ml) blue raspberry syrup (I use Torani, but you can make your own with blue raspberry drink mix and sugar)
- Blue gel food coloring (just a drop or two for a Dr. Seuss-worthy blue—liquid food coloring works in a pinch, but gel gives richer color)
- For the Red Swirl:
- 1/3 cup (80 ml) strawberry or cherry syrup (homemade or store-bought—Smucker’s or Hershey’s works well here)
- Red gel food coloring (again, a little goes a long way for that bright Cat in the Hat red)
- Other Essentials:
- Popsicle sticks (wooden or reusable plastic—both work!)
- Popsicle molds or disposable 5-ounce (150 ml) paper cups
If you need to go dairy-free, swap the ice cream and milk for your favorite coconut or oat-based ice cream and non-dairy milk. For a lower-sugar version, use sugar-free syrups and light ice cream. You can even puree fresh strawberries and blueberries with a tablespoon of sugar to make your own swirls—just strain out the seeds if you want a smoother pop.
Got a kiddo with food allergies? Double-check your syrups and ice cream for potential allergens. If you want to make these pops gluten-free, just read your ice cream label (most are, but best to check). I’ve even tried using Greek yogurt instead of ice cream for a tart, creamy version—so don’t be afraid to play around with what you have on hand!
Equipment Needed
You really don’t need a fancy chef’s kitchen to whip up these Dr. Seuss Blue & Red Ice Cream Swirl Pops. Here’s everything I use (and a couple of handy alternatives):
- Popsicle molds: Any style works! Silicone molds are my favorite because the pops slide right out (even if you’re a little impatient). No mold? No problem—just use small paper cups and peel them away when you’re ready to eat.
- Popsicle sticks: Wooden craft sticks or reusable plastic sticks both do the trick. I found a rainbow pack at the dollar store that adds extra flair (the kids love to pick their color).
- Mixing bowls (2-3): Medium-size glass or stainless steel bowls are easiest for mixing and swirling your colors.
- Spoons or butter knives: For swirling in the color—use what you have, just avoid anything too sharp.
- Measuring cups and spoons: For accuracy (and to keep the colors from blending too much).
- Freezer space: Make a little room for your molds to sit upright and freeze evenly. If you’re using soft-sided molds, set them on a baking sheet for stability.
If you don’t have popsicle molds, I’ve had success with muffin tins, ice cube trays, and even shot glasses (for mini pops). Just cover with foil and poke your stick through to keep it upright. A little tip: rinse your tools in warm water between colors to keep those blue and red swirls bold and beautiful.
How to Make Dr. Seuss Blue & Red Ice Cream Swirl Pops

-
Prep your ice cream base:
Scoop 2 cups (475 ml) vanilla ice cream into a large mixing bowl. Let it sit at room temperature for about 10 minutes—or until it’s soft but not melted. Add 1/3 cup (80 ml) whole milk or heavy cream and stir gently until smooth and creamy. (Don’t overmix or it’ll get runny.) If your ice cream’s too hard, microwave it in 10-second bursts. -
Divide and color:
Split your ice cream base evenly into two bowls. In one bowl, stir in 1/3 cup (80 ml) blue raspberry syrup and 1-2 drops blue gel food coloring. In the other, add 1/3 cup (80 ml) strawberry or cherry syrup plus 1-2 drops red gel food coloring. Fold gently with a spatula—swirl, don’t blend, for that Seussian effect. -
Layer and swirl:
Spoon alternating dollops of blue and red ice cream into your popsicle molds, filling each about halfway. Use a butter knife or skewer to gently swirl the colors together—just a couple of turns, or you’ll end up with purple! Fill the rest of the mold, repeating the pattern. (If you’re using paper cups, same method applies.) -
Insert sticks:
Slide a popsicle stick into the center of each mold. If the mixture is too soft, freeze for 20 minutes, then insert the sticks so they stand up straight. -
Freeze:
Place your molds in the freezer and chill for at least 4 hours, or until completely firm. Overnight is best if you can wait that long (I know, it’s tough). -
Unmold and serve:
To release, run the outside of the mold under warm water for 10-20 seconds. Don’t force it—just wiggle gently until the pop slides out. If using paper cups, peel them away. -
Troubleshooting tips:
If your pops are too icy, your freezer might be set too cold—let them rest at room temp for a minute before serving. If the colors aren’t vibrant enough, add another drop of food coloring next time. For stubborn molds, dip in warm water a little longer or use a silicone spatula to gently ease them out.
Pro tip: Clean as you go! The food coloring can stain, so keep a damp cloth handy for quick wipe-ups. And don’t forget to snap a photo of your most beautiful swirls before they disappear!
Cooking Tips & Techniques for Perfect Swirl Pops
Let’s face it, not every pop comes out of the freezer looking like a Pinterest superstar (I’ve had my share of tie-dye disasters). Here’s what I’ve learned from many batches of Dr. Seuss Blue & Red Ice Cream Swirl Pops:
- Use gel food coloring for the brightest colors. Liquid works, but it can thin out the ice cream base and make the colors bleed.
- Don’t over-swirl! Two or three gentle turns with a skewer is all you need; too much mixing turns everything purple. The goal is bold ribbons, not a blended mess.
- Work quickly but gently. If your ice cream melts too much, the pops can get icy. Pop the bowls back in the freezer for a few minutes if things start to get soupy.
- Layer for drama. Alternate blue and red spoonfuls instead of just swirling. You’ll get more color separation and that classic Seuss look.
- Freeze overnight for best texture. I know, waiting is hard, but the pops set up best when given plenty of time.
- Troubleshooting tips: If your sticks won’t stand up, the base is too soft—freeze 15–20 minutes, then try again. If pops break while unmolding, run under warm water a little longer and twist gently.
- Cleanup tip: Food coloring can be a bit wild. Wear an apron or use gloves if you want to keep your hands clean (especially if the kids are helping!).
- Batch strategy: Double or triple the recipe for parties—just use a larger bowl and work in batches so the colors stay bold and vibrant.
I’ve learned (the hard way) that letting kids swirl their own pops means no two ever look the same—and that’s part of the fun. If you end up with a few popsicles that lean more “modern art” than “storybook perfect,” just roll with it. They taste incredible, no matter what!
Variations & Adaptations
There are endless ways to riff on these Dr. Seuss Blue & Red Ice Cream Swirl Pops, so don’t be afraid to put your own spin on things. Here are some of my favorite twists:
- Dairy-Free & Vegan: Swap in a coconut, almond, or oat-based vanilla ice cream and use dairy-free milk. I’ve tried So Delicious vanilla and it works beautifully—still creamy with a hint of coconut.
- Seasonal Swaps: In summer, try blending fresh blueberries and strawberries with a spoonful of sugar for your swirls instead of syrups. You get a burst of real fruit flavor (and some extra vitamins, too!).
- Flavor Twists: Mix in a few drops of mint or lemon extract for a zippy pop, or use raspberry and cherry syrup for a different red-and-blue combo. Vanilla and lemon ice cream also makes for a fun, tangy base.
- Low-Sugar Option: Use light ice cream and sugar-free syrups. The colors come out just as vibrant and you can feel a little less guilty grabbing a second pop.
- Nut-Free & Allergy-Friendly: Always double-check your ice cream and syrup for possible allergens. Most major brands are nut-free, but best to scan the label.
My personal favorite? Swapping the vanilla ice cream for birthday cake ice cream and using cotton candy syrup for the blue. It turns the pops into a carnival in your freezer—trust me, it’s a hit at every kid’s party!
Serving & Storage Suggestions
These Dr. Seuss Blue & Red Ice Cream Swirl Pops are best served straight from the freezer, ice cold and swirly-bright. For parties, arrange them on a chilled platter or upright in a bucket filled with ice for that “wow” effect. If you want to get fancy, tie a little ribbon around each stick or serve with a drizzle of extra syrup.
Pair these pops with a pitcher of lemonade, fruity punch, or even a scoop of rainbow sherbet for a full-on Seussical dessert bar. If you’re feeling extra creative, garnish with whipped cream and sprinkles—or let the kids dip the ends in melted white chocolate and nonpareils.
To store, wrap each pop individually in plastic wrap or parchment and keep in an airtight container in the freezer. They’ll stay fresh and delicious for up to 2 weeks (though honestly, ours never last that long). If you need to stack them, place a sheet of wax paper between layers to prevent sticking.
For best flavor, let the pops sit at room temperature for 2–3 minutes before serving—just enough to soften the ice cream but not so long they start to melt. The colors stay vibrant and the swirls hold up beautifully!
Nutritional Information & Benefits
Each Dr. Seuss Blue & Red Ice Cream Swirl Pop (about 1/6 of the recipe) has roughly:
- Calories: 150–180
- Fat: 6–8g
- Sugar: 16–20g
- Protein: 2–3g
They’re a treat, for sure, but using real fruit syrups or fresh berries can add a little vitamin C and fiber. If you opt for lower-sugar or non-dairy ice creams, the pops fit nicely into gluten-free or lactose-free diets. Just keep an eye on the labels for potential allergens (especially if serving at a party with kids).
From a wellness perspective, I love that these pops are portion-controlled and easy to customize with healthier swaps. They’re a fun way to cool off and sneak in a bit of fruit—plus, they make everyone smile, and that’s a health benefit in my book!
Conclusion
These Dr. Seuss Blue & Red Ice Cream Swirl Pops are pure joy—easy enough for a weekday treat, whimsical enough for the fanciest themed party, and customizable for every dietary need. The creamy base and playful colors make each pop a mini celebration, whether you’re five or fifty.
I hope you’ll put your own twist on these and make them a staple for birthdays, summer afternoons, or just because. Honestly, I can’t get enough of the smiles these bring to my family and friends. So grab your molds, let your imagination run wild, and give your freezer a pop of Seuss-inspired fun.
If you try these, I’d love to hear your creative variations or see your swirliest results—drop a comment, share this recipe, or tag me on social so we can all enjoy that Seussian magic together. Happy swirling, and may your treats be as bright and bold as your favorite storybook adventure!
FAQs About Dr. Seuss Blue & Red Ice Cream Swirl Pops
Can I make these pops without food coloring?
Absolutely! Just use naturally colorful fruit purees—like blended strawberries and blueberries—or look for natural food dyes at the grocery store. The colors won’t be quite as bold, but the pops will still look and taste fantastic.
How long do the swirl pops need to freeze?
For best results, freeze them at least 4 hours, but overnight is ideal. That way, the pops are solid and come out of the molds easily without breaking.
Do I need special popsicle molds?
Nope! Small paper cups, muffin tins, or even ice cube trays work in a pinch. Just cover with foil and poke your popsicle sticks through so they stay upright as they freeze.
Can I use frozen yogurt or sherbet instead of ice cream?
Yes! Frozen yogurt gives a tangier flavor and slightly firmer texture, while sherbet adds a fruity zing. Just make sure to soften them a bit before swirling in the colors.
How do I prevent the colors from blending into purple?
Go easy on the swirling—just a couple of gentle turns with a skewer or knife. Too much mixing will combine the blue and red into purple, so keep your swirls bold and separate for that classic Dr. Seuss look!
Pin This Recipe!

Dr. Seuss Blue & Red Ice Cream Swirl Pops
- Total Time: 4 hours 20 minutes (includes freezing time)
- Yield: 6 pops 1x
Description
These whimsical ice cream pops feature bold blue and cherry red swirls in a creamy vanilla base, inspired by Dr. Seuss and perfect for parties or summer treats. Easy to make, customizable, and guaranteed to bring smiles to kids and adults alike.
Ingredients
- 2 cups vanilla ice cream, slightly softened
- 1/3 cup whole milk or heavy cream
- 1/3 cup blue raspberry syrup
- 1–2 drops blue gel food coloring
- 1/3 cup strawberry or cherry syrup
- 1–2 drops red gel food coloring
- Popsicle sticks
- Popsicle molds or disposable 5-ounce paper cups
Instructions
- Scoop 2 cups vanilla ice cream into a large mixing bowl. Let it sit at room temperature for about 10 minutes until soft but not melted. Add 1/3 cup whole milk or heavy cream and stir gently until smooth and creamy.
- Divide the ice cream base evenly into two bowls. In one bowl, stir in 1/3 cup blue raspberry syrup and 1-2 drops blue gel food coloring. In the other, add 1/3 cup strawberry or cherry syrup plus 1-2 drops red gel food coloring. Fold gently to swirl, not blend.
- Spoon alternating dollops of blue and red ice cream into popsicle molds, filling each about halfway. Use a butter knife or skewer to gently swirl the colors together. Fill the rest of the mold, repeating the pattern.
- Insert a popsicle stick into the center of each mold. If the mixture is too soft, freeze for 20 minutes, then insert the sticks.
- Freeze the molds for at least 4 hours, or overnight, until completely firm.
- To release, run the outside of the mold under warm water for 10-20 seconds and gently wiggle the pop out. If using paper cups, peel them away.
- If pops are too icy, let them rest at room temperature for a minute before serving. For more vibrant colors, add another drop of food coloring next time.
Notes
Use gel food coloring for the brightest colors and avoid over-swizzling to keep the colors bold. For dairy-free or vegan pops, substitute with non-dairy ice cream and milk. Clean tools between colors to prevent blending. Pops can be made in muffin tins or ice cube trays if you don’t have molds.
- Prep Time: 20 minutes
- Cook Time: 0 minutes
- Category: Dessert
- Cuisine: American
Nutrition
- Serving Size: 1 pop (about 1/6 of
- Calories: 150180
- Sugar: 1620
- Sodium: 4060
- Fat: 68
- Saturated Fat: 45
- Carbohydrates: 2024
- Protein: 23
Keywords: ice cream pops, Dr. Seuss, party treats, swirl pops, summer dessert, kid-friendly, red and blue dessert, popsicles, frozen treats
