

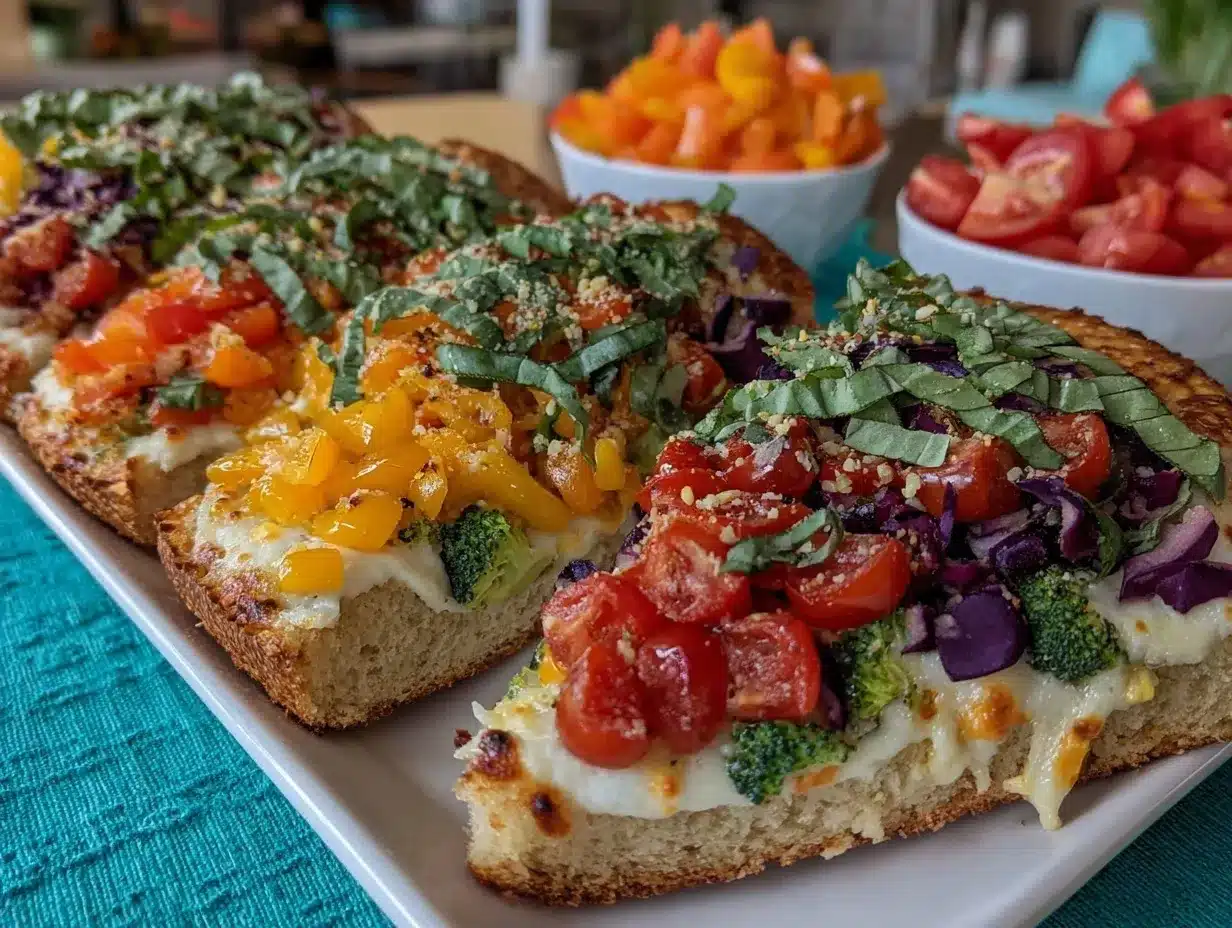
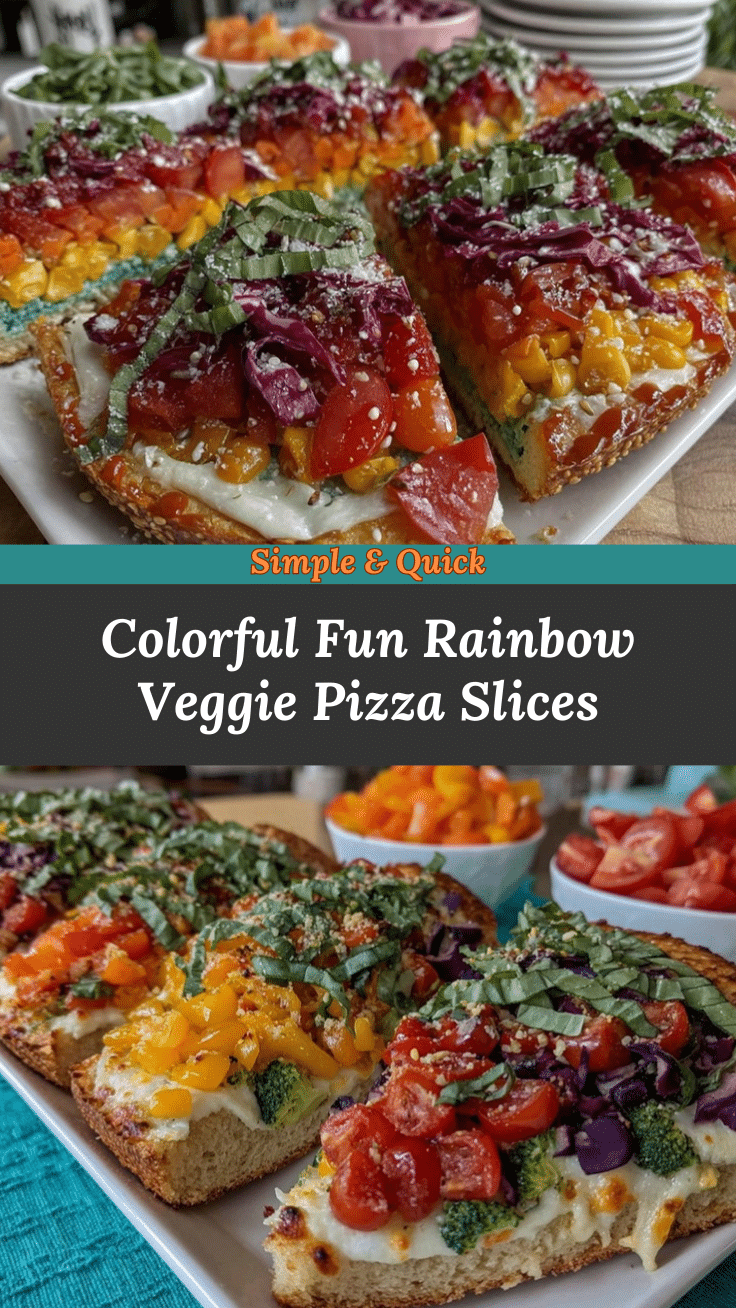
Imagine the kitchen filled with the scent of bubbling cheese and the earthy sweetness of roasted peppers—honestly, it’s enough to make anyone’s stomach growl. The first time I made these Dr. Seuss Rainbow Veggie Pizza Slices for kids, my little one’s eyes went wide, and even the adults at the table couldn’t resist sneaking a slice (or two). There’s something magical about seeing every vibrant color—red, orange, yellow, green, and purple—lined up on a crispy crust that just sparks pure joy. The textures are a party: the slight crunch of fresh veggies, the gooeyness of cheese, and the chewy, toasty base.
You know those moments when you stumble onto something that’s not just a meal but an experience? That’s how it felt—just a rainy Saturday, a handful of veggies, and a curious kid by my side. We started arranging peppers and tomatoes, and suddenly it looked like a page right out of a Dr. Seuss book. It was the kind of moment where you pause, take a deep breath, and just smile because you know you’re onto something truly special.
This recipe has become our go-to for birthday parties, playdates, and even grown-up gatherings—because, let’s face it, adults love fun food too. I wish I’d discovered this trick for getting kids to eat more veggies years ago. Kids actually beg for seconds, and I catch my partner snacking on leftover slices straight from the fridge. The colors alone are enough to brighten up any lunchbox or Pinterest board, but the flavor is what keeps everyone coming back. I’ve tested endless combinations (in the name of research, of course), and this one truly feels like a warm hug on a plate. Fresh Dr. Seuss Rainbow Veggie Pizza Slices for kids are now a staple for our family gatherings, gifting, and anytime we want to add a little color and cheer to the table. Bookmark this one, friends!
Why You’ll Love This Recipe
- Quick & Easy: Comes together in under 30 minutes—perfect for busy weekdays, spontaneous playdates, or last-minute lunch ideas.
- Simple Ingredients: No wild goose chases at the grocery store; you probably have most of these in your kitchen right now.
- Perfect for Parties: Whether it’s a school event, birthday bash, or a colorful family brunch, these slices are always a hit.
- Crowd-Pleaser: Kids and grown-ups both reach for seconds. The vibrant look means picky eaters are way more likely to try something new.
- Unbelievably Delicious: The mix of melty cheese and crisp-tender veggies delivers comfort food vibes with a healthy twist. Each bite is a little adventure!
So what makes these Dr. Seuss Rainbow Veggie Pizza Slices for kids really stand out? First, it’s the playful, color-coded layout. Lining up veggies by color isn’t just cute—it’s a sneaky way to encourage trying new flavors. I discovered that cutting the veggies small and arranging them in bright stripes makes kids actually want to eat every color. The other trick? A thin layer of garlic-herb cream cheese under the mozzarella, locking in flavor and helping the toppings stick (no messy piles sliding off!).
This isn’t your classic “throw everything on” pizza. Each color is thoughtfully chosen for taste, texture, and fun. Sometimes I even let the kids “paint” their own slices—everyone gets creative, and no two pizzas look the same. It’s comfort food, but it’s also a little lesson in rainbows and healthy eating, all in one. If you’re looking for a recipe that delivers both smiles and full bellies, this is the one. It’s the kind of lunch that makes memories, not just meals.
What Ingredients You Will Need
This recipe uses simple, wholesome ingredients to deliver bold flavor and a joyful, crunchy texture—no fancy shopping list required! Most of these are pantry staples or easy finds at any market, and you can swap in whatever’s freshest or your kid’s favorites. Here’s the full run-down:
- For the Pizza Base:
- 1 large prepared pizza crust (about 12 inches/30 cm) or 1 package of naan or flatbreads (for individual pizzas)
- 2 tablespoons olive oil (for brushing, adds crispiness)
- For the Cream Cheese Spread:
- 1/3 cup (80g) plain cream cheese, softened (or dairy-free alternative)
- 1/2 teaspoon garlic powder
- 1/2 teaspoon dried Italian herbs (or just oregano)
- For the Cheese Layer:
- 1 cup (100g) shredded mozzarella cheese (or dairy-free mozzarella)
- “Rainbow” Veggie Toppings:
- 1/4 cup (30g) red bell pepper, finely diced
- 1/4 cup (30g) orange bell pepper, finely diced
- 1/4 cup (30g) yellow bell pepper, finely diced
- 1/4 cup (30g) green bell pepper, finely diced
- 1/4 cup (30g) purple (or red) onion, finely diced
- 1/4 cup (30g) cherry tomatoes, quartered (for extra color)
- 1/4 cup (30g) baby spinach, chopped
- 1/4 cup (30g) sweetcorn kernels (optional, for yellow stripe)
- 1/4 cup (30g) black olives, sliced (for a fun “dots” effect)
- Other Tasty Additions:
- Pinch of salt and pepper
- Drizzle of extra olive oil (for finishing, optional)
Ingredient tips: I always go for small, firm bell peppers because they’re easier for kiddos to pick up and nibble. If you can’t find one of the colors, swap in shredded carrot (for orange), peas (for green), or even purple cabbage (for the purple stripe). For a gluten-free version, use a gluten-free pizza crust or flatbread. If you need dairy-free, just use plant-based cream cheese and shredded cheese—works like a charm! When shopping, I look for the freshest, brightest veggies (sometimes even letting my kids pick out their favorites at the store, which gets them more excited to cook). For best results, chop everything small so each bite gets a little of every color. If you’re prepping ahead, you can keep the veggies in separate containers in the fridge for up to 2 days. Easy peasy!
Equipment Needed
- Baking sheet or pizza stone (I use a trusty old sheet pan; a pizza stone makes the bottom extra crispy if you have one)
- Sharp chef’s knife and cutting board (for all that veggie dicing—don’t skimp on a good knife, it changes everything!)
- Small bowl (for mixing the cream cheese spread)
- Spatula or spoon (for spreading cream cheese and cheese)
- Pastry brush (optional, for brushing olive oil on the crust—fingers work in a pinch)
- Pizza cutter or large sharp knife (for slicing those rainbow wedges)
If you don’t have a pizza stone, don’t sweat it—just use your regular baking sheet and line it with parchment for easy cleanup. I’ve made these with everything from a fancy pizza peel to a humble butter knife (when my spatula was MIA). If you’re cooking with kids, let them use kid-safe knives for the softer veggies. My tip: keep your tools sharp and clean for the neatest slices and easiest veggie prep. For budget-friendly pizza nights, grocery store crust and a regular baking tray do the job just fine.
Preparation Method
- Prep Your Oven and Crust: Preheat your oven to 425°F (220°C). If you’re using a pizza stone, pop it in now to heat up. Place your pizza crust or flatbread on a parchment-lined baking sheet. Brush the top with 2 tablespoons olive oil. This helps it get that golden, crispy edge and keeps the crust from drying out.
- Make the Cream Cheese Spread: In a small bowl, mix together 1/3 cup (80g) cream cheese, 1/2 teaspoon garlic powder, and 1/2 teaspoon Italian herbs. Stir until smooth and creamy. If the cheese is too firm, microwave it for 10 seconds to soften.
- Spread the Cheese Base: Using a spatula or the back of a spoon, gently spread the cream cheese mixture all over the pizza base, leaving a tiny border at the edges. This layer acts as “glue” for the veggies and gives a subtle, herby flavor in every bite.
- Add Shredded Mozzarella: Sprinkle 1 cup (100g) shredded mozzarella evenly over the cream cheese layer. Don’t overload—too much cheese can make the veggies slide off!
- Chop and Arrange the Veggies: Dice all your rainbow veggies into small, even pieces (about 1/4 inch/0.5 cm cubes). The smaller the cut, the easier they’ll stick and the more colorful each slice will be. Keep each color in its own little pile.
- Create the Rainbow: Working from one edge of the pizza to the other, arrange the veggies in colorful stripes—red, orange, yellow, green, and purple. Get creative! I usually start with red bell pepper, then orange, yellow, green bell pepper, spinach or peas, and finish with purple onion or cabbage. Add sweetcorn, cherry tomatoes, or olives wherever you like for extra pops of color.
- Bake: Slide the pizza into the oven and bake for 12-15 minutes (or until the cheese is bubbly and the crust is golden brown). If using a pizza stone, check at 10 minutes. The veggies should look bright but still slightly crisp. If you like them softer, bake for an extra 2-3 minutes.
- Cool and Slice: Let the pizza cool for 2-3 minutes on the pan. This helps the cheese set and keeps toppings from falling off when you slice. Use a pizza cutter or sharp knife to cut into wedges or rectangles—whatever suits your crowd.
- Finishing Touch: Sprinkle a pinch of salt, a crack of black pepper, and a little drizzle of olive oil if you’re feeling fancy. Serve warm, and watch those rainbow slices disappear!
Preparation notes: If the crust bubbles up in the oven, just poke it gently with a fork. If your kids are “texture detectives,” try roasting the veggies for 5 minutes before adding them—they’ll be softer and sweeter. And if you end up with a few rogue toppings, just pop them back on before serving (it happens to me every time!). For a speedy prep, dice veggies ahead and keep in airtight containers in the fridge for up to 2 days.
Cooking Tips & Techniques
- Keep Veggies Small: I’ve learned (sometimes the hard way) that the smaller you chop the veggies, the better they’ll stick and the more even the color stripes. Big chunks tend to roll off when you slice or eat.
- Don’t Overload the Cheese: Too much cheese and things get slippery—use just enough to hold the veggies in place, not drown them!
- Pre-Bake for Extra Crunch: If you love a super crispy crust, bake your crust plain for 3-4 minutes before adding toppings. This helps avoid sogginess, especially with homemade dough.
- Let Kids Help: Kids love arranging colors, and it’s a sneaky way to get them interested in eating more veggies. Even picky eaters tend to try something they made themselves (I’ve seen it in action with my own kiddo).
- Troubleshooting: If you find the crust is getting too brown before the cheese melts, cover loosely with foil and finish baking. If your veggies seem dry, brush lightly with olive oil before baking.
- Timing and Multitasking: I usually prep my veggies while the oven heats up. If you’re making multiple pizzas, chop all veggies at once and set them up “buffet style” so everyone can make their own rainbow.
- Consistency: Stick with the same cut size for all veggies—this ensures even cooking and a prettier presentation. If you’re batch-cooking, bake one pizza at a time for the crispiest crust.
- Lesson Learned: Once, I forgot to pat dry my veggies after washing, and the extra water made the pizza soggy. Now I always blot them with a paper towel before topping the pizza.
Honestly, these little tweaks are what make the difference between “just okay” and “absolutely awesome” Dr. Seuss Rainbow Veggie Pizza Slices for kids. Don’t worry if it’s not perfect—every pizza is a new adventure!
Variations & Adaptations
One of the best things about these Dr. Seuss Rainbow Veggie Pizza Slices for kids is how flexible they are. You can make them your own, no matter what’s in your fridge or what your kids like (or don’t like!). Here are some favorite ways to switch things up:
- Gluten-Free: Use your favorite gluten-free pizza crust or even large rice cakes for mini versions. My sister-in-law swears by the cauliflower crust from the freezer aisle—it’s surprisingly tasty and holds up well to all those toppings.
- Dairy-Free: Swap in a plant-based cream cheese and mozzarella. I’ve tried this with both almond and oat milk cheeses, and they melt nicely (bonus: it keeps the pizza vegan, too!).
- Seasonal Swaps: In spring, try thinly sliced asparagus or snap peas. In fall, sweet potato or roasted butternut squash adds a golden stripe. I love using whatever’s fresh from the farmer’s market—keeps things exciting!
- Protein Boost: Add shredded rotisserie chicken, cooked sausage, or even some crumbled tofu for extra staying power. Just sprinkle over the cheese layer before adding veggies.
- Flavor Twists: Don’t limit yourself to Italian herbs! Try a sprinkle of taco seasoning, ranch mix, or even a little curry powder for a fun twist. Sriracha drizzle for the grown-ups is always a hit in our house.
- Allergen Substitutions: For nut allergies, all ingredients here are safe, but always double-check your crust and cheese labels. For soy allergies, use a soy-free dairy alternative or just stick with the veggies and a little olive oil.
Personal favorite? Once, I tried a “garden party” version with rainbow cherry tomatoes, roasted zucchini, and fresh basil. It was a total hit—even with the kids! Don’t be afraid to let everyone pick their own colors and combos; half the fun is in the creativity.
Serving & Storage Suggestions
These Dr. Seuss Rainbow Veggie Pizza Slices for kids are best served warm, straight from the oven. The cheese is gooey, the veggies are bright and a little crisp, and the crust is just the right amount of chewy. If you want to get fancy, arrange the slices on a wooden board in a “rainbow fan” for parties—makes for a super Instagram-worthy spread!
Pair with a side of fruit salad, carrot sticks, or even a simple green salad for a cheerful, well-rounded meal. For drinks, lemonade, fruit-infused water, or even a fun smoothie keeps the meal light and refreshing.
Leftovers? Store slices in an airtight container in the fridge for up to 3 days. To reheat, pop a slice in the oven at 375°F (190°C) for 5-7 minutes or zap in the microwave for 30 seconds. The crust stays crispier with oven reheating. Honestly, these slices taste just as good cold—great for lunchboxes the next day. The flavors seem to get even better as they sit, and my family never complains about pizza for breakfast!
Nutritional Information & Benefits
Each Dr. Seuss Rainbow Veggie Pizza Slice (assuming 8 slices per pizza) is about 180 calories, with 7g fat, 20g carbs, and 8g protein. The real stars here are the veggies: bell peppers, spinach, and tomatoes are loaded with vitamins A, C, and antioxidants. You get a nice fiber boost, plus a good dose of calcium from the cheese.
This recipe is naturally vegetarian (and easily made vegan or gluten-free with the swaps above). For families watching sodium, just use low-salt cheese and crust. The pizza contains dairy and wheat, but you can easily adjust for allergies. From a wellness perspective, I love how these slices sneak in at least 4 servings of veggies per meal—my kid eats the rainbow without even thinking about it!
Conclusion
If you’ve been hunting for a fun, colorful lunch idea that’s as good for the soul as it is for your taste buds, these Dr. Seuss Rainbow Veggie Pizza Slices for kids are it. They’re easy, customizable, and guaranteed to bring a smile to any table—kids, adults, picky eaters, and foodies alike. No two pizzas ever look the same, which is half the fun, and you’ll find yourself making this recipe again and again.
I love how this pizza brings my family together, sparks creativity, and makes eating veggies a real treat rather than a chore. Try swapping in your own favorite toppings and let the kids lend a hand—there’s no wrong way to make a rainbow. If you give this a go, leave a comment below, share your creations, or tag me with your best rainbow masterpiece. Here’s to colorful plates and happy tummies—may your lunches always be this much fun!
Frequently Asked Questions
How can I get my child involved in making Dr. Seuss Rainbow Veggie Pizza Slices?
Let your child help wash, chop (with a kid-safe knife), and arrange the veggies. Kids love creating the rainbow pattern, and they’re more likely to eat what they help make!
Can I prepare this pizza ahead of time?
Yes, you can chop all the veggies and mix the cream cheese spread up to 2 days ahead. Assemble just before baking for best results, or bake and reheat slices as needed.
What’s the best way to keep the crust from getting soggy?
Brush the crust with olive oil before adding toppings and avoid piling on too many wet veggies. For extra crispiness, bake the crust for a few minutes before adding the cheese and veggies.
How do I make this recipe gluten-free or dairy-free?
Use a gluten-free pizza crust (store-bought or homemade) and choose dairy-free cream cheese and shredded cheese options. The rest of the ingredients are naturally gluten- and dairy-free!
What other veggies work well for the rainbow topping?
You can use sliced carrots, zucchini, peas, purple cabbage, or even thinly sliced radishes. Just keep the pieces small and colorful for the best effect!
Pin This Recipe!

Dr. Seuss Rainbow Veggie Pizza Slices for Kids
- Total Time: 30 minutes
- Yield: 8 slices 1x
Description
A fun, colorful pizza loaded with vibrant veggies and gooey cheese, perfect for kids and adults alike. This easy lunch idea encourages healthy eating and creativity, making it a hit for parties, playdates, or family meals.
Ingredients
- 1 large prepared pizza crust (about 12 inches) or 1 package naan or flatbreads
- 2 tablespoons olive oil (for brushing)
- 1/3 cup plain cream cheese, softened (or dairy-free alternative)
- 1/2 teaspoon garlic powder
- 1/2 teaspoon dried Italian herbs (or oregano)
- 1 cup shredded mozzarella cheese (or dairy-free mozzarella)
- 1/4 cup red bell pepper, finely diced
- 1/4 cup orange bell pepper, finely diced
- 1/4 cup yellow bell pepper, finely diced
- 1/4 cup green bell pepper, finely diced
- 1/4 cup purple (or red) onion, finely diced
- 1/4 cup cherry tomatoes, quartered
- 1/4 cup baby spinach, chopped
- 1/4 cup sweetcorn kernels (optional)
- 1/4 cup black olives, sliced
- Pinch of salt and pepper
- Drizzle of extra olive oil (optional, for finishing)
Instructions
- Preheat oven to 425°F (220°C). If using a pizza stone, place it in the oven to heat up. Put pizza crust or flatbread on a parchment-lined baking sheet. Brush top with 2 tablespoons olive oil.
- In a small bowl, mix cream cheese, garlic powder, and Italian herbs until smooth. Microwave for 10 seconds if needed to soften.
- Spread cream cheese mixture evenly over pizza base, leaving a small border at the edges.
- Sprinkle shredded mozzarella evenly over the cream cheese layer.
- Dice all veggies into small, even pieces (about 1/4 inch cubes). Keep each color separate.
- Arrange veggies in colorful stripes across the pizza: red, orange, yellow, green, and purple. Add sweetcorn, cherry tomatoes, or olives for extra color.
- Bake for 12-15 minutes, or until cheese is bubbly and crust is golden brown. If using a pizza stone, check at 10 minutes.
- Let pizza cool for 2-3 minutes. Slice into wedges or rectangles.
- Sprinkle with salt, pepper, and a drizzle of olive oil if desired. Serve warm.
Notes
Chop veggies small for best results. For gluten-free or dairy-free, use appropriate crust and cheese alternatives. Pre-bake crust for extra crunch. Let kids help arrange veggies for a fun activity. Blot veggies dry before topping to avoid sogginess. Store leftovers in the fridge for up to 3 days; reheat in oven for best texture.
- Prep Time: 15 minutes
- Cook Time: 15 minutes
- Category: Main Course
- Cuisine: American
Nutrition
- Serving Size: 1 slice (1/8 of pizz
- Calories: 180
- Sugar: 3
- Sodium: 350
- Fat: 7
- Saturated Fat: 3
- Carbohydrates: 20
- Fiber: 2
- Protein: 8
Keywords: rainbow pizza, veggie pizza, kids lunch, colorful pizza, vegetarian pizza, party food, easy lunch, fun food, Dr. Seuss, healthy pizza
