
“You know that feeling when you’re scrambling to pull together a dessert for a last-minute barbecue, and the heat outside is making the oven feel like a personal sauna? That was me last Fourth of July, standing in my kitchen with a melting chocolate cake attempt and a very impatient neighbor tapping on the window. Honestly, I wasn’t planning on making a trifle that day, let alone a no-bake one. But then my friend Jen, who’s the queen of easy summer desserts, slid over a cup of these red white and blue trifle cups. The layers of fluffy cream, juicy berries, and buttery cake bits were like a patriotic party in my mouth.
It wasn’t just the colors that caught me off guard—it was how simple and fuss-free they were. I mean, no oven? No problem. And the best part: I managed to whip up a batch while juggling a fussy toddler and a chatty neighbor. These trifle cups have since become my go-to, especially when I want to impress without stress. Maybe you’ve been there, too—needing a dessert that’s quick, festive, and just plain delicious. That’s why I’m sharing this recipe. It’s not fancy, but it’s honestly one of those “keep it in your back pocket” kind of treats that always steals the show.”
Why You’ll Love This Recipe
Having tested this recipe multiple times at family gatherings and neighborhood cookouts, I can confidently say it’s a crowd-pleaser for many reasons. Here’s why these easy no-bake red white and blue trifle cups should be on your radar:
- Quick & Easy: Comes together in about 20 minutes—perfect for busy summer days or last-minute dessert emergencies.
- Simple Ingredients: No need for specialty stores; you likely have everything on hand, from angel food cake to fresh berries.
- Perfect for 4th of July & Other Occasions: Great for patriotic holidays, summer picnics, or even casual weeknight treats.
- Crowd-Pleaser: Kids love the layers and colors, adults appreciate the light, refreshing taste.
- Unbelievably Delicious: The creamy whipped topping combined with the sweet berries and soft cake creates a delightful texture contrast that’s hard to resist.
What sets this recipe apart is the layering technique and the use of store-bought angel food cake, which keeps it light and airy without any baking hassle. Plus, folding in a bit of vanilla into the cream topping adds a subtle richness that takes it from simple to memorable. Honestly, I’ve seen guests close their eyes after the first bite—if that’s not a sign of winning, what is?
What Ingredients You Will Need
This recipe uses simple, wholesome ingredients to deliver bold flavor and satisfying texture without the fuss. Most are pantry staples, and the fresh berries add that seasonal pop of color and taste.
- Angel Food Cake: 1 store-bought 10-ounce (284 g) cake, cut into 1-inch cubes (I recommend Sara Lee for consistent texture)
- Strawberries: 1 cup (150 g), fresh, hulled and sliced (in summer, choose ripe, juicy berries for best flavor)
- Blueberries: 1 cup (150 g), fresh (frozen works in a pinch, but fresh is best for texture)
- Whipped Topping: 1 ½ cups (360 ml), chilled (store-bought or homemade whipped cream works beautifully)
- Vanilla Extract: 1 teaspoon (adds a lovely depth to the cream)
- Powdered Sugar: 2 tablespoons (optional, for lightly sweetening the whipped topping)
- Lemon Zest: 1 teaspoon (optional, adds a fresh citrus note that brightens the dessert)
For a dairy-free option, swap whipped topping with coconut whipped cream. If you want a gluten-free treat, look for gluten-free angel food cake or substitute with gluten-free sponge cake pieces. I’ve even tried adding a handful of chopped toasted almonds for crunch, which was a delightful twist!
Equipment Needed
Since this is a no-bake recipe, the equipment list is pretty straightforward:
- Mixing bowl (medium size) for whipping or folding the cream
- Electric hand mixer or whisk (a whisk works if you have strong arms, but the mixer saves time)
- Measuring spoons and cups for accuracy
- Paring knife for slicing strawberries and cubing the cake
- Serving cups or small clear jars (about 8-ounce or 240 ml size)—I like using clear ones so the layers really pop visually
Don’t have a mixer? No worries. I once whipped cream by hand while chatting with a neighbor, and it turned out just fine—though it took a bit longer. For budget-friendly serving ideas, disposable clear plastic cups work great and save on cleanup.
Preparation Method
- Prep the Ingredients (10 minutes): Start by washing and slicing your strawberries. Cube the angel food cake into roughly 1-inch pieces. Having everything ready makes the assembly smooth and quick.
- Make the Whipped Topping (5 minutes): In a chilled mixing bowl, combine the whipped topping with vanilla extract, powdered sugar, and lemon zest if using. Use an electric mixer on medium speed until soft peaks form. If you’re using store-bought whipped topping, just fold in the vanilla and lemon zest gently with a spatula.
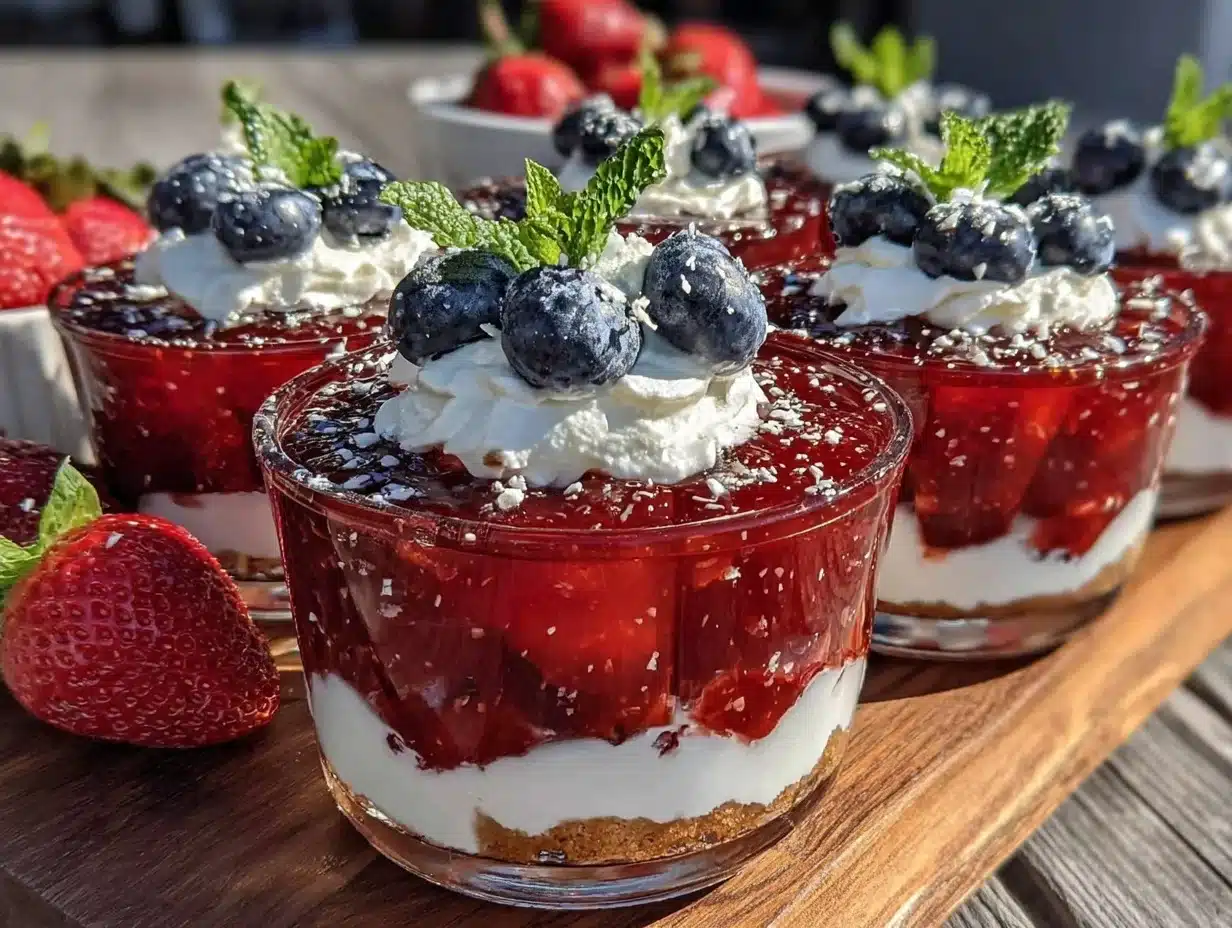
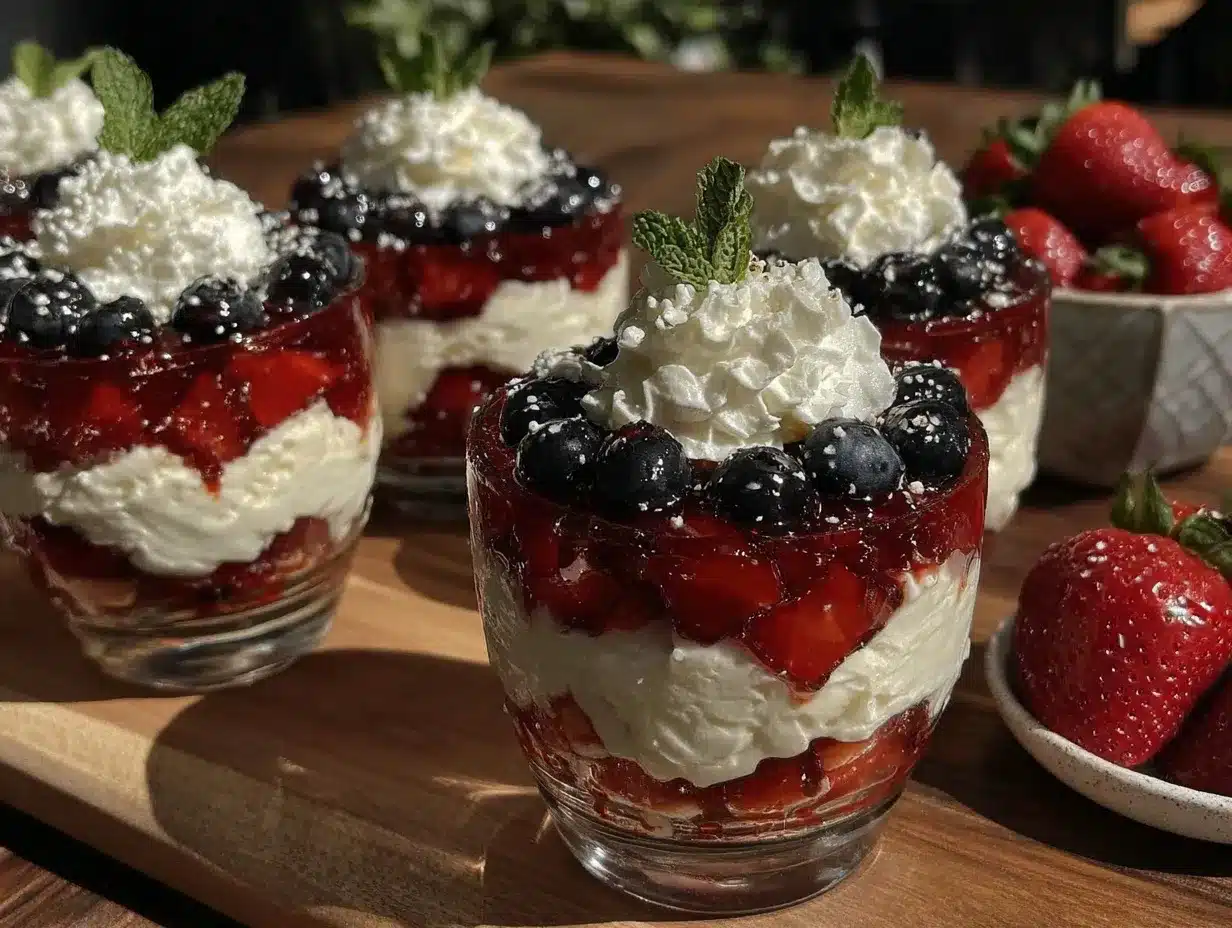
- Layer the Trifle Cups (5-7 minutes): Begin by placing a layer of angel food cake cubes at the bottom of each cup, about ¼ cup (30 g). Next, add a spoonful of strawberries, followed by a spoonful of blueberries. Then add a layer of the whipped topping, roughly 3 tablespoons (45 ml). Repeat the layers once or twice more, depending on cup size, ending with whipped topping on top.
- Chill Before Serving (at least 30 minutes): Cover the cups with plastic wrap or lids and refrigerate. This chilling helps the flavors meld and the whipped topping to set just right. I once forgot to chill them and the topping was a bit runny—definitely not the vibe!
- Garnish and Serve: Just before serving, add a few extra berries or a small sprig of fresh mint on top for that final pop of color and freshness.
Watch out for soggy cake—don’t over-layer the cream, and keep the cups refrigerated until ready to serve. The cake should stay light and airy, not mushy.
Cooking Tips & Techniques
Here’s the deal: the success of these no-bake trifle cups lies in the balance and texture contrast. Here’s what I’ve learned through trial and error:
- Don’t Overmix the Whipped Topping: You want soft peaks, not stiff. Overwhipping can make it grainy and harder to fold into the layers.
- Use Fresh Berries: The flavor and texture of fresh strawberries and blueberries make a huge difference. Frozen berries can release extra moisture, which might make the layers soggy.
- Cube Cake Evenly: Try to keep the angel food cake pieces uniform so the layers look pretty and every bite has a good balance of cake and cream.
- Layer Lightly: Avoid packing too much cake or cream in one spot. The goal is a delicate layering so each spoonful is a perfect combo of flavors.
- Chill Time Matters: Even 30 minutes in the fridge helps the flavors marry and the texture settle. If you’re in a rush, 15 minutes can work, but I wouldn’t skip it.
One time, I tried prepping these too early in the day, and by dinner, the cake had absorbed too much moisture. Lesson learned: assemble the day of or the night before but keep chilled tightly wrapped.
Variations & Adaptations
Want to switch things up? Here are some variations I’ve played around with that work beautifully:
- Different Berries: Swap strawberries and blueberries with raspberries and blackberries for a deeper color palette and tartness.
- Chocolate Twist: Add a drizzle of melted dark chocolate between layers or sprinkle mini chocolate chips for a fun contrast.
- Dairy-Free Version: Use coconut whipped cream and gluten-free cake or ladyfingers for those with allergies or dietary needs.
- Adult Version: Mix a tablespoon of your favorite liqueur (like Grand Marnier or Amaretto) into the whipped topping for a grown-up kick.
- Seasonal Swap: In winter, use canned or frozen fruit, like cherries or peaches, to keep the patriotic look with a twist.
Personally, I once tried layering with pound cake instead of angel food cake—delicious but heavier. If you like a more indulgent dessert, that’s a fun way to change it up.
Serving & Storage Suggestions
These trifle cups are best served chilled—straight from the fridge. I like to bring them out about 10 minutes before eating to take the chill off just a bit, making the flavors pop.
For presentation, clear cups or glass jars really show off the red, white, and blue layers, making them perfect for festive occasions. Pair these with a light lemonade or iced tea for a refreshing combo.
If you have leftovers (which is rare!), cover tightly and store in the refrigerator up to 2 days. The cake will slowly absorb moisture, so try to eat them sooner rather than later. To re-energize the whipped topping, give it a quick stir before serving.
These cups don’t freeze well—the whipped topping tends to separate and the texture gets off. So plan to enjoy fresh!
Nutritional Information & Benefits
Each serving (one trifle cup) offers approximately:
| Nutrient | Amount |
|---|---|
| Calories | 180-220 kcal |
| Fat | 7-9 g |
| Carbohydrates | 28-32 g |
| Protein | 2-3 g |
| Sugar | 18-22 g |
Besides being visually festive, this recipe includes antioxidant-rich blueberries and vitamin C-packed strawberries, which add a healthful touch. The angel food cake keeps the dessert lighter compared to traditional dense cakes. For those mindful of sugar, you can reduce powdered sugar or use sugar-free whipped toppings.
Overall, it’s a balanced treat that satisfies a sweet tooth without feeling too heavy, perfect for summer indulgence.
Conclusion
There’s something undeniably charming about these easy no-bake red white and blue trifle cups. They manage to be festive, fresh, and fuss-free all at once. Whether you’re rushing to a last-minute party or simply craving a light dessert that doesn’t require the oven, these trifle cups have your back.
Feel free to tweak the layers, swap in your favorite berries, or add a little twist of your own. I keep coming back to this recipe because it’s simple, colorful, and always a hit—plus, I love that I can make it while juggling a million other summer tasks without breaking a sweat.
If you try these, I’d love to hear how they turned out or what fun variations you came up with. Share your thoughts, photos, or secret ingredient additions—I’m all ears!
Happy celebrating and happy eating!
Frequently Asked Questions
Can I make these trifle cups ahead of time?
Yes! You can assemble them up to a day in advance. Just cover tightly and keep refrigerated. However, avoid freezing as the texture of the whipped topping can suffer.
What can I use if I can’t find angel food cake?
Pound cake or sponge cake work as substitutes, but they’ll make the dessert richer and denser. For gluten-free options, look for gluten-free angel food cake or use gluten-free sponge cake.
Can I use frozen berries instead of fresh?
Frozen berries can be used if fresh aren’t available, but thaw and drain them well to prevent sogginess. Fresh berries give the best texture and flavor.
Is there a vegan version of this recipe?
Yes! Use a vegan-friendly pound or sponge cake and replace the whipped topping with coconut whipped cream or another plant-based alternative.
How long will these trifle cups stay fresh in the fridge?
They’re best eaten within 1-2 days for optimal freshness and texture. After that, the cake may become soggy and the whipped topping lose its lightness.
Pin This Recipe!

Easy No-Bake Red White and Blue Trifle Cups Recipe for Perfect 4th of July Dessert
- Total Time: 45 minutes
- Yield: 8 servings 1x
Description
A quick and easy no-bake dessert featuring layers of angel food cake, fresh strawberries and blueberries, and whipped topping, perfect for patriotic celebrations and summer gatherings.
Ingredients
- 1 store-bought 10-ounce (284 g) angel food cake, cut into 1-inch cubes
- 1 cup (150 g) fresh strawberries, hulled and sliced
- 1 cup (150 g) fresh blueberries
- 1 ½ cups (360 ml) whipped topping, chilled (store-bought or homemade whipped cream)
- 1 teaspoon vanilla extract
- 2 tablespoons powdered sugar (optional)
- 1 teaspoon lemon zest (optional)
Instructions
- Prep the Ingredients (10 minutes): Wash and slice strawberries. Cube the angel food cake into roughly 1-inch pieces.
- Make the Whipped Topping (5 minutes): In a chilled mixing bowl, combine whipped topping with vanilla extract, powdered sugar, and lemon zest if using. Use an electric mixer on medium speed until soft peaks form. If using store-bought whipped topping, fold in vanilla and lemon zest gently with a spatula.
- Layer the Trifle Cups (5-7 minutes): Place a layer of angel food cake cubes (about ¼ cup or 30 g) at the bottom of each cup. Add a spoonful of strawberries, then blueberries, followed by a layer of whipped topping (about 3 tablespoons or 45 ml). Repeat layers once or twice more, ending with whipped topping on top.
- Chill Before Serving (at least 30 minutes): Cover cups with plastic wrap or lids and refrigerate to let flavors meld and whipped topping set.
- Garnish and Serve: Just before serving, add a few extra berries or a small sprig of fresh mint on top.
Notes
Do not overmix the whipped topping to avoid grainy texture. Use fresh berries for best flavor and texture. Cube cake evenly and layer lightly to prevent sogginess. Chill at least 30 minutes before serving. Assemble the day of or the night before and keep refrigerated. Avoid freezing as whipped topping texture suffers.
- Prep Time: 15 minutes
- Cook Time: 0 minutes
- Category: Dessert
- Cuisine: American
Nutrition
- Serving Size: One trifle cup (abou
- Calories: 200
- Sugar: 20
- Fat: 8
- Carbohydrates: 30
- Protein: 3
Keywords: no-bake dessert, trifle cups, 4th of July dessert, angel food cake, patriotic dessert, summer dessert, easy dessert, berry dessert
