

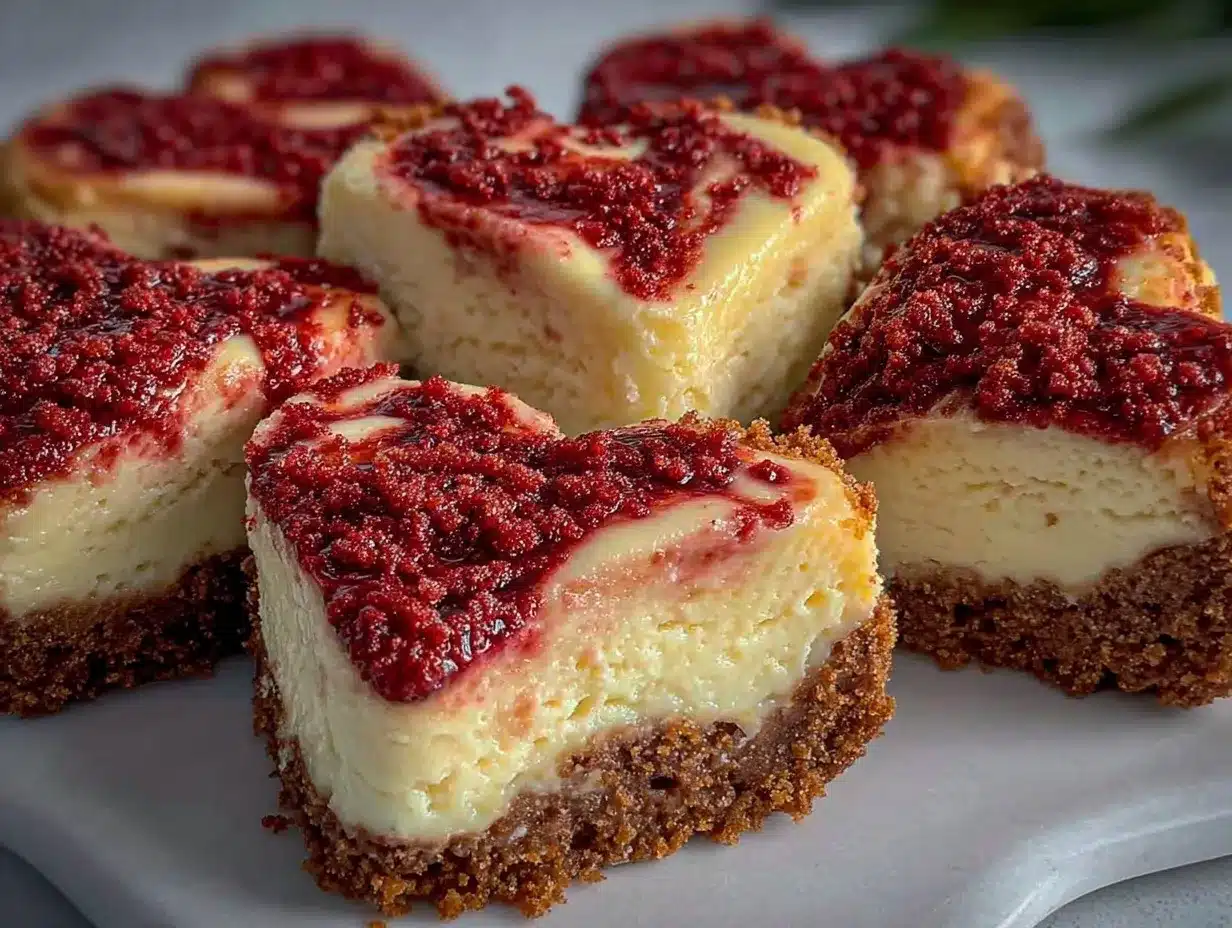
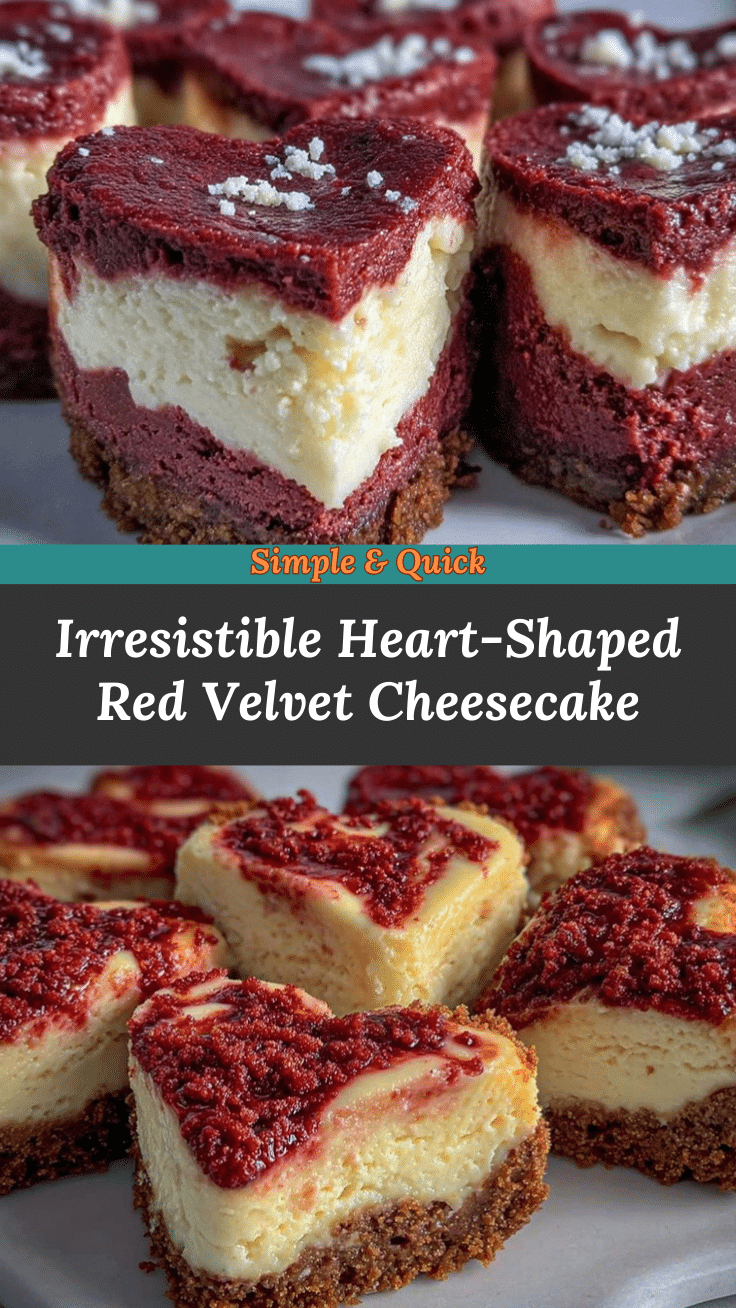
Let me just say—when the scent of sweet cocoa and tangy cream cheese starts swirling around my kitchen, it’s like a little celebration in the air. The first time I pulled this heart-shaped red velvet cheesecake from the oven, I actually had to pause and admire it. The brilliant red cake, the smooth ivory cheesecake, and that unforgettable aroma—that was the kind of moment where you stop, take a deep breath, and just smile because you know you’re onto something truly special.
I stumbled onto this recipe years ago, during a rainy weekend when I wanted something both indulgent and festive for my best friend’s birthday. You know, when I was knee-high to a grasshopper, red velvet was the “fancy” cake you’d get at church potlucks (and if it was heart-shaped, well, you were basically royalty). The idea to combine my grandma’s red velvet cake with my mom’s classic cheesecake came as a lightbulb moment—why not make the ultimate showstopper?
Honestly, my family couldn’t stop sneaking slices off the cooling rack (and I can’t really blame them). It has this dangerously easy charm—pure, nostalgic comfort dressed up for special occasions. Whether it’s Valentine’s Day, anniversaries, birthdays, or just because, this heart-shaped red velvet cheesecake delivers smiles every single time. It brightens up any Pinterest board and guarantees a few “wow!” comments at the table.
I’ve tested, tweaked, and perfected this recipe more times than I’d like to admit (in the name of research, of course). Now it’s a staple for family gatherings, gifting, and those days when you just need some edible love. If you’re looking for a dessert that feels like a warm hug and tastes even better, you’re going to want to bookmark this one. It’s the perfect heart-shaped red velvet cheesecake, and trust me, it’s worth every bite.
Why You’ll Love This Heart-Shaped Red Velvet Cheesecake
I’ve baked dozens of cheesecakes, tested countless red velvet variations, and this combo really stands out. Here’s why you’ll love this recipe (and why it’s become my go-to for special occasions):
- Quick & Easy: Comes together in under 90 minutes, including bake time—perfect for last-minute celebrations or surprise guests.
- Simple Ingredients: No fancy grocery runs required. You probably have everything in your pantry already.
- Perfect for Special Occasions: Whether it’s Valentine’s Day, anniversaries, birthdays, or a festive dinner party, the heart shape adds that extra “aww” factor.
- Crowd-Pleaser: Kids and adults can’t resist the vibrant color, creamy texture, and rich flavors. It’s always met with rave reviews (and requests for seconds).
- Unbelievably Delicious: The cocoa-flecked, tender red velvet base supports a silky, tangy cheesecake layer—seriously, this is comfort food at its best.
What sets this recipe apart? Honestly, it’s the balance between the moist, lightly chocolatey red velvet cake and the ultra-smooth, rich cheesecake filling. A pinch of vinegar in the cake keeps the crumb tender and that classic tang, while blending the cream cheese until it’s utterly lump-free makes every bite melt in your mouth. No dry cake or lumpy cheesecake here!
This heart-shaped red velvet cheesecake isn’t just tasty—it’s the dessert that makes you close your eyes after that first forkful. It’s comfort food reimagined: quicker, easier, but with all the soul-soothing satisfaction of the classics. It’s perfect for impressing guests without the stress, or for turning a simple night in into something memorable. If you want a dessert that’s both beautiful and reliably delicious, this is the one to try.
What Ingredients You Will Need
This recipe uses simple, wholesome ingredients to deliver bold flavor and a dreamy texture—nothing too fancy, just what you need to make a heart-shaped red velvet cheesecake that tastes as good as it looks. Most items are pantry staples, and I’ll toss in a few substitution tips where they help.
For the Red Velvet Cake Base
- 1 cup (130g) all-purpose flour (or use a gluten-free blend if needed)
- 1/2 cup (100g) granulated sugar
- 2 tbsp (15g) unsweetened cocoa powder (I love Hershey’s for that deep red color)
- 1/2 tsp baking soda
- 1/4 tsp salt
- 1/2 cup (120ml) vegetable oil (can swap for melted coconut oil for extra richness)
- 1 large egg, room temperature
- 1/2 cup (120ml) buttermilk (or use 1/2 cup milk + 1 tsp vinegar as a quick substitute)
- 1 tsp distilled white vinegar (this keeps the crumb soft and adds tang)
- 1 tsp vanilla extract
- 1 tbsp red food coloring (gel works best for vibrant color; natural beet powder can work too, though it’s less vivid)
For the Cheesecake Layer
- 16 oz (450g) cream cheese, softened (full-fat for best texture)
- 1/2 cup (100g) granulated sugar
- 2 large eggs, room temperature
- 1/4 cup (60ml) sour cream (adds creaminess and a little tang)
- 1 tsp vanilla extract
For the Topping (Optional)
- 1/2 cup (120ml) heavy cream, whipped (for garnish)
- Fresh berries (raspberries or strawberries look stunning)
- Chocolate shavings or sprinkles (for a little pizzazz)
If you need to keep things dairy-free, use vegan cream cheese and coconut yogurt instead of sour cream. For a lower-sugar option, swap the sugar with your preferred baking alternative. I’ve tried Bob’s Red Mill gluten-free flour and it works great here—no one can tell the difference.
When it comes to the red food coloring, gel versions are more intense and won’t water down your batter. If you want a more natural approach, beet powder gives a subtle pink hue (not as bold but still pretty). For the cheesecake, full-fat cream cheese is key for silky texture—trust me, I’ve tested the lighter stuff and it just isn’t the same.
Most of these ingredients are easy to find year-round. In summer, you can swap the berries for sliced peaches or cherries on top. This recipe is forgiving, so don’t worry if you need to make a few swaps. The result is always a beautiful, delicious heart-shaped red velvet cheesecake that’s the star of any special occasion.
Equipment Needed
To make this heart-shaped red velvet cheesecake, you don’t need a fancy kitchen setup—just a handful of trusty tools. Here’s what I use every time, with a few budget-friendly tips and alternatives if you don’t have something on hand.
- Heart-shaped cake pan (8-inch/20cm works best; if you don’t have one, use a round springform pan and trim the edges after baking!)
- Mixing bowls (one large, one medium)
- Hand mixer or stand mixer (a whisk and strong arms work in a pinch, honestly)
- Rubber spatula (for scraping every last bit)
- Measuring cups and spoons (accuracy matters for cheesecake!)
- Wire cooling rack
- Baking parchment or nonstick spray (for easy release)
- Offset spatula or knife (for spreading batter and smoothing layers)
If your heart-shaped pan is nonstick, a quick spritz of oil is usually enough. If not, line it with parchment for easy lifting. I’ve used everything from silicone pans to old-school metal ones—just watch for leaks with springforms and double up on parchment if needed.
For cleanup, soaking your mixer attachments right after use saves so much time (learned this after many late-night baking marathons). If you’re on a budget, you can find great pans at thrift stores or online—honestly, a sturdy pan is all you need for perfect results.
Preparation Method
Here’s how to make the perfect heart-shaped red velvet cheesecake, step by step—with exact measurements, timing, and my best troubleshooting tips along the way. Let’s get baking!
-
Prep the Pan: Preheat your oven to 325°F (163°C). Lightly grease your heart-shaped pan with nonstick spray or line with parchment paper for easy release. Set aside.
Tip: If using a springform, wrap the bottom in foil to prevent leaks. -
Make the Red Velvet Batter: In a medium bowl, whisk together 1 cup (130g) flour, 1/2 cup (100g) sugar, 2 tbsp (15g) cocoa powder, 1/2 tsp baking soda, and 1/4 tsp salt.
In a separate bowl, combine 1/2 cup (120ml) oil, 1 large egg, 1/2 cup (120ml) buttermilk, 1 tsp vinegar, 1 tsp vanilla, and 1 tbsp red food coloring.
Pour wet ingredients into dry and mix gently—don’t overmix! Batter should be smooth and vibrantly red.
Troubleshooting: If batter seems too thick, add 1-2 tbsp milk. If color is pale, add a touch more coloring. -
Spread the Red Velvet Base: Pour the red velvet batter into the prepared pan, smoothing the top with a spatula.
Bake for 15 minutes, just until the edges are set (center may be slightly soft). Remove from oven and let cool for 10 minutes.
Sensory cue: Cake should be springy to the touch, not sticky. -
Prepare the Cheesecake Layer: In a large bowl, beat 16 oz (450g) cream cheese until smooth—no lumps! Add 1/2 cup (100g) sugar and beat again. Mix in 2 large eggs, 1/4 cup (60ml) sour cream, and 1 tsp vanilla.
Blend until silky and thick. Scrape bowl down often for even mixing.
Note: Room temperature cream cheese mixes smoother. Cold cream cheese can cause lumps. -
Layer the Cheesecake: Pour cheesecake mixture over cooled red velvet base. Use an offset spatula to spread evenly.
Tap pan gently on the counter to release air bubbles. -
Bake: Return pan to oven and bake for 40-45 minutes at 325°F (163°C), or until edges look set but center jiggles slightly.
Time estimate: Total baking time is about 55-60 minutes.
Warning: Overbaking can cause cracks. If top browns too quickly, tent loosely with foil. -
Cool: Turn off oven and crack door open. Let cheesecake cool in oven for 30 minutes—prevents cracks.
Then, transfer pan to a wire rack and cool completely (about 1 hour).
Tip: Chill in fridge for at least 3 hours, or overnight, for best texture. -
Decorate: Once chilled, top with whipped cream, fresh berries, and chocolate shavings if desired.
Carefully lift from pan and serve.
Sensory cue: Cheesecake should be firm, creamy, and slightly tangy—red velvet base moist and tender.
Personal tip: Use a sharp knife dipped in hot water for slicing—makes for clean, beautiful slices. If you notice any cracks, just cover with extra whipped cream (no one will ever know).
Cooking Tips & Techniques
Making heart-shaped red velvet cheesecake isn’t hard, but a few pro tips can make it truly perfect. Here’s what I’ve learned (sometimes the hard way!):
- Room Temperature Ingredients: Always use room temperature cream cheese and eggs for the cheesecake layer. Cold ingredients can cause lumps and uneven texture.
- Mixer Speed: Mix cheesecake filling on medium speed—too fast adds air, which leads to cracks.
- Don’t Overbake: Cheesecake is done when edges are set and center jiggles slightly. Overbaking makes it dry and crumbly.
- Cooling Matters: Cool slowly in the oven before moving to the countertop. Quick temperature changes can cause cracks (learned this after a few “fault line” disasters).
- Avoid Overmixing Cake Batter: Mix just until combined for a tender crumb. Overmixing makes the cake tough.
- Multitasking: While the cake base bakes, prep your cheesecake filling. This saves time and gets dessert on the table faster.
- Consistency: Scrape down your mixer bowl often so everything blends smoothly—missed this step once and ended up with a lumpy cheesecake (not the end of the world, but not Pinterest-worthy!).
- Edge Protection: If you’re using a springform pan, double up on foil and parchment to avoid leaks—trust me, cleaning burnt batter from the oven is no fun.
Little things like sifting cocoa powder and using gel food coloring instead of liquid add up to a more vibrant, beautiful cake. If you’re new to cheesecake, don’t stress about small cracks—they’re easily hidden and don’t affect the taste. With these tips, your heart-shaped red velvet cheesecake will be a stunner every time!
Variations & Adaptations
One of the best things about this heart-shaped red velvet cheesecake is how flexible it is. Here are some fun ways to switch things up, plus a few personal favorites:
- Gluten-Free Version: Use a 1:1 gluten-free flour blend for the cake base. Bob’s Red Mill is my go-to and gives a tender crumb.
- Dairy-Free: Substitute vegan cream cheese and coconut yogurt for the cheesecake layer. Use plant-based milk and vegan butter in the cake base. The texture stays creamy and the flavor is still spot-on.
- Chocolate Lovers’ Twist: Add 1/4 cup (30g) mini chocolate chips to the red velvet batter or sprinkle on top before baking.
- Seasonal Fruit: In summer, top with sliced peaches, cherries, or even kiwi for a fresh pop. In winter, candied orange peel or pomegranate seeds look gorgeous.
- Flavor Boost: Add a teaspoon of espresso powder to the cake base for a subtle mocha depth that pairs perfectly with the cheesecake.
- Allergen Substitutions: For egg-free, use a flax egg (1 tbsp ground flax + 3 tbsp water) in the cake. For nut allergies, skip any nut-based toppings.
One time, I added a little almond extract to the cheesecake layer—just a quarter teaspoon—and it gave a lovely, delicate flavor that my mom absolutely adored. The beauty of this recipe is that you can tweak it to fit your tastes, dietary needs, and the season. No matter how you adapt it, you’ll end up with a heart-shaped red velvet cheesecake that’s both beautiful and delicious.
Serving & Storage Suggestions
This heart-shaped red velvet cheesecake is best served chilled, straight from the fridge. For presentation, I like to pipe a ring of whipped cream around the edge and pile fresh berries in the center—makes it pop on any dessert table!
For a special touch, dust with cocoa powder or add a sprinkle of chocolate curls. Pair with a glass of cold milk, hot coffee, or even a sweet dessert wine if you’re feeling fancy.
- Serving Temperature: Chill at least 3 hours before slicing. Cold cheesecake slices cleanly and tastes creamier.
- Storage: Store leftovers in an airtight container in the refrigerator for up to 5 days. For longer storage, wrap tightly and freeze for up to 2 months. Thaw overnight in the fridge.
- Reheating: Cheesecake is best cold, but you can gently warm a slice in the microwave for 10 seconds if you prefer it softer.
- Flavor Development: Flavors deepen after a day in the fridge. Honestly, the second-day slice is even more delicious!
If you’re gifting, wrap slices in parchment and package in a pretty box—guaranteed to brighten someone’s day. Whether for a party or a quiet night in, this cheesecake brings joy every time.
Nutritional Information & Benefits
Here’s a quick look at the nutritional profile of a slice (1/10th of the cake):
| Calories | 340 |
|---|---|
| Protein | 6g |
| Fat | 22g |
| Carbohydrates | 28g |
| Fiber | 1g |
| Sugar | 18g |
Cream cheese provides a good dose of calcium and protein, while cocoa adds antioxidants and flavor. If you use Greek yogurt in place of sour cream, you’ll bump up the protein even more. This dessert is naturally nut-free (unless you add toppings) and can be made gluten-free or dairy-free with simple swaps.
From a wellness perspective, this heart-shaped red velvet cheesecake is a treat for the soul as much as the body—sometimes a little celebration is just what you need. Just keep an eye out for allergens like dairy, eggs, and gluten if you’re serving a crowd. I always appreciate a dessert that brings people together and makes them feel good!
Conclusion
If you’re searching for a dessert that looks stunning, tastes incredible, and brings a little extra love to any special occasion, this heart-shaped red velvet cheesecake is the one to try. It’s easy to make, endlessly customizable, and always gets rave reviews from family and friends.
I love this recipe because it combines the best of both worlds—classic red velvet and silky cheesecake—in one beautiful package. Don’t be afraid to tweak it and make it your own; that’s half the fun! Serve it up at your next celebration and watch the smiles light up around the table.
Got your own twist or a secret ingredient? I’d love to hear about it! Drop a comment below, share your photos, or tell me how you adapted the recipe. Happy baking—and may every occasion be a little sweeter with a slice of heart-shaped red velvet cheesecake.
FAQs About Heart-Shaped Red Velvet Cheesecake
Can I make this cheesecake without a heart-shaped pan?
Absolutely! You can use a round or square pan and carefully trim the cooled cake into a heart shape. Or just bake as usual—taste comes first, shape is just the cherry on top.
How do I prevent cracks in my cheesecake?
Cool the cheesecake slowly in the oven after baking and avoid overmixing the batter. If cracks happen, cover with whipped cream or berries—no one will notice!
Can I use natural food coloring instead of artificial?
Yes, beet powder or juice works for a softer pink hue. It won’t be as vibrant as gel coloring, but it’s a great natural option.
Is this recipe suitable for gluten-free or dairy-free diets?
It sure is! Swap in gluten-free flour and use vegan cream cheese/yogurt for a delicious allergy-friendly version. The texture and flavor hold up beautifully.
How far in advance can I make this cheesecake?
You can make it up to 2 days ahead. Store in the fridge, covered, and decorate just before serving. Flavors actually improve with some chill time!
Pin This Recipe!

Heart-Shaped Red Velvet Cheesecake
- Total Time: 1 hour 15 minutes
- Yield: 10 servings 1x
Description
A showstopping dessert combining moist, cocoa-flecked red velvet cake with a silky, tangy cheesecake layer, baked in a heart shape for special occasions. Perfect for celebrations like Valentine’s Day, birthdays, or anniversaries.
Ingredients
- 1 cup all-purpose flour (or gluten-free blend)
- 1/2 cup granulated sugar
- 2 tbsp unsweetened cocoa powder
- 1/2 tsp baking soda
- 1/4 tsp salt
- 1/2 cup vegetable oil (or melted coconut oil)
- 1 large egg, room temperature
- 1/2 cup buttermilk (or 1/2 cup milk + 1 tsp vinegar)
- 1 tsp distilled white vinegar
- 1 tsp vanilla extract
- 1 tbsp red food coloring (gel preferred, or beet powder)
- 16 oz cream cheese, softened (full-fat)
- 1/2 cup granulated sugar
- 2 large eggs, room temperature
- 1/4 cup sour cream
- 1 tsp vanilla extract
- 1/2 cup heavy cream, whipped (optional, for garnish)
- Fresh berries (raspberries or strawberries, optional)
- Chocolate shavings or sprinkles (optional)
Instructions
- Preheat oven to 325°F (163°C). Grease an 8-inch heart-shaped pan or line with parchment paper.
- In a medium bowl, whisk together flour, sugar, cocoa powder, baking soda, and salt.
- In a separate bowl, combine oil, egg, buttermilk, vinegar, vanilla, and red food coloring.
- Pour wet ingredients into dry and mix gently until smooth and red. Do not overmix.
- Spread red velvet batter into prepared pan and smooth the top. Bake for 15 minutes until edges are set. Cool for 10 minutes.
- In a large bowl, beat cream cheese until smooth. Add sugar and beat again. Mix in eggs, sour cream, and vanilla until silky.
- Pour cheesecake mixture over cooled red velvet base and spread evenly. Tap pan to release air bubbles.
- Bake for 40-45 minutes at 325°F, until edges are set and center jiggles slightly. Total baking time is about 55-60 minutes.
- Turn off oven, crack door, and let cheesecake cool in oven for 30 minutes. Transfer to wire rack and cool completely (about 1 hour). Chill in fridge for at least 3 hours or overnight.
- Decorate with whipped cream, berries, and chocolate shavings if desired. Slice with a hot knife for clean cuts.
Notes
Use room temperature cream cheese and eggs for a smooth cheesecake layer. Don’t overmix or overbake to avoid cracks. Cool slowly in the oven before chilling. For gluten-free or dairy-free, use appropriate substitutes. Decorate just before serving for best presentation.
- Prep Time: 20 minutes
- Cook Time: 55 minutes
- Category: Dessert
- Cuisine: American
Nutrition
- Serving Size: 1 slice (1/10th of c
- Calories: 340
- Sugar: 18
- Sodium: 320
- Fat: 22
- Saturated Fat: 12
- Carbohydrates: 28
- Fiber: 1
- Protein: 6
Keywords: red velvet cheesecake, heart-shaped dessert, special occasion cake, Valentine’s Day, birthday cake, anniversary dessert, easy cheesecake, festive baking
