

“You know, I wasn’t exactly planning to craft a cake that looked like it belonged in a jewelry shop,” I said to my friend over a late-night call, holding a slice of what I now call the Perfect Golden Black Velvet Chocolate Cake with Gold Leaf Accents. Honestly, it started as a bit of a kitchen whim on a sleepy Sunday afternoon, when I’d already baked one too many regular chocolate cakes (including a few attempts at a Dubai chocolate bar style dessert). I had this leftover black cocoa powder and a small stash of edible gold leaf that I’d bought on a whim for another project.
I figured, why not? The idea of a deep, rich black velvet cake with a golden shimmer sounded like a total showstopper—something that felt luxurious but didn’t take a whole day to pull off. The first bite surprised me; the cake was unbelievably moist and velvety with this bittersweet chocolate depth that wasn’t too heavy. And that gold leaf? It gave it this unexpected elegance, like a secret sparkle that made every bite feel like a celebration.
It’s funny how a simple mix of pantry staples and a touch of gold can turn an ordinary afternoon into a moment worth savoring. This cake stuck with me because it’s not just about looking fancy — it’s about that perfect balance of flavor and texture that keeps you coming back, slice after slice, no guilt involved. If you decide to try this recipe, it might just become your go-to for when you want something special but not complicated — trust me on this one.
Why You’ll Love This Recipe
This Perfect Golden Black Velvet Chocolate Cake with Gold Leaf Accents has been tested over and over (okay, maybe more times than I’m willing to admit), and here’s why it’s become a favorite in my kitchen:
- Quick & Easy: Ready in about 1 hour from start to finish — perfect for those moments when you want something decadent but don’t have all day.
- Simple Ingredients: Most are pantry staples. You probably already have the key players like black cocoa powder, flour, and buttermilk.
- Perfect for Celebrations: Whether it’s a birthday, dinner party, or just a treat-yourself moment, the gold leaf adds that wow factor effortlessly.
- Crowd-Pleaser: The bittersweet chocolate flavor appeals to both kids and adults, and the texture is soft without being crumbly.
- Unbelievably Delicious: The combination of black cocoa and buttermilk creates a velvet crumb that’s rich but surprisingly light.
What sets this cake apart is the use of black cocoa powder for that deep, dark color and intense flavor — not just regular cocoa powder. Plus, the subtle application of edible gold leaf makes it feel like a dessert you’d find at a high-end patisserie, but honestly, it’s way easier to make than it looks. This isn’t just another chocolate cake; it’s the kind that makes you pause and savor, closing your eyes and thinking, “Yep, this is the one.”
What Ingredients You Will Need
This recipe calls for straightforward, wholesome ingredients that come together to create that bold black velvet cake with luxurious golden accents. You’ll find most of these in your pantry or local grocery store:
- For the cake batter:
- All-purpose flour – 2 ½ cups (320 g)
- Black cocoa powder – ⅔ cup (55 g) (Look for Hershey’s Special Dark for best depth)
- Baking soda – 1 ½ teaspoons
- Salt – 1 teaspoon
- Unsalted butter – 1 cup (227 g), softened
- Granulated sugar – 2 cups (400 g)
- Large eggs – 3, room temperature
- Buttermilk – 1 cup (240 ml), room temperature (adds tenderness and tang)
- Vanilla extract – 2 teaspoons
- Hot water – 1 cup (240 ml) (to bloom the cocoa, intensifying flavor)
- For the frosting:
- Cream cheese – 8 oz (226 g), softened (for a light tangy contrast)
- Unsalted butter – ½ cup (113 g), softened
- Powdered sugar – 4 cups (480 g), sifted
- Vanilla extract – 1 teaspoon
- Pinch of salt (balances sweetness)
- For decoration:
- Edible gold leaf sheets – about 1-2 sheets (handle carefully, they’re delicate!)
If you need to make this gluten-free, swapping the all-purpose flour with a 1:1 gluten-free baking flour blend works well. For a dairy-free version, try substituting the butter with coconut oil and use a dairy-free cream cheese alternative. In summer, I love adding a few fresh raspberries on top for an extra pop of color and tartness, which pairs wonderfully with the chocolate.
Equipment Needed
- Two 9-inch (23 cm) round cake pans – non-stick or lined with parchment paper to avoid sticking.
- Electric mixer or stand mixer – while you can mix by hand, the batter blends much smoother and lighter with a mixer.
- Mixing bowls – one large for dry ingredients, one medium for wet ingredients.
- Measuring cups and spoons – precise measurements matter here, especially for cocoa and baking soda.
- Rubber spatula – for folding and scraping the batter from the bowl.
- Cooling racks – essential for letting cakes cool evenly without becoming soggy.
- Offset spatula or butter knife – helpful for spreading the frosting evenly.
- Small brush or tweezers – to carefully place the delicate gold leaf accents without tearing.
For a budget-friendly option, I’ve used silicone cake pans before and they work just fine. Also, a hand mixer does the job well if you don’t have a stand mixer. Just take your time to cream the butter and sugar properly for the best texture. If you want to get fancy, a cake turntable can make frosting easier, but it’s definitely not required.
Preparation Method
- Preheat your oven to 350°F (175°C). Grease your two 9-inch cake pans and line the bottoms with parchment paper. This ensures easy release later. (Prep time: 10 minutes)
- Mix the dry ingredients: In a large bowl, sift together the all-purpose flour, black cocoa powder, baking soda, and salt. Sifting helps prevent lumps and gives a smooth batter.
- Cream butter and sugar: Using an electric mixer, beat the softened butter and granulated sugar on medium speed until light and fluffy, about 3-4 minutes. This step is key for a tender crumb.
- Add eggs and vanilla: Beat in the eggs one at a time, mixing well after each addition. Then add the vanilla extract.
- Alternate adding dry ingredients and buttermilk: Add the dry mixture in three parts, alternating with the buttermilk in two parts, starting and ending with the dry ingredients. Mix gently on low speed after each addition to avoid overmixing.
- Prepare the hot water: In a separate cup, stir the hot water to the batter slowly, mixing on low until combined. The hot water blooms the black cocoa, making the cake ultra-moist and rich. The batter will be thin — that’s perfect.
- Pour batter into pans: Divide the batter evenly between the two pans. Tap the pans gently on the counter to release air bubbles.
- Bake: Place in the preheated oven and bake for 30-35 minutes, or until a toothpick inserted in the center comes out with just a few moist crumbs.
- Cool: Let the cakes cool in the pans for 15 minutes, then run a knife around the edges and invert them onto cooling racks. Peel off the parchment paper and allow them to cool completely before frosting.
- Make the frosting: Beat the cream cheese and butter together until smooth and creamy. Gradually add powdered sugar, one cup at a time, beating on low speed. Add vanilla and salt, then beat on medium-high until fluffy.
- Assemble the cake: Place one cake layer on your serving plate. Spread a generous layer of frosting on top. Place the second layer and frost the top and sides evenly.
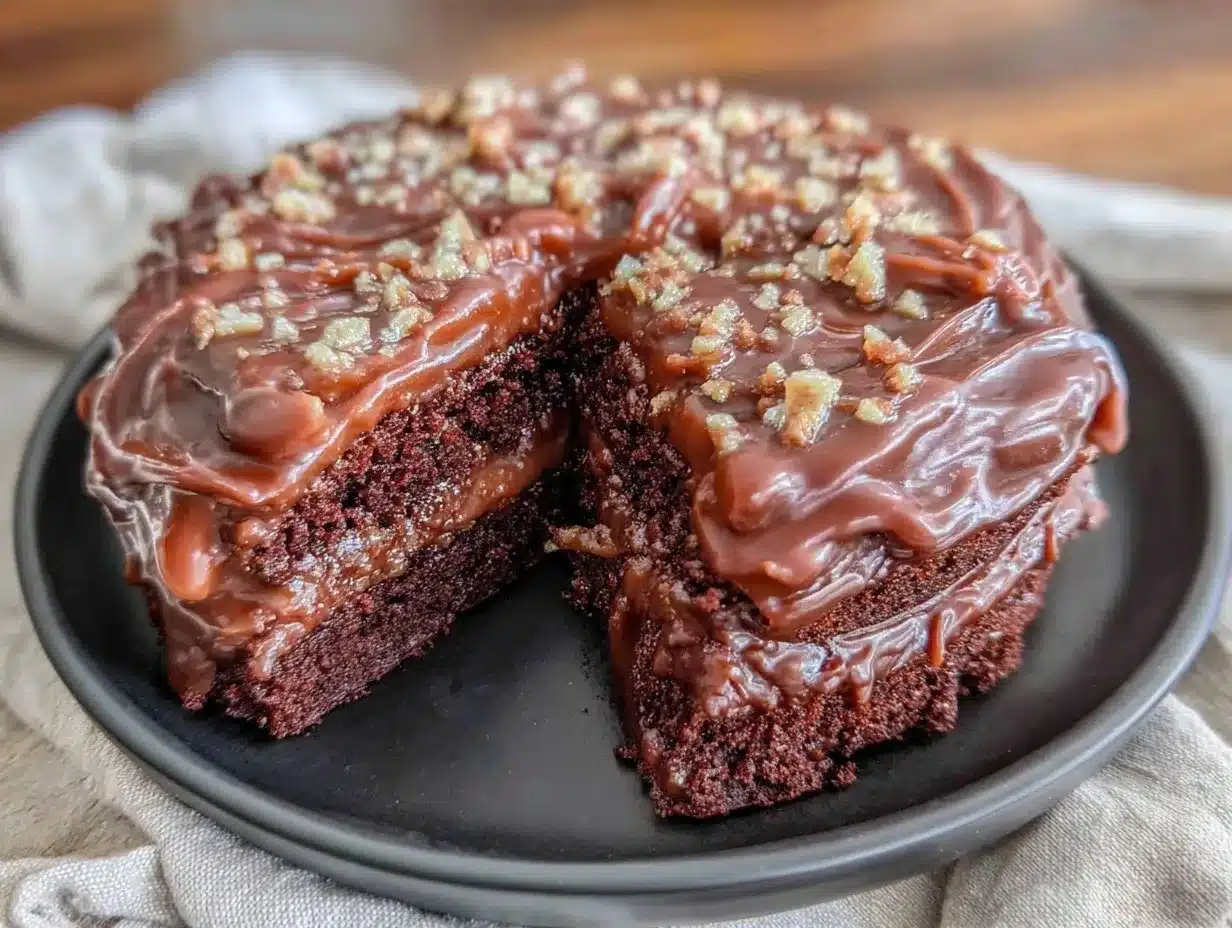
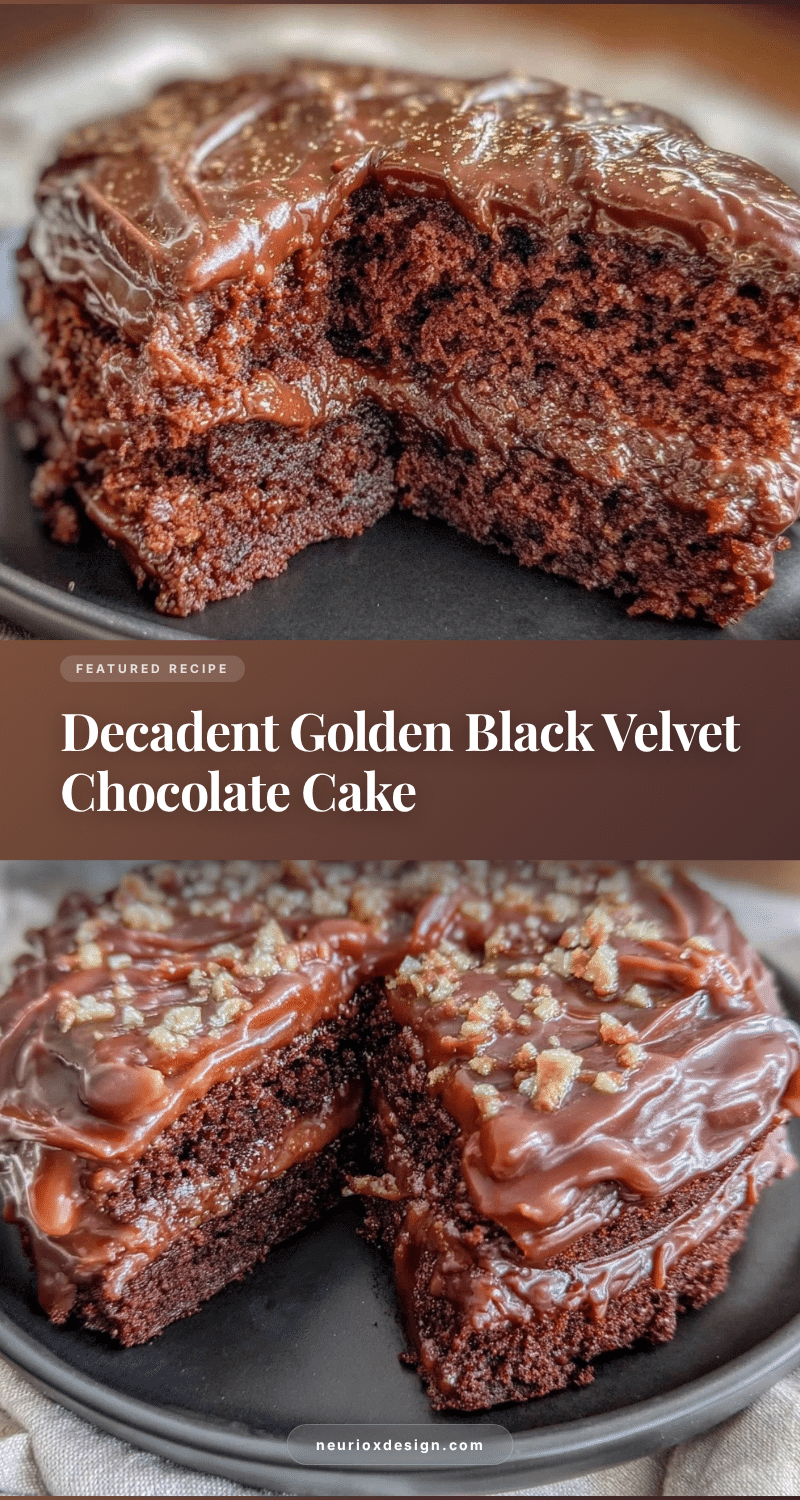
- Add the gold leaf accents: Using tweezers or a small brush, gently place small pieces of edible gold leaf on the frosting. Be careful — it’s delicate and tears easily! The gold leaf adds an elegant shimmer that makes this cake a showstopper.
Pro tip: If your frosting seems too soft to hold the gold leaf, chill the cake for 15 minutes before applying the gold. Also, don’t rush cooling — a warm cake will melt the frosting.
Cooking Tips & Techniques
Here’s the thing — black velvet chocolate cake is a bit of a diva. It demands respect but rewards patience. First, always use black cocoa powder, not just regular cocoa — it’s darker and less acidic, which gives the cake its signature color and flavor.
When mixing the batter, avoid overmixing once the dry ingredients hit the wet. Overmixing can lead to a dense, tough cake, and that’s the last thing you want here. The batter will be quite thin after adding hot water — don’t panic, that’s exactly how it should be for a moist crumb.
Frosting should be smooth and not runny. If your cream cheese frosting is too soft, pop it in the fridge for 10-15 minutes before frosting. Applying the gold leaf is delicate work; use clean, dry hands or tweezers, and try not to breathe directly over it, or it might stick to your breath.
One lesson I learned the hard way: don’t skip sifting your dry ingredients. The black cocoa tends to clump, and those pesky lumps can ruin the cake’s texture. Also, take your time creaming the butter and sugar — it’s the secret for an airy crumb.
Multi-tasking tip: While the cake bakes, whip up the frosting and clean up your workspace. It keeps you efficient and ready for assembly once the layers cool. And hey, if you’re in the mood for a different chocolatey morning treat, consider my fluffy single-serve baked oats cake with berries and chocolate chips for a quick fix!
Variations & Adaptations
This cake is pretty versatile — here are a few ways I’ve tweaked it for different occasions and preferences:
- Seasonal twist: Swap the gold leaf for fresh edible flowers or gold-dusted berries in spring and summer for a natural touch.
- Dietary adaptation: Use almond flour and coconut yogurt instead of buttermilk for a gluten-free and dairy-free version that still tastes indulgent.
- Flavor variation: Add a teaspoon of espresso powder to the batter to deepen the chocolate flavor, or swirl in raspberry jam between layers for a fruity surprise.
- Cooking method: You can bake this cake in a bundt pan for a different shape; just adjust baking time to about 40-45 minutes.
Personally, I once made a mini version topped with a thin layer of ganache and a single gold leaf for a fancy dinner party dessert. It was a hit and looked incredible plated alongside a scoop of vanilla bean ice cream. If you want something lighter but still chocolatey, the red velvet chocolate chip mug cake for two is a fun alternative.
Serving & Storage Suggestions
Serve this cake slightly chilled or at room temperature — the frosting softens beautifully, and the gold leaf really shines under soft lighting. Presentation-wise, a simple white or black cake stand makes the golden accents pop, and a few fresh berries on the side never hurt.
This cake pairs wonderfully with a bold cup of coffee or a glass of rich red wine for adults. For a brunch twist, it’s a decadent companion to creamy custard toast or an herbaceous green salad to balance richness.
Store leftovers in an airtight container in the refrigerator for up to 4 days. The flavors actually deepen overnight, so it’s fine (even better, I’d say) the next day.
If you want to keep it longer, freeze the cake layers separately wrapped tightly in plastic wrap and foil for up to 3 months. Thaw in the fridge overnight before frosting. To reheat slices, let them warm to room temperature or microwave for 15-20 seconds — it’s like a little chocolate hug.
Nutritional Information & Benefits
Each slice (assuming 12 servings) contains approximately 350-400 calories, with 18g fat, 45g carbohydrates, and 4g protein. The black cocoa powder is rich in antioxidants and offers a deeper chocolate flavor with less sugar than regular cocoa blends.
Buttermilk adds protein and calcium, plus it aids digestion thanks to its probiotics. Cream cheese frosting provides a tangy contrast, though it’s best enjoyed in moderation.
This cake can be made gluten-free or dairy-free with substitutes, making it suitable for many dietary needs. Just be mindful of the gold leaf if you have sensitivities, and always check that it’s food-grade quality.
From a wellness perspective, I appreciate that this cake doesn’t rely on artificial colors or overly processed ingredients — it’s a treat that feels honest and satisfying.
Conclusion
The Perfect Golden Black Velvet Chocolate Cake with Gold Leaf Accents is more than just a dessert — it’s a statement. It’s that rare cake that looks stunning but feels approachable in your own kitchen.
Feel free to make it your own, whether by adding a personal touch in the frosting, experimenting with flavors, or using seasonal decorations. I love this cake because it brings a little sparkle to ordinary days and a whole lot of joy to special occasions.
Give it a try, and when you do, I’d love to hear how you made it yours. Whether it’s your first time working with black cocoa or your gold leaf debut, this cake promises a slice of happiness.
Happy baking and savor every golden crumb!
Frequently Asked Questions
- What’s the difference between black cocoa powder and regular cocoa powder? Black cocoa is Dutch-processed and much darker with a more intense, almost smoky chocolate flavor, perfect for that deep black velvet color.
- Can I use regular cocoa powder instead of black cocoa? You can, but the cake won’t be as dark or have quite the same flavor depth.
- Is the edible gold leaf safe to eat? Yes, edible gold leaf is food-grade and safe to consume in small amounts; just handle it carefully as it’s very delicate.
- How do I store leftovers? Keep the cake covered in an airtight container in the fridge for up to 4 days or freeze layers separately for longer storage.
- Can I make this cake dairy-free? Yes, substitute butter with coconut oil and cream cheese with a dairy-free alternative like cashew cream cheese.
Pin This Recipe!

Perfect Golden Black Velvet Chocolate Cake Recipe Easy Homemade with Gold Leaf Accents
- Total Time: 1 hour
- Yield: 12 servings 1x
Description
A rich, moist black velvet chocolate cake with a bittersweet flavor and elegant edible gold leaf accents, perfect for celebrations and special occasions.
Ingredients
- 2 ½ cups (320 g) all-purpose flour
- ⅔ cup (55 g) black cocoa powder (Hershey’s Special Dark recommended)
- 1 ½ teaspoons baking soda
- 1 teaspoon salt
- 1 cup (227 g) unsalted butter, softened
- 2 cups (400 g) granulated sugar
- 3 large eggs, room temperature
- 1 cup (240 ml) buttermilk, room temperature
- 2 teaspoons vanilla extract
- 1 cup (240 ml) hot water
- 8 oz (226 g) cream cheese, softened
- ½ cup (113 g) unsalted butter, softened
- 4 cups (480 g) powdered sugar, sifted
- 1 teaspoon vanilla extract
- Pinch of salt
- 1–2 sheets edible gold leaf
Instructions
- Preheat oven to 350°F (175°C). Grease two 9-inch round cake pans and line bottoms with parchment paper.
- Sift together flour, black cocoa powder, baking soda, and salt in a large bowl.
- Using an electric mixer, beat softened butter and granulated sugar on medium speed until light and fluffy, about 3-4 minutes.
- Beat in eggs one at a time, mixing well after each addition, then add vanilla extract.
- Add dry ingredients in three parts alternating with buttermilk in two parts, starting and ending with dry ingredients. Mix gently on low speed after each addition.
- Slowly stir hot water into the batter on low speed until combined; batter will be thin.
- Divide batter evenly between prepared pans and tap pans gently to release air bubbles.
- Bake for 30-35 minutes or until a toothpick inserted in the center comes out with a few moist crumbs.
- Cool cakes in pans for 15 minutes, then invert onto cooling racks, remove parchment, and cool completely.
- Beat cream cheese and butter until smooth and creamy. Gradually add powdered sugar one cup at a time, beating on low speed. Add vanilla and salt, then beat on medium-high until fluffy.
- Place one cake layer on serving plate, spread a generous layer of frosting on top. Place second layer and frost top and sides evenly.
- Using tweezers or a small brush, gently place small pieces of edible gold leaf on the frosting. Chill cake for 15 minutes before applying gold leaf if frosting is too soft.
Notes
Use black cocoa powder for the signature deep color and flavor. Avoid overmixing after adding dry ingredients to keep the cake tender. Chill frosting if too soft before applying gold leaf. Handle gold leaf delicately with tweezers or a brush and avoid breathing directly over it.
- Prep Time: 20 minutes
- Cook Time: 35 minutes
- Category: Dessert
- Cuisine: American
Nutrition
- Serving Size: 1 slice (1/12 of cak
- Calories: 375
- Fat: 18
- Carbohydrates: 45
- Protein: 4
Keywords: black velvet cake, chocolate cake, gold leaf cake, black cocoa powder, celebration cake, homemade chocolate cake, easy chocolate cake
