
Introduction: The Revival of Vinyl and the Art of Vintage Decor
When I first set out to create my own vintage music nook, I could never have guessed how much joy it would bring. There’s something magical about flipping through vinyl records, the gentle crackle before a song starts, and the feeling of being surrounded by your favorite albums. The right decor transforms a simple listening corner into a retro sanctuary. Did you know that vinyl sales in the US hit a 30-year high recently, outpacing CDs for the first time since 1987? It’s not just nostalgia—it’s a full-blown design movement.
I remember inheriting my dad’s collection in battered milk crates. At first, they were just clutter in the corner. But with a little creativity and some vintage-inspired decor, I turned that chaotic pile into a stylish retreat. You don’t need a sprawling space or a huge budget—just a love for music, a dash of retro flair, and a few clever storage ideas. In this guide, I’ll share real-life tips, inspiration, and practical projects to help you organize your records and decorate your own vintage music nook. Whether you’re new to vinyl or a seasoned collector, get ready to fall in love with your collection all over again.
What Makes a Vintage Music Nook So Inspiring?

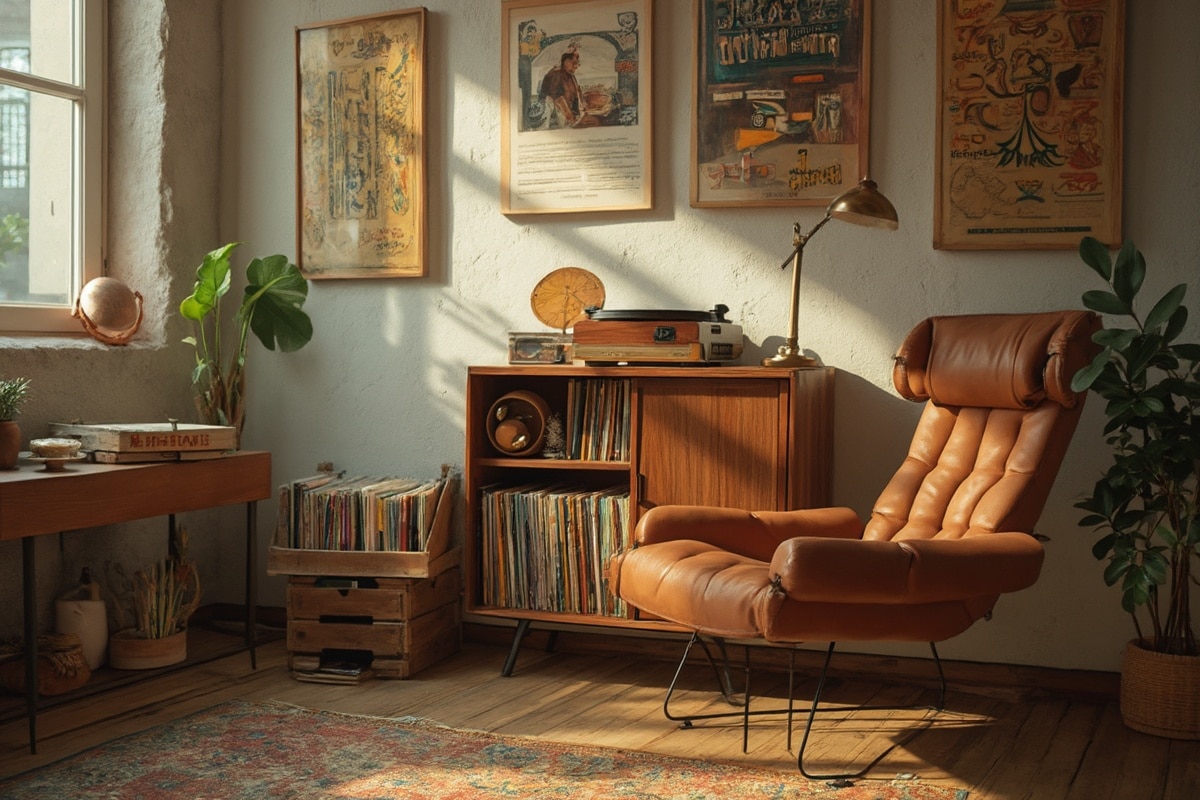
The vintage music nook is more than just a place to store records—it’s a celebration of nostalgia, creativity, and personal style. This design trend draws from mid-century modern aesthetics, 1970s bohemian vibes, and industrial accents. Think rich walnut woods, hairpin legs, brass hardware, textured rugs, and eclectic wall art. The mood is warm, inviting, and a little bit quirky, perfect for unwinding after a long day or hosting a cozy listening party with friends.
Vintage decor thrives on authenticity and well-loved details. Worn leather chairs, retro turntables, and bold patterned wallpaper all play a part. You might spot similar setups in celebrity homes—Elton John’s legendary record room or Jack White’s eclectic listening lounge spring to mind. Even in small apartments, creative use of vertical shelving and compact furniture makes these music nooks accessible and stylish.
Designers have noticed the surge in demand for retro-inspired storage solutions. From classic IKEA Kallax hacks to custom-built cabinetry, there’s a solution for every budget and taste. The resurgence of vinyl goes hand-in-hand with a desire for tactile, analog experiences—a perfect match for anyone craving a break from screens and sterile minimalism. The current trend: blending modern convenience with vintage soul, using bold decor accents and practical storage to create a personal retreat.
How to Plan and Visualize Your Dream Music Nook
Every great vintage music nook begins with a bit of planning. The first step is to assess your available space. Start by measuring your chosen area—width, depth, and height are all important. Even a 3-foot by 5-foot corner can work wonders with the right decor and storage. Think about natural lighting, proximity to outlets (for turntables and speakers), and traffic flow. If your nook is part of a living room or bedroom, consider how it connects with the rest of your decor.
Next, define your goals. Are you looking for a display-worthy setup, or is easy access to your records more important? Do you want a cozy reading spot, or do you plan to host friends for listening sessions? Jot down your must-haves—mine included a comfortable chair, a sturdy record cabinet, and a spot for my favorite concert posters.
Mood boards are your best friend here. Gather images of music nooks, color swatches (like Pantone 18-0830 for vintage gold accents or Sherwin-Williams SW 6244 for a moody blue wall), and fabric samples. I like to use free apps like Canva or Pinterest to pull everything together visually. Print out your board or keep it on your phone for reference while shopping.
When making design choices, think about layering. Combine open shelving for easy browsing with closed cabinets for less attractive gear. Use a decision matrix: rate each piece of furniture or decor by cost, function, and style impact. I learned the hard way that prioritizing aesthetics over function led to a beautiful but impractical setup—my records were hard to reach! Now, I always ask: does this piece make my life easier, or just prettier?
Finally, sketch a layout. Even a rough pencil drawing with measurements helps you visualize the end result. Try different configurations: record racks under windows, wall-mounted shelves, or even a repurposed bar cart. Remember, the best decor feels like an extension of your personality—don’t be afraid to mix eras, colors, and textures until it feels just right.
What Do You Need? Materials & Shopping Guide for Retro Record Storage

Ready to gather your supplies? Here’s a handy list to organize your vintage music nook decor:
- Vinyl record storage units (wooden crates, wall-mounted shelves, or dedicated cabinets)
- Turntable stand or vintage console
- Comfortable armchair or retro lounge seat
- Rug (5×7 ft or 6×9 ft, preferably in bold patterns or muted neutrals)
- Table lamp with warm LED bulb (2700K-3000K)
- Decor accents: macrame wall hangings, framed album covers, potted plants
- Record cleaning kit
- Optional: bar cart, woven baskets, vintage suitcase for extra storage
For budget-friendly decor, check local thrift stores for wooden crates, old cabinets, or mid-century furniture. IKEA’s Kallax shelf is a time-tested favorite, but you can also find unique pieces on Facebook Marketplace or during seasonal sales at Target and Urban Outfitters. Don’t forget to scout flea markets for vintage finds. For a personal touch, upcycle old furniture with a fresh coat of paint or new hardware.
Step-by-Step Decorating Process: Bringing Your Vintage Music Nook to Life
- Clear and Measure Your Space (30 minutes):
Remove clutter and measure your nook’s dimensions. Mark wall outlets and windows to plan for lighting and furniture placement. - Choose and Arrange Storage (1-2 hours):
Select your main storage—crates, shelves, or cabinets. Place them against the wall or under a window. If stacking crates, keep the tallest no higher than 36 inches for safety and easy access. - Set Up Your Turntable and Audio Gear (30 minutes):
Position your turntable on a stable surface, ideally at waist height (about 32-36 inches). Place speakers at ear level when seated. Use cable organizers to keep cords tidy. - Add Your Records (30-60 minutes):
Organize by genre, artist, or color. Store records vertically to prevent warping. Use DIY wooden dividers for easy browsing. - Bring in Comfort (30 minutes):
Add a cozy chair or floor cushion. Throw in a patterned pillow or a chunky knit blanket for retro vibes. - Layer in Decor (45 minutes):
Hang framed album covers or vintage posters about 57-60 inches from the floor (standard eye level). Mix in plants for a fresh look. Add a small side table for drinks or books. - Perfect Your Lighting (20 minutes):
Use a warm-toned lamp for atmosphere. Try a dimmer switch if you want to control the mood. - Personalize with Accessories (30 minutes):
Display your favorite headphones, music magazines, or a retro clock. Add a woven basket for record cleaning supplies. - Troubleshooting and Adjusting (15 minutes):
Sit in your nook and test everything. Adjust shelves or decor as needed for comfort and accessibility. If you notice tight corners, swap bulky furniture for slimmer pieces. - Before and After Snapshots (10 minutes):
Take pictures before and after your transformation. It’s rewarding to see how far your space has come—and you’ll inspire others too!
If you run into issues, like not enough storage or awkward layouts, don’t stress. Stack crates vertically, use wall-mounted shelves, or repurpose a bookshelf. I once used a sturdy bar cart as a mobile record station—perfect for small apartments. Efficiency tip: keep your most-played albums within arm’s reach and rotate displays with the seasons for a fresh look.
Styling Tips & Design Techniques for a Magazine-Worthy Music Nook

Professional designers know that small touches make a big impact in vintage music nook decor. One secret: mix high and low furniture—pair a thrifted record cabinet with a new velvet chair for contrast. Use odd numbers when styling shelves; three or five decor objects create natural rhythm.
Balance is key. If your storage is heavy on one side, add a tall plant or lamp to the other. Pay attention to scale—a giant poster might overwhelm, but a gallery wall of smaller prints looks curated. Layering is your friend: stack books, add a tray for accessories, and drape a throw blanket over your chair for texture.
Common styling mistake: overcrowding. I once packed every record and trinket into my nook, only to find it felt cluttered. Now, I rotate items and leave negative space for breathing room. Don’t forget vertical space—wall-mounted shelves or pegboards double your storage and show off your favorites.
For that magazine-worthy finish, keep cords hidden, dust regularly, and swap out accessories seasonally. I once swapped out a brown rug for a bold orange one (Pantone 16-1359), and my whole nook felt brand new. Trust your eye, but don’t be afraid to tweak things until it feels just right.
How to Mix Colors & Textures for the Perfect Vintage Vibe
Choosing the right color palette brings your vintage music nook decor to life. Classic combinations include olive green (Sherwin-Williams SW 6171) with mustard yellow accents, or deep navy (Benjamin Moore 2063-10) paired with warm walnut wood. For a softer look, blend muted pinks with cream and brass.
Textures add depth. Try pairing a shag rug with a smooth leather chair, or mix woven baskets with polished wooden shelves. Velvet cushions and linen curtains soften the space and absorb sound, making your nook both beautiful and functional.
Seasonal color swaps keep things fresh. In fall, bring in burnt orange and forest green accessories. For spring, swap to pastel blues and lively yellows. Accent colors work best in small doses—think a turquoise vase or a crimson record crate.
One of my favorite combos: dark wood shelves, brass lamp, forest green wall, and pops of orange and teal in the accessories. The result is always inviting, never fussy.
Common Design Mistakes to Avoid in Your Music Nook
It’s easy to get carried away when decorating your vintage music nook, but a few classic missteps can spoil the vibe. One common pitfall is using furniture that’s too large or too small for the space—your record storage should fit proportionally, with at least 18 inches of clearance for easy movement.
Another mistake is poor lighting. Overhead lights can feel harsh; instead, use layered lighting with lamps and string lights for a cozy atmosphere. Don’t forget to test light placement at night, not just during the day.
Layout issues can creep in if you ignore the flow of the room. Make sure nothing blocks your records or turntable. In my first setup, I realized the chair was too far from the records—now, I check by pretending to browse and sit before finalizing the layout.
Finally, avoid skipping storage for accessories—cleaning kits, extra cables, and headphones need their own home to prevent clutter. These lessons came from trial and error, and now my nook feels both organized and inviting.
How Can You Get the Look for Less? Budget-Friendly Alternatives
You don’t need deep pockets for stylish vintage music nook decor. Try DIYing your own record crates from reclaimed wood, or repaint a thrifted bookcase in a retro hue. Woven baskets from dollar stores make perfect storage for cleaning supplies.
Local thrift shops are goldmines for mid-century chairs, lamps, and quirky wall art. Prioritize your spending: invest in a good turntable and storage, and save on accessories by upcycling or shopping secondhand. I once scored a $15 vintage magazine rack that works perfectly for 45s—it’s all about creative thinking.
Mixing splurge and save items gives your nook personality without breaking the bank. With a bit of patience, you’ll find treasures that make your space feel curated and unique.
Conclusion: The Joy of Creating Your Own Vintage Music Nook
Designing a vintage music nook isn’t just about storage—it’s about crafting a space that feels like home, full of memories and music. Thoughtful decor and organization turn a pile of records into a personal retreat, perfect for relaxing, reminiscing, or sharing your favorite tunes with friends.
Start small, swap out a crate for a cabinet, or hang one piece of art. Every little change adds up to a space that reflects your story. From my own experience, a well-designed nook can spark creativity and bring calm after a busy week.
Ready to get started? Gather your records, pick your favorite retro accents, and let your personality shine. Your dream vintage music nook is just a few steps away—happy decorating!
FAQs: Vintage Music Nook Decor & Organization
How do I keep my vinyl records organized and easily accessible?
Store records vertically in sturdy crates or shelves, sorted by genre or artist. Use labeled dividers for quick browsing and keep your favorites within arm’s reach for easy listening.
What are some affordable ways to decorate my music nook with vintage flair?
Look for decor at thrift stores, flea markets, and garage sales. Upcycle old furniture with paint or new knobs, and frame vintage album covers for instant wall art.
How can I make a small space work for a music nook?
Use wall-mounted shelves and compact storage units. A bar cart or narrow bookcase fits in tight corners, while hanging plants and art draw the eye upward, making the space feel larger.
What lighting works best in a vintage music nook?
Warm-toned table lamps or string lights create a cozy, inviting atmosphere. Avoid overhead lights that can feel harsh. Use dimmers if possible to adjust mood as needed.
How do I protect my records and make them last?
Always handle records by the edges, store them vertically, and keep them in sleeves. Use a record cleaning kit regularly and avoid placing them near heat or direct sunlight.
