

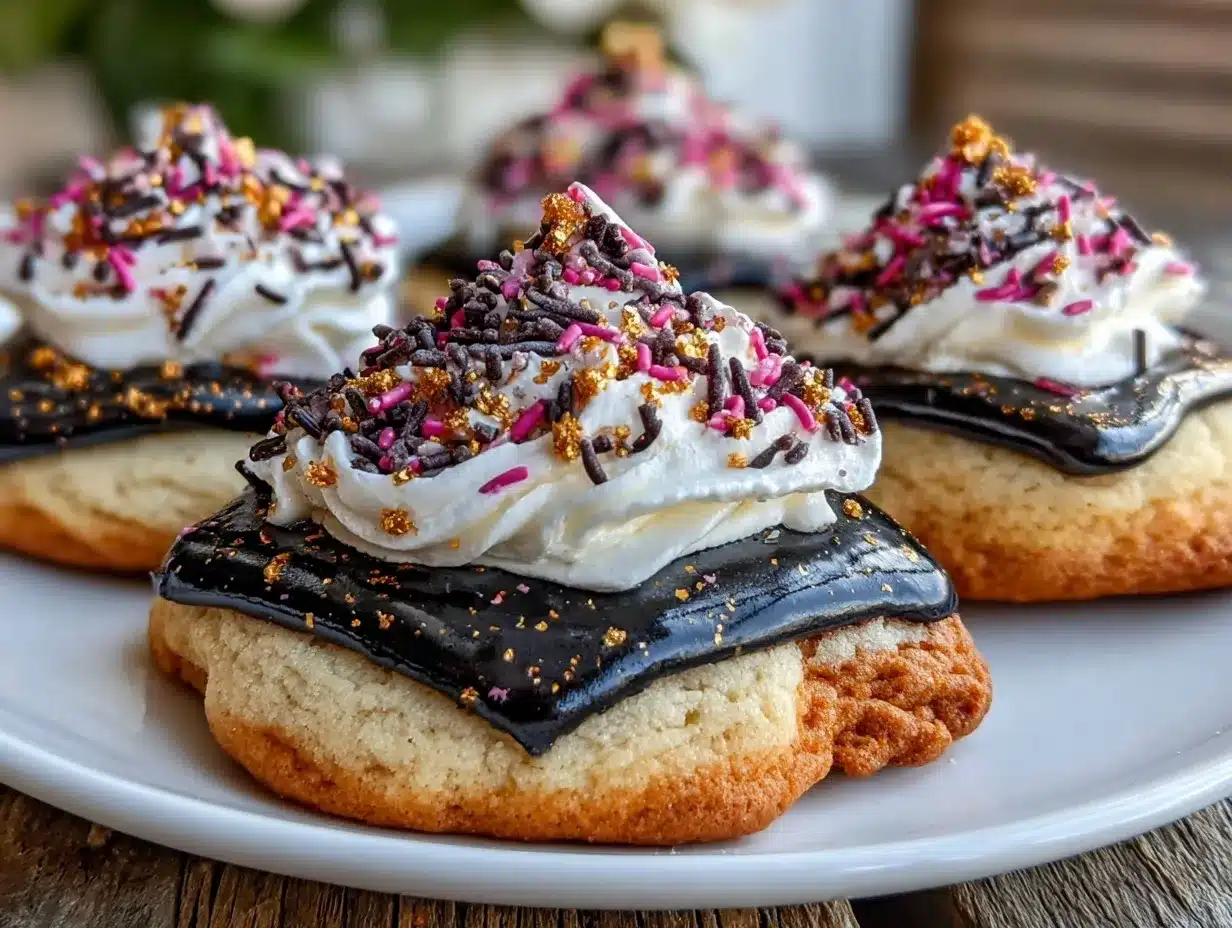
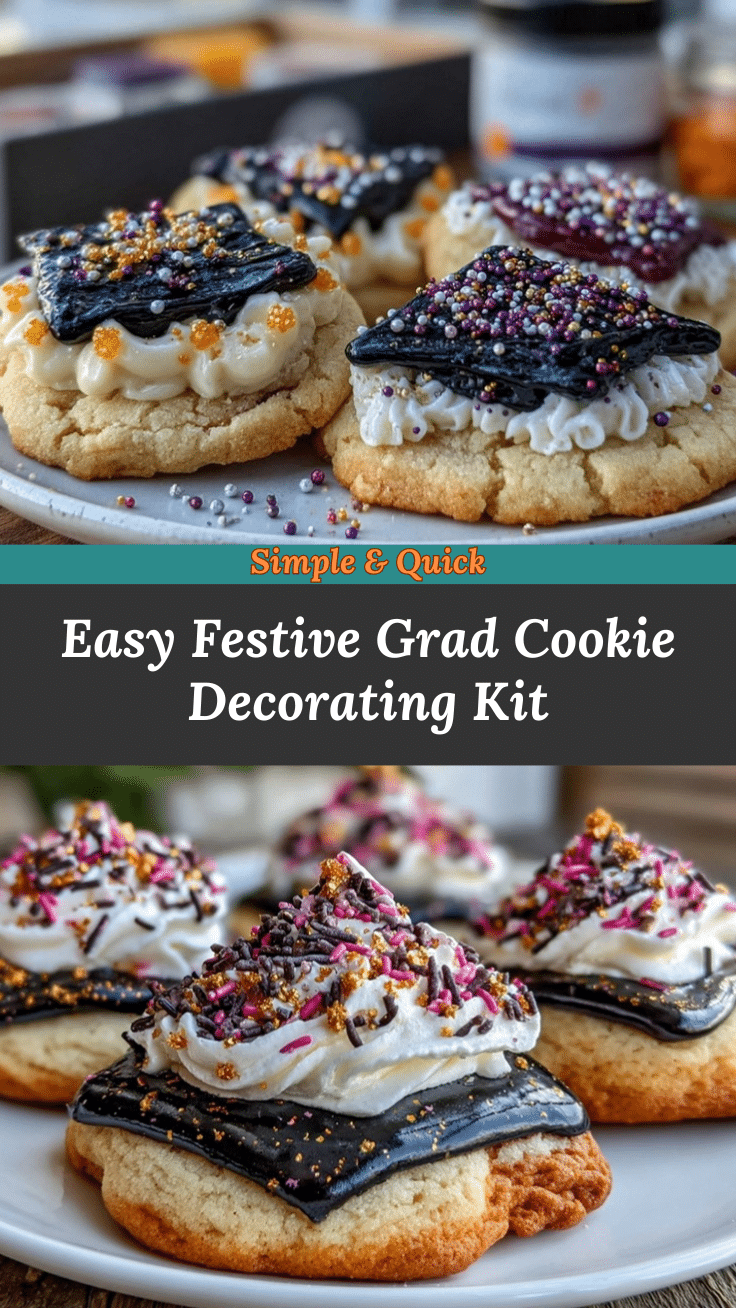
“I never thought cookie decorating could turn into a full-on party until last Saturday,” my neighbor Lisa said as she handed me a slightly smudged, yet utterly charming graduation cookie. It was her impromptu idea to celebrate her nephew’s graduation with a bit of hands-on fun, and honestly, it was contagious. The kitchen was a delightful mess of sprinkles, colored icing, and laughter, with everyone—from toddlers to grandparents—getting involved. You know that feeling when something simple becomes unexpectedly memorable? That’s exactly what happened with our Easy Festive Grad Cookie Decorating Kit.
Last week, while rushing through a crowded craft store, I stumbled upon some plain sugar cookies and a few tubes of icing. I grabbed them on a whim, thinking, ‘Well, why not try something festive for the big grad party?’ What followed was a hilarious, slightly chaotic decorating session that outshone any fancy gift. I forgot the piping tips at home, so we improvised with zip-top bags and toothpicks, and it worked like a charm. The kids were thrilled, the adults got competitive, and the grad? She was genuinely touched by the personalized touch.
Maybe you’ve been there before—wanting to add a bit of personality to a celebration without spending hours or breaking the bank. Easy Festive Grad Cookie Decorating Kits are exactly for that: approachable, fun, and endlessly customizable. They bring a spark to any party and create keepsakes that taste as good as they look. Let me tell you, this little tradition is sticking around in my family. It’s not just about cookies; it’s about the moments shared while making them.
Why You’ll Love This Recipe
After testing countless cookie decorating ideas, this Easy Festive Grad Cookie Decorating Kit stands out for so many reasons. It’s genuinely approachable, even if you don’t own a single fancy baking tool. Plus, it brings a personal touch that store-bought gifts just can’t match.
- Quick & Easy: Comes together in under 30 minutes, perfect for last-minute celebrations or casual get-togethers.
- Simple Ingredients: No need for specialty shops; the kit uses common baking staples you probably have on hand.
- Perfect for Graduation Parties: Adds a festive, personalized flair that’s great for both kids and adults.
- Crowd-Pleaser: Everyone loves customizing their own cookie, making it an interactive treat that sparks smiles.
- Unbelievably Delicious: The sugar cookies have a tender crumb and buttery flavor that pairs perfectly with sweet, colorful icing.
What sets this recipe apart is the layering of fun and flavor without the fuss. The cookie base is soft but sturdy, making decorating a breeze, and the icing recipe is forgiving—meaning less stress, more creativity. Honestly, this isn’t just another cookie kit; it’s about creating little edible works of art that celebrate your grad in style. Whether you’re hosting a big bash or a quiet family dinner, this recipe offers a sweet way to mark the moment.
What Ingredients You Will Need
This recipe uses simple, wholesome ingredients to deliver bold flavor and a satisfying texture without any fuss. Most are pantry staples, and you can easily find substitutions if needed.
- For the Sugar Cookies:
- 2 ¾ cups (345 g) all-purpose flour – for a tender but sturdy cookie
- 1 teaspoon baking powder – helps cookies rise just right
- ½ teaspoon salt – balances sweetness
- 1 cup (225 g) unsalted butter, softened – I prefer Kerrygold for that creamy richness
- 1 ½ cups (300 g) granulated sugar – classic sweetness
- 1 large egg, room temperature – binds everything
- 1 teaspoon pure vanilla extract – adds warm depth
- 2 tablespoons whole milk – keeps dough soft and easy to roll
- For the Royal Icing:
- 3 cups (360 g) powdered sugar, sifted – for smooth icing
- 2 tablespoons meringue powder – ensures hard-drying, shiny finish
- 5-6 tablespoons warm water – adjust for desired consistency
- Food coloring gels (red, blue, gold, silver) – for festive grad colors; AmeriColor gels work great
- Decorations:
- Assorted sprinkles and edible glitter – adds that celebratory sparkle
- Edible markers (optional) – perfect for writing names or messages
If you want a dairy-free version, swap the butter with vegan margarine and use almond or oat milk instead of whole milk. For gluten-free, I recommend King Arthur’s gluten-free flour blend; it works surprisingly well here. In summer, fresh edible flowers can be a charming twist for decoration, too.
Equipment Needed
Here’s what you’ll need to make your Easy Festive Grad Cookie Decorating Kit a success:
- Mixing bowls – A medium and a large one work best for dough and icing.
- Electric mixer or stand mixer – Makes creaming butter and beating icing a breeze.
- Measuring cups and spoons – Accuracy helps keep the cookies perfect.
- Rolling pin – For flattening dough evenly.
- Cookie cutters – Graduation-themed shapes like caps, stars, or diplomas add extra fun. If you don’t have these, round or square cutters are great alternatives.
- Baking sheets lined with parchment paper – Prevents sticking and makes cleanup easier.
- Cooling racks – Essential to let cookies cool fully before decorating.
- Piping bags and tips – While nice to have, you can improvise with zip-top bags by snipping a small corner.
- Small bowls or cups – For mixing different colored icings.
If you don’t own a rolling pin, a smooth wine bottle can work just fine. Also, I’ve found silicone baking mats are a game-changer for even baking and easy cleanup, and they’re quite affordable. Keeping your piping bags clean and reusable is easier when you wash them promptly with warm soapy water.
Preparation Method
- Mix Dry Ingredients: In a medium bowl, whisk together 2 ¾ cups (345 g) all-purpose flour, 1 teaspoon baking powder, and ½ teaspoon salt. Set aside. (5 minutes)
- Cream Butter and Sugar: In a large bowl, beat 1 cup (225 g) softened unsalted butter with 1 ½ cups (300 g) granulated sugar using an electric mixer on medium speed until light and fluffy—about 3-5 minutes. This step is key for a tender cookie. (7 minutes)
- Add Egg and Vanilla: Beat in 1 large room-temperature egg and 1 teaspoon pure vanilla extract until combined. (2 minutes)
- Incorporate Dry Ingredients and Milk: Gradually add dry ingredients to the butter mixture, alternating with 2 tablespoons whole milk. Beat on low speed until dough just comes together. Avoid overmixing to keep cookies soft. (5 minutes)
- Chill Dough: Divide dough into two discs, wrap in plastic wrap, and chill in the refrigerator for at least 30 minutes. Cold dough is easier to roll and holds shapes better. (30 minutes)
- Roll and Cut Cookies: Preheat oven to 350°F (175°C). On a lightly floured surface, roll out one dough disc to about ¼ inch (6 mm) thick. Use your graduation-themed cookie cutters to cut shapes, placing them 1 inch (2.5 cm) apart on parchment-lined baking sheets. (15 minutes)
- Bake Cookies: Bake for 8-10 minutes or until edges are just golden. Don’t overbake; cookies should be soft, not crispy. Remove from oven and cool on baking sheet for 5 minutes, then transfer to wire racks to cool completely. (15 minutes)
- Prepare Royal Icing: In a clean bowl, whisk 3 cups (360 g) sifted powdered sugar with 2 tablespoons meringue powder. Slowly add 5-6 tablespoons warm water, mixing until smooth. Adjust water to reach a thick but pipeable consistency. Divide icing into bowls and tint with food coloring gels as desired. (10 minutes)
- Decorate Cookies: Fill piping bags or zip-top bags with colored icing. Outline cookie edges first, then flood the centers. Use sprinkles or edible glitter while icing is wet. Let cookies dry uncovered for at least 4 hours or overnight for best results. (Varies)
Pro tip: If you notice icing pooling or running off edges, your icing might be too thin. Add more powdered sugar to thicken it up. Also, if the dough feels sticky while rolling, chill it a bit longer instead of adding more flour.
Cooking Tips & Techniques
Here are some hands-on tips to get your Easy Festive Grad Cookie Decorating Kit just right:
- Don’t Skip Chilling: Chilling the dough is essential. I’ve learned the hard way that skipping this step leads to cookies that spread too much and lose their shape.
- Beat Butter Well: Creaming butter and sugar until fluffy traps air, making cookies lighter. Rushing this step results in dense, flat cookies.
- Practice Your Piping: If you’re new to royal icing, practice on parchment paper before decorating cookies. It helps get a feel for pressure and flow.
- Use Consistency Tricks: To flood cookies smoothly, thin your icing with water carefully. It should spread easily but not run off the edges.
- Multitasking: While cookies bake and cool, prep your icing colors and set up the decorating station. It saves time and keeps the momentum going.
- Keep Icing Covered: Royal icing dries out fast. Cover bowls with damp towels or plastic wrap between uses.
Honestly, my first cookie decorating attempt was a bit of a mess—icings mixed, sprinkles everywhere—but each batch got better. The key is patience and having fun, not perfection. Let your creativity flow, and don’t stress the little smudges; they’re part of the charm!
Variations & Adaptations
This cookie decorating kit is a flexible canvas. Here are some ways to switch it up:
- Dietary Options: Use gluten-free flour blends for gluten-free cookies or swap butter for coconut oil for a dairy-free version. The royal icing recipe can be made vegan by using aquafaba instead of meringue powder.
- Seasonal Flavors: Add lemon or orange zest to the cookie dough for a citrusy twist. You can also blend in a teaspoon of ground cinnamon or nutmeg for warm, cozy notes.
- Alternate Decorating Mediums: Instead of royal icing, try melted chocolate or colored white chocolate for a different texture and flavor.
- Creative Shapes: Beyond graduation caps and diplomas, use star and heart cutters or even letters to spell out names or messages.
- Personal Touch: Last year, I added edible gold leaf accents to a few cookies, and the grad was over the moon. It’s a splurge but makes for a fancy look.
Serving & Storage Suggestions
Serve these decorated cookies at room temperature to enjoy the full flavor and texture. Arrange them on a festive platter or in clear cellophane bags tied with colorful ribbon for a charming gift presentation.
Pair your cookies with a cold lemonade, iced tea, or a sparkling water with fresh fruit for a refreshing combo. If you’re hosting a party, these cookies also go well alongside light finger sandwiches or fruit platters.
To store, place cookies in an airtight container layered with parchment paper to prevent sticking. They keep well at room temperature for up to 3 days. For longer storage, freeze decorated cookies in a single layer on a baking sheet, then transfer to a freezer-safe container for up to 3 months.
When reheating, avoid the microwave as it can soften royal icing. Instead, let frozen cookies thaw at room temperature fully to preserve their crisp edges and smooth icing finish. Over time, flavors meld beautifully, and the icing hardens just right.
Nutritional Information & Benefits
Each decorated sugar cookie (about 3 inches) contains roughly 150-180 calories, depending on icing thickness and decorations. They provide a quick energy boost thanks to the sugar and butter, making them a satisfying treat during celebrations.
The key ingredients—like butter and eggs—offer some fat and protein, while the flour provides carbohydrates. Using real vanilla extract means you’re avoiding artificial flavors, and opting for natural food colorings where possible is a bonus.
For those mindful of allergens, this recipe contains gluten, dairy, and eggs, but adaptations for gluten-free or dairy-free needs are straightforward. It’s a treat best enjoyed in moderation but offers emotional nourishment through the joy of baking and sharing.
Conclusion
Easy Festive Grad Cookie Decorating Kits are more than just a sweet treat—they’re a way to bring people together, share laughs, and celebrate milestones with a personal touch. Whether you’re a seasoned baker or a decorating newbie, this recipe makes it simple to create beautiful, tasty memories.
Feel free to customize the colors, shapes, and decorations to fit your style and celebration theme. I love this recipe because it turns any grad party into a moment filled with creativity and connection—something you and your guests will remember long after the last crumb.
Give it a try, and don’t forget to share your decorating adventures in the comments below! Who knows? Your version might inspire the next festive celebration.
FAQs
Can I prepare the cookie dough ahead of time?
Yes! You can make and chill the dough up to 3 days in advance or freeze it for up to a month. Just thaw it in the fridge before rolling out.
What if I don’t have meringue powder for the royal icing?
You can substitute with egg whites, but be cautious with raw eggs. For a safer option, try aquafaba (chickpea brine) as a vegan alternative.
How long does royal icing take to dry completely?
Typically, royal icing sets to the touch within 1-2 hours but needs 4-6 hours or overnight to harden fully, especially for thicker layers.
Can I store decorated cookies at room temperature?
Absolutely! Just keep them in an airtight container away from heat and humidity to preserve freshness and icing texture.
What’s the best way to fix mistakes while decorating?
If you mess up, quickly scrape off the wet icing with a clean toothpick or knife and try again. For dried icing, gently scrape or soak off before redecorating.
Pin This Recipe!

Easy Festive Grad Cookie Decorating Kit for Perfect Personalized Celebrations
- Total Time: 1 hour 15 minutes
- Yield: 24 cookies 1x
Description
A fun and approachable sugar cookie decorating kit perfect for graduation parties, featuring tender sugar cookies and customizable royal icing for a festive, personalized touch.
Ingredients
- 2 ¾ cups (345 g) all-purpose flour
- 1 teaspoon baking powder
- ½ teaspoon salt
- 1 cup (225 g) unsalted butter, softened
- 1 ½ cups (300 g) granulated sugar
- 1 large egg, room temperature
- 1 teaspoon pure vanilla extract
- 2 tablespoons whole milk
- 3 cups (360 g) powdered sugar, sifted
- 2 tablespoons meringue powder
- 5–6 tablespoons warm water
- Food coloring gels (red, blue, gold, silver)
- Assorted sprinkles and edible glitter
- Edible markers (optional)
Instructions
- Mix Dry Ingredients: In a medium bowl, whisk together 2 ¾ cups (345 g) all-purpose flour, 1 teaspoon baking powder, and ½ teaspoon salt. Set aside. (5 minutes)
- Cream Butter and Sugar: In a large bowl, beat 1 cup (225 g) softened unsalted butter with 1 ½ cups (300 g) granulated sugar using an electric mixer on medium speed until light and fluffy—about 3-5 minutes. (7 minutes)
- Add Egg and Vanilla: Beat in 1 large room-temperature egg and 1 teaspoon pure vanilla extract until combined. (2 minutes)
- Incorporate Dry Ingredients and Milk: Gradually add dry ingredients to the butter mixture, alternating with 2 tablespoons whole milk. Beat on low speed until dough just comes together. Avoid overmixing to keep cookies soft. (5 minutes)
- Chill Dough: Divide dough into two discs, wrap in plastic wrap, and chill in the refrigerator for at least 30 minutes. (30 minutes)
- Roll and Cut Cookies: Preheat oven to 350°F (175°C). On a lightly floured surface, roll out one dough disc to about ¼ inch (6 mm) thick. Use graduation-themed cookie cutters to cut shapes, placing them 1 inch (2.5 cm) apart on parchment-lined baking sheets. (15 minutes)
- Bake Cookies: Bake for 8-10 minutes or until edges are just golden. Remove from oven and cool on baking sheet for 5 minutes, then transfer to wire racks to cool completely. (15 minutes)
- Prepare Royal Icing: In a clean bowl, whisk 3 cups (360 g) sifted powdered sugar with 2 tablespoons meringue powder. Slowly add 5-6 tablespoons warm water, mixing until smooth. Adjust water to reach a thick but pipeable consistency. Divide icing into bowls and tint with food coloring gels as desired. (10 minutes)
- Decorate Cookies: Fill piping bags or zip-top bags with colored icing. Outline cookie edges first, then flood the centers. Use sprinkles or edible glitter while icing is wet. Let cookies dry uncovered for at least 4 hours or overnight for best results.
Notes
Chill dough to prevent spreading and maintain shape. If icing is too thin, add more powdered sugar. Practice piping on parchment paper before decorating. Cover royal icing bowls with damp towels to prevent drying out. Dough can be made ahead and chilled or frozen. For dairy-free, use vegan margarine and plant milk; for gluten-free, use gluten-free flour blend. Royal icing can be made vegan using aquafaba instead of meringue powder.
- Prep Time: 20 minutes
- Cook Time: 25 minutes
- Category: Dessert
- Cuisine: American
Nutrition
- Serving Size: 1 decorated sugar co
- Calories: 165
- Sugar: 15
- Sodium: 90
- Fat: 7
- Saturated Fat: 4
- Carbohydrates: 25
- Fiber: 0.5
- Protein: 2
Keywords: graduation cookies, sugar cookies, cookie decorating kit, royal icing, festive cookies, personalized cookies, easy cookie recipe
